App Engine Series #1: Getting Started
Important: As of July 2015, this tutorial no longer works, as App Engine has shut down the Master/Slave Data Store that the application uses. We are keeping it online for reference purposes and you can still download the code, but it needs to be converted to the newer High Availability Data Store to work.
In this first part of our App Engine series, you will learn about the platform and how to successfully launch applications. Throughout the series, we will be creating a fully functional web application written in Python and jQuery, which will monitor the performance of your website, and report downtime.
What is Google App Engine?
App Engine is Google's platform for developing web applications that run on their infrastructure. This means high scalability, reliability, and speed. You only need to care about your code and rest assured that no matter the load, Google can take it.
There is also another great thing about this service - it offers a generous amount of resources for free. You can host a web app that could serve up to 5 million pageviews free of charge. If you outgrow the free quota, however, you will have to pay for your resource usage.
Applications on App Engine are built in either Python or Java. Python version 2.5 is supported, which is what we will be using in the series. App Engine provides a number of APIs for storing data, caching, cron jobs and more, that you can use in your apps. The daily quotas that apply to these services are high enough to be safely ignored for the application we are building in the series.
These resources will help you with getting a better understanding of the platform. While developing the dashboard, I had these open at all times:
- App Engine getting started guide;
- App Engine documentation for Python;
- Python tutorial for beginners;
- Python 2.5.2 documentation;
Getting Started
The first step is to register at appengine.google.com. If you already have an account with Google, you just need to login with your email and password.
The next step is to install Python 2.5 and download the App Engine SDK for your operating system. The SDK contains a development environment similar to that of App Engine, and an App Launcher program that you can deploy your apps on the platform with. Web applications are meant to be developed locally on your computer, and deployed to App Engine when ready.
The App Launcher is a small utility with which you can start / stop your applications and deploy them to app engine. You can access your applications from localhost.
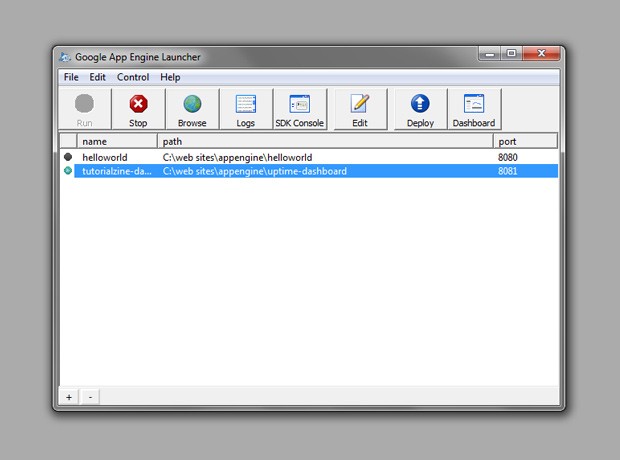
Hitting "Run" on an application would start a web server instance which provides the same environment as you would get from App Engine. Hitting "Browse" opens the project in your default browser. "SDK Console" gives you access to the management of the integrated database (which our dashboard application is going to use to store data). "Deploy" will upload the web application to the platform and set it up for you on an .appspot.com domain.
Setting up your own dashboard
Because I don't want to keep you waiting till the end of the series, you can set up a working version of the dashboard right away. You will also get a feel of how apps are set up on App Engine. Here is what you need to do:
- Open up appengine.google.com and create a new application. You will need to verify your account via SMS the first time you do this. Choose an application identifier and name your app. Write down the application identifier that you choose at this step.
- Grab a copy of the dashboard source code from the download button above, and extract it somewhere on your hard drive;
- Fire up Google App Launcher and import the application using File > Add Existing Application;
After you've completed the steps above, you need to open app.yaml in a code editor (on Windows I am using Notepad++) and replace the application identifier.
application: your-application-identifier
version: 1
runtime: python
api_version: 1
Next you need to open up config/config.py and add the name of your application, the URL that is going to be checked and a search string.
scriptTitle       = "Your Application Title"
fetchURL        = "http://domain-to-be-checked.com/"
searchString    = "WordInThePageText"
The search string must be present on your homepage. For example in my dashboard, I use the string "Tutorialzine". The presence of this string will tell the script that your page was successfully fetched.
Finally you need to press "Deploy" and the App Launcher will set up the uptime dashboard on your .appspot.com subdomain. It is possible to forward a custom domain to the app, like I've done with mine (dashboard.tutorialzine.com points to tutorialzine-dashboard.appspot.com) from the AppEngine control panel.
To Wrap it up
You now have a working version of the uptime dashboard! Stay tuned for the next part of the series, where we will get started with the real development. Subscribe to our feed, or follow us on twitter to get notified when the next tutorials are released.
Bootstrap Studio
The revolutionary web design tool for creating responsive websites and apps.
Learn more
Woow, you keep on impressing me Martin. Thank you so much, keep it up!
Awesome, keep 'em coming :)
Wow just what i was searching for !
Impressive start ..... keep it up ,
I have high hopes for this series !!!
as always u r damn best.... really an excellent tut...
and finally, someone wrote about appengine, I think it's going to be a unique series while other blogs repeating a boring PHP stuff. Good Idea Martin. am already appengine guru and waiting for you to dive more and more deeper. and I hope that you start a django series as well. thanks
loved this!
Thank you for the amazing series Martin. I am a newbie about GAppEng and my learnin curve is steep thanks to you.
I have tried the dashboard demo on IE9 but the graph is not visible. Do you know why? By the way it is working earlier IE versions._