Getting Started With WebAssembly
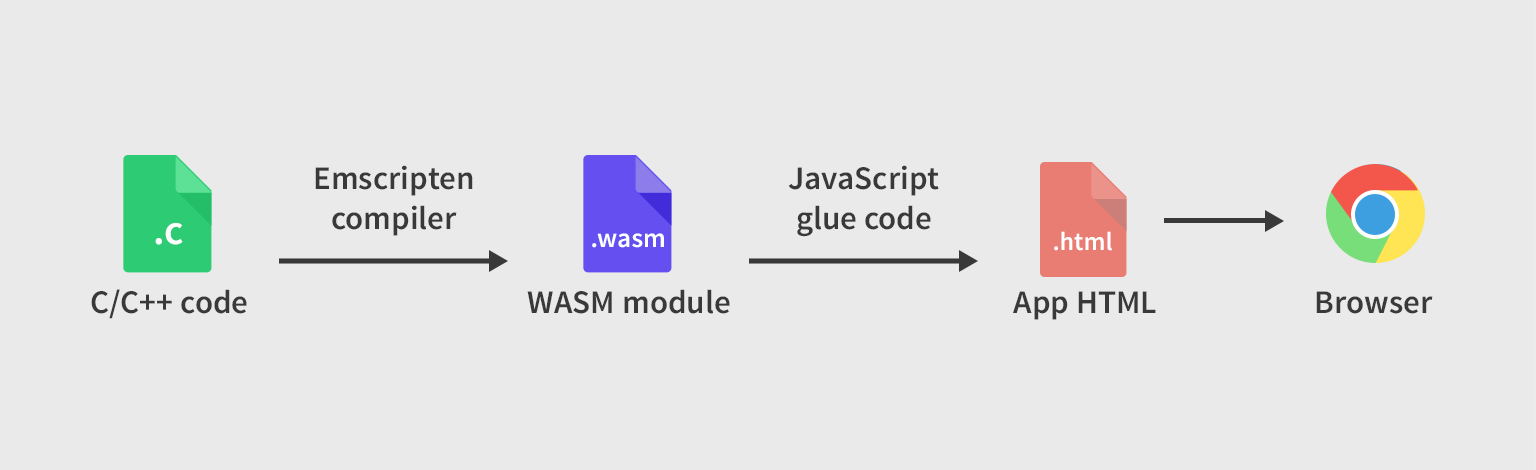
WebAssembly is a new technology that makes it possible to run highly performant, low-level code in the browser. It can be used to bring large C and C++ codebases like games, physics engines and even desktop apps to the web platform.
As of right now, WebAssembly can be used in Chrome and Firefox, with Edge and Safari support almost complete as well. This means that very soon, you will be able to run wasm in every popular web browser.
In this lesson, we will be demonstrating how to compile a simple C file down to wasm and include it in a web page.
How Does WebAssembly Work?
First, a quick overview on what WebAssembly actually does. We'll try not to get too technical here.
In browsers today, JavaScript is executed in a virtual machine (VM) which optimizes your code and squeezes every ounce of performance. As things stand, JS is one of the fastest dynamic languages around. Even though it is fast, it still can't compete with raw C and C++ code. This is where WebAssembly comes in.
Wasm runs in the same JavaScript VM, but performs much better. The two can communicate freely and don't exclude each other. This way you can have the best of both worlds - JavaScript's huge ecosystem and friendly syntax, combined with the near-native performance of WebAssembly.
Most people write WebAssembly modules in C and compile them to .wasm files. These wasm files aren't recognized by the browser directly, so they need something called JavaScript glue code to be loaded.
In the future, this process will likely be shortened with WebAssembly frameworks and native wasm module support.
What You'll Need For This Lesson
You need quite a bit of tooling for writing Web Assembly. However, most things on the list are very common and you probably have them available already.
- Browser with support for WebAssembly, an up-to-date Chrome or Firefox should do the trick (caniuse)
- C to WebAssembly compiler, we will be using Emscripten portable.
- A compiler for C (GCC on Linux, Xcode on OS X, Visual Studio for Windows).
- Simple local web server to run the example (e.g.
python -m SimpleHTTPServer 9000)
Installing Emscripten takes a while and is definitely not fun, but it's the most recommended compiler right now. Also, make sure you have enough free hard drive space, it took up nearly 1GB on my machine.
Step 1: Writing C Code
We'll create a super simple C example that picks a random number between 1 and 6. In a working directory of your choice, make a new dice-roll.c file.
#include <stdio.h>
#include <stdlib.h>
#include <time.h>
#include <emscripten/emscripten.h>
int main(int argc, char ** argv) {
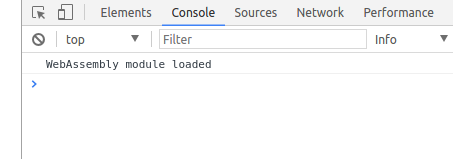
printf("WebAssembly module loaded\n");
}
int EMSCRIPTEN_KEEPALIVE roll_dice() {
srand ( time(NULL) );
return rand() % 6 + 1;
}
When we compile to wasm and load this code into the browser, the main will be automatically executed. The printf inside of it will be translated into a console.log and called.
We want the roll_dice function to be available in the JavaScript whenever we need it to. To tell the Emscripten compiler our intentions we have to add EMSCRIPTEN_KEEPALIVE.
Step 2: Compile C to WebAssembly
Now that we have our simple c program, we need to compile it into wasm. Not only that, but we also need to generate JavaScript glue code that will help us actually run it.
Here we have to use the Emscripten compiler. There are tons of CLI options available and lots of different approaches. We found the following combination most user-friendly:
emcc dice-roll.c -s WASM=1 -O3 -o index.js
Here is a breakdown of what's happening:
- emcc - The Emscripten compiler.
- dice-roll.c - The input file containing our C code.
- -s WASM=1 - Specify we are working with WebAssembly.
- -03 - The level of code optimization we want, 3 is pretty high.
- -o index.js - Tells emcc to generate a JS file with all the needed glue code for our wasm module.
After running the command, in our working directory will be added two files: index.wasm and index.js. They hold the WebAssembly module and its glue code, respectively.
Although these emcc options work well for our example, in more complex situations a different approach might be better. You can read more here.
Step 3: Load WebAssembly Code In The Browser
Now we are in familiar web dev territory. We create a basic index.html file and include the JavaScript glue code in a script tag.
<!DOCTYPE html>
  <head>
    <meta charset="utf-8">
    <meta http-equiv="X-UA-Compatible" content="IE=edge">
    <title>WebAssembly Example</title>
    <meta name="viewport" content="width=device-width, initial-scale=1">
  </head>
  <body>

    <!-- Include the JavaScript glue code. -->
    <!-- This will load the WebAssembly module and run its main. -->
    <script src="index.js"></script>

  </body>
</html>
Because of cross-origin issues, to run the project we will need a local web server. On Linux/OS X you can start one by running the following code in the project directory:
python -m SimpleHTTPServer 9000
Now in the browser, go to localhost:9000 to view the app. If you open the browser console, there should be the greeting message we printf-ed in the main of our C code:
Step 4: Call WebAssembly Functions
The last step of our experiment is to connect JavaScript and WebAssembly (just like in the wasm logo). This is actually very easy tanks to the JavaScript glue code generated from Emscripten. It handles all the wiring for us.
There is a pretty powerful API for working with WebAssembly in the browser. We won't get into it in detail as it is way beyond the scope of this tutorial. The only parts we will need are the Module interface and its ccall method. This method allows us to call a function from the C code by name, and use it just like a JS one.
var result = Module.ccall(
    'funcName',     // name of C function
    'number',       // return type
    ['number'],     // argument types
    [42]);          // arguments
After the ccall, in result we will have whatever is returned from the respective C function. All arguments apart from the first one are optional.
A shortened version is also available:
// Call a C function by adding an underscore in front of its name:
var result = _funcName();
Our roll_dice C function doesn't require any parameters. Calling it in the JavaScript code is super easy:
// When a HTML dice is clicked, it's value will change.
var dice = document.querySelector('.dice');

dice.addEventListener('click', function(){

    // Make a call to the roll_dice function from the C code.
    var result = _roll_dice();
    dice.className = "dice dice-" + result;

});
If your browser supports WebAssembly (caniuse), you should be able to see the working demo below.
Conclusion
We may still be in the early stages of WebAssembly but the new standard already shows its huge potential. The ability to run fast low-level code in the browser will give way to new apps and web experiences not possible with JavaScript alone.
Admittedly, working with WebAssembly is a bit tedious at the moment. The documentation is split over several places, tools are difficult to use, and you need JavaScript glue code to require wasm modules. All of these issues should be resolved as more and more people get into the new platform.
Bootstrap Studio
The revolutionary web design tool for creating responsive websites and apps.
Learn more
Comments 5
Looks like the line
#include <time.h>is missing in dice-roll.c. That's preventing the compilation from completing. Once you add it the errordice-roll.c:10:11: error: implicit declaration of function 'time' is invalid in C99 [-Werror,-Wimplicit-function-declaration] srand(time(NULL));should go away and the index.js and index.wasm files will be generated. Great intro to WebAssembly though! I really enjoyed it.I'm glad you liked the tutorial, Webmley!
Sorry, I forgot to add
time.hto the article. Thanks for pointing that out. I'll fix it asap.wow, saw many articles about web assembly and still didnt get the real picture, last time i heard about was when i watched a video about react developers talking about it . Thanks :)
I had an issue using the shorthand version "var result = _roll_dice();" in the javascript. It could not find the method.
So I changed it to "var result = Module.ccall('roll_dice', 'number');" and it worked just fine. You may want to change it to the long hand version as it seems to be more compatible.
I'm using Visual Studio Code on Windows 10 with Firefox on the included python http server.
Thank you so much for this tutor, I have been attempting to wrap my head around this.
I'm just starting out in using Emscripten, so I don't know much. I read the stuff on the Emscripten website, but I still have things I don't really understand. So I was wondering if there was a free online resource I could use to learn more about WebAssembly and Emscripten. For this tutorial, I also don't get where in the JavaScript glue code I should put this code:
I also have some code I wrote for an exercise in Bjarne Stroustrup's C++ intro book, Programming: Principles and Practice Using C++ 2nd Edition, that I want to compile to WebAssembly, but I ran into some trouble. I have one header file and two .cpp files as inputs, so the Python script for em++ raises an AssertionError exception saying that when we have one header file as input, it assumes we want to precompile headers and that we therefore can't have .cpp files as input. I don't know how to fix this problem, so some help would be appreciated.