Everything You Should Know About Progressive Web Apps
A Progressive Web Apps is a web application which takes advantage of modern browser features and can be added to your homescreen, behaving just like a native application.
In this tutorial we're going to show you everything you need to know about PWAs, step by step, with practical examples and a demo app. To not start from scratch, we are going to use the selfie app we made recently, and make it progressive.
What is a Progressive Web App
In its core a progressive web app isn't any different from a normal website - it's made of HTML, CSS and JavaScript, and lives in the browser. What separates PWAs from regular websites is a list of 10 key concepts that need to be fulfilled. Here they are, taken directly from the Google Developers website.
- Safe - Served via HTTPS to prevent snooping and ensure content hasn’t been tampered with.
- Progressive - Work for every user, regardless of browser choice because they’re built with progressive enhancement as a core tenet.
- Responsive - Fit any form factor: desktop, mobile, tablet, or whatever is next.
- Connectivity-independent - Enhanced with service workers to work offline or on low quality networks.
- App-like - Feel like an app to the user with app-style interactions and navigation because they’re built on the app shell model.
- Fresh - Always up-to-date thanks to the service worker update process.
- Discoverable - Are identifiable as “applications” thanks to W3C manifests and service worker registration scope allowing search engines to find them.
- Re-engageable - Make re-engagement easy through features like push notifications.
- Installable - Allow users to “keep” apps they find most useful on their home screen without the hassle of an app store.
- Linkable - Easily share via URL and not require complex installation.
Following these guidelines will ensure that your app works well not only when viewed in the browser, but also when started separately via a home screen shortcut. You may find the wording Google has chosen rather confusing, but don't worry, we will explain the rules one by one later in the tutorial.
What a Progressive Web App is NOT
The concept of PWAs shouldn't be confused with:
- Cordova based hybrid apps
- React Native
- NativeScript
- Electron and NW.js
All of the aforementioned technologies wrap HTML apps and package them into executable files, be it an .apk, .exe or anything else, which then have to be downloaded from the respective app store and installed on the user's device.
PWAs don't require installation and aren't available (yet) in Google Play or the iTunes App store. To download a PWA you need to simply visit it's website and then save it to the home screen as a shortcut. Developing and maintaining separate iOS and Android versions is no longer an issue, but browser support needs to be taken into consideration.

1. Safe
Most progressive web apps work with native APIs and service workers, technologies that deal with sensitive data and need to be handled with caution. That's why every PWA has to be served through a HTTPS connection.
If you don't have access to a server with a SSL certificate, the easiest way run projects in a secure environment is via GitHub Pages or a similar service. Any GitHub repository can be hosted directly over HTTPS, and both GitHub and GitHub Pages are free for public repos.
This is where we've chosen to host our demo: https://tutorialzine.github.io/pwa-photobooth/.
For simple testing on a local server, you can also try Ngrok. Its a tiny tool that allows you to tunnel any currently running localhost to a secure public URL. Ngrok is free and available for Windows, Mac, and Linux.

2. Progressive
Essentially, what this means is that PWAs should use web technologies that are widely supported and work equally well on as many browsers as possible. As we all know, in the world of web development this is close to impossible, but still there are things we can do to cover a larger user base.
For example, in our PhotoBooth app we use the getUserMedia() API for accessing the hardware camera on a device. Its support in different browsers is quite inconsistent - Safari doesn't support it at all, the browsers that do support it need prefixes and differ in usage.
To ensure more people can actually use our app, we cover all the prefixes:
navigator.getMedia = (
    navigator.getUserMedia ||
    navigator.webkitGetUserMedia ||
    navigator.mozGetUserMedia ||
    navigator.msGetUserMedia
);
We also show an error if none of the prefixes work:
if (!navigator.getMedia) {
    displayErrorMessage("Your browser doesn't have support for the navigator.getUserMedia interface.");
}
else {
    // Use Camera API
}
Fallbacks and polyfills should be provided where possible. The same principles go for the CSS and HTML code.

3. Responsive
The app should look nice on all devices, no matter their screen size. Our app has a fairly simple UI so we've used only a couple of media queries to control font-size, paddings, margins, etc.
Don't be afraid to use CSS libraries and frameworks such as Bootstrap, as they make it really easy to form grids, and deal with typography and general responsiveness.

4. Connectivity independent
This is an important one. Using service workers allows your app to work even when there is no internet connection available.
Some apps can be cached only partially: UI is cached and available offline, dynamic content still needs access to a server.
Others, like our PhotoBooth demo, can be cached in their entirety. All of the source code and resources will be saved locally and the app will work offline and online exactly the same way. Here is the code that makes the magic happen:
This is an oversimplified usage of Service Workers, use with caution in commercial projects.
First we need to make a service worker JavaScript file, and define the logic behind it.
sw.js
// Install the service worker.
this.addEventListener('install', function(event) {
    event.waitUntil(
        caches.open('v1').then(function(cache) {
            // The cache will fail if any of these resources can't be saved.
            return cache.addAll([
                // Path is relative to the origin, not the app directory.
                '/pwa-photobooth/',
                '/pwa-photobooth/index.html',
                '/pwa-photobooth/assets/css/styles.css',
                '/pwa-photobooth/assets/fonts/MaterialIcons-Regular.woff2',
                '/pwa-photobooth/assets/js/script.js',
                '/pwa-photobooth/assets/icons/ic-face.png',
                '/pwa-photobooth/assets/icons/ic-face-large.png',
                '/pwa-photobooth/manifest.json'
            ])
            .then(function() {
                console.log('Success! App is available offline!');
            })
        })
    );
});

// Define what happens when a resource is requested.
// For our app we do a Cache-first approach.
self.addEventListener('fetch', function(event) {
    event.respondWith(
        // Try the cache.
        caches.match(event.request)
        .then(function(response) {
            // Fallback to network if resource not stored in cache.
            return response || fetch(event.request);
        })
    );
});
Then we need to link that service worker to our HTML.
index.html
<script>
// Register Service Worker.

if ('serviceWorker' in navigator) {
    // Path is relative to the origin, not project root.
    navigator.serviceWorker.register('/pwa-photobooth/sw.js')
    .then(function(reg) {
        console.log('Registration succeeded. Scope is ' + reg.scope);
    })
    .catch(function(error) {
        console.error('Registration failed with ' + error);
    });
}
</script>
Now all of the files in our project will be saved in the user's browser. Any JavaScript variables and object should also be saved in the localStorage or IndexDB where possible.
Right now Service Workers are supported in Chrome, Firefox and Opera. Safari and Edge are also working towards adopting them, and we hope that in the future they will be available in every browser.

5. App-like
When building PWAs, it's recommended to follow a design concept called app-shell architecture. It sounds very complicated but essentially boils down to this: the app is separated into two major components: the shell and the content.
The shell contains all the static UI elements such as a header, menus, drawers, etc. When we cache an app, the shell should always be saved on the device, because we want it to be available at all times. That way when a user with no internet connection opens the app, they won't see an empty screen or a running dinosaur - they will see the cached app interface and an appropriate error message.
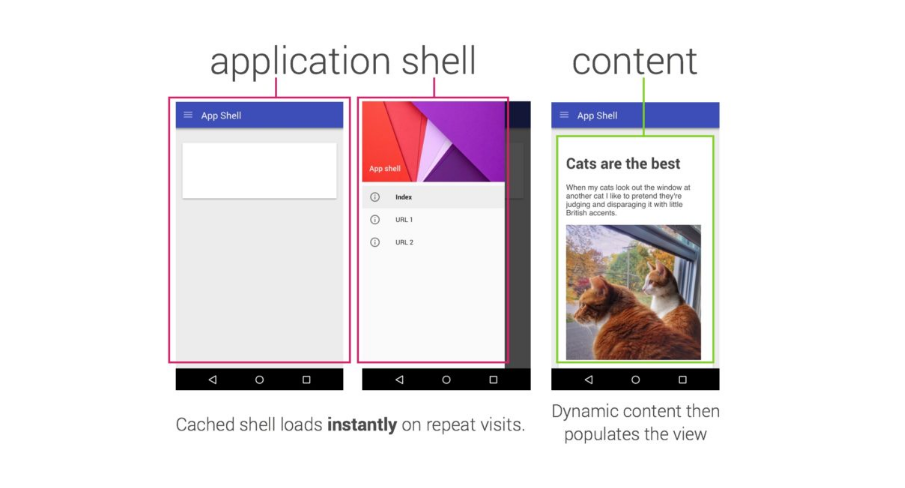
The content resides within the shell. It can also be cached but it isn't necessary to do so as content is usually dynamic, changes frequently and can be different on every single page load.

6. Fresh
Once cached, our PWA will always load from the local storage. However, if we change the service worker sw.js in any way, on the next page load the new version will be downloaded and installed.
this.addEventListener('install', function(event) {
    event.waitUntil(
        caches.open('v1.0.1').then(function(cache) {
            // ...
        })
    );
});
Using service worker updates we can re-download resources, delete old cache, or completely change the service worker logic. You can learn more about the SW Update process from this Google Developers article - here.

7. Discoverable
By adding a Web Manifest to our app we can provide various information about it and change the way it is displayed on people's devices. It allows apps to be saved to the home screen with a custom icon, to be started in a separate browser window, and a lot of other cool stuff.
The Web Manifest takes the form of a simple JSON file:
manifest.json
{
  "name": "Progressive Web App: PhotoBooth",
  "short_name": "PhotoBooth",
  "description": "Simple Progressive Web App for taking selfies.",
  "icons": [{
      "src": "assets/icons/ic-face.png",
      "type": "image/png",
      "sizes": "72x72"
    }, {
      "src": "assets/icons/ic-face-large.png",
      "type": "image/png",
      "sizes": "144x144 256x256"
    }],
  "start_url": "index.html",
  "display": "standalone",
  "background_color": "#fff",
  "theme_color": "#fff",
  "orientation": "portrait"
}
Most of the properties are self explanatory so we will cover only the more important ones. To see the full Web manifest format and all the available fields go here.
- Shortname - This is the name our app will have when saved to the home screen.
- Icons - Array of icons with different resolutions.
- Display - Defines how the app will be opened. We've chosen standalone so when started our photo booth will appear in a full-screen window without any browser navigation or menus. It will also be seen as a separate app in multitasking.
To register the manifest we have to link it to our HTML:
<!-- Web Manifest -->
<link rel="manifest" href="manifest.json">
Safari doesn't support the Web Manifest standard yet but we can define app-like behavior with this Apple-specific meta tag:
<!-- Meta tag for app-like behaviour in iOS -->
<meta name=”apple-mobile-web-app-capable” content=”yes”>

8. Re-engageable
Push notifications aren't limited to native apps any more. Thanks to service workers and the Push API, web applications can also send messages to the Android notification bar. Not all apps will benefit from having this feature, but when used properly notifications can really help engage users.
This topic goes beyond the scope of our tutorial, as Push Notifications are quite complicated and deserve a full lesson on their own. If you still want to implement notifications to your web app, here are some of the best learning resources available:
- Google Developers, Push Notifications: Timely, Relevant, and Precise - here.
- Google Developers, Push Notifications on the Open Web - here.
- MDN, Using the Push API - here.
- Push.js, Library that provides a cleaner API for handling push notifications - here.

9. Installable
By default any website can be manually saved to the home screen using the Add to Home Screen button from the Chrome browser menu. However, it might be rather difficult to make users "install" our app this way, since most people don't know about that feature at all.
Thankfully, there is a way for your app to prompt users to save it with a simple installation pop-up. To prevent developers from abusing these pop ups, there isn't any way to programmatically show them. Instead, they will appear on their own when an app fulfills a series of requirements:
- There is a valid Web Manifest.
- There is a valid Service Worker installed.
- The app is served over HTTPS.
We have all of the above covered, so when a user visits our app's website a couple of times, they will get this prompt:

The entire installation process of our app is in this simple prompt. The install happens instantly, and once saved the PhotoBooth will be available to launch from a home screen icon, behaving exactly like a native app.

10. Linkable
Anyone with a web browser has access to PWA apps and they can be shared simply via their URL. No third party tools are required for finding or installing them.
If an app runs in standalone mode, it's also advisable to add in-app share buttons, since the browser address bar and menus aren't visible.
Conclusion
Our PWA is now complete. We can test how well it follows the PWA rules with an official Google-made tool called Lighthouse. It recreates possible scenarios and tests the app thoroughly. Here is what it tells us about the PhotoBooth:

We passed!
If you want to find more PWAs to play with, go to pwa.rocks. They offer a nice collection of games and useful tools, showcasing the great power of Progressive Web Apps.
Bootstrap Studio
The revolutionary web design tool for creating responsive websites and apps.
Learn more
Comments 4
Great tutorial. You can read more about all benefits of using PWA in this article: https://www.digitalauthority.me/insights/the-ultimate-guide-to-progressive-web-apps-24-12-2017.
You can see some examples of apps based on progressive web app technologies at http://www.progressivewebapproom.com
What technologies or frameworks are responsible for progressive web apps? You did not mention that in your content. Let us in...
Thanks
When building progressive web apps we are not bound to any framework. You can use whatever feels comfortable, be it a huge framework like Angular, good old jQuery, or even pure vanilla JavaScript.