Setting Up a Local WordPress Testing Environment
This is a guest tutorial by Matej Latin, a freelance web & mobile UI designer from Slovenia. You can find more about him on his website.
So, let's assume we have a WordPress website and that we update and then test the updates on a weekly basis. That's quite often, I guess. Your visitors' experience with the website may be affected when you update and test these updates on a live website. Even the smallest updates can result in an error, design issue or missing content on the website. And that's something we try to avoid by setting up a local environment for developing and testing purposes.
Having a local test version of your website is a must if you modify or update it often. So here's an article that will try to explain how to set up a local testing environment for your WordPress powered website.
The Preparations
Let's start. The way to do this is actually quite simple. We only need access to our website host, the database, and a tool to set up the local host. Here is what we need:
- access to the phpMyAdmin on your live website server,
- FTP access to your live website server,
- WAMP tool for setting up a local host,
- the latest version of WordPress (or the same version of WordPress on your live site).
I strongly advise you to use the same version of WordPress, to avoid any complications. So you might consider updating the WordPress on your live website or downloading an older version for your local backup. I will be using WordPress 3.5 in this article. You can download older versions of WordPress here.
Database Export
Let's start with the export of the database from the live website. Login to phpMyAdmin (you should have access to it through the control panel of your host provider). Select the database you wish to export and click on the Export tab.
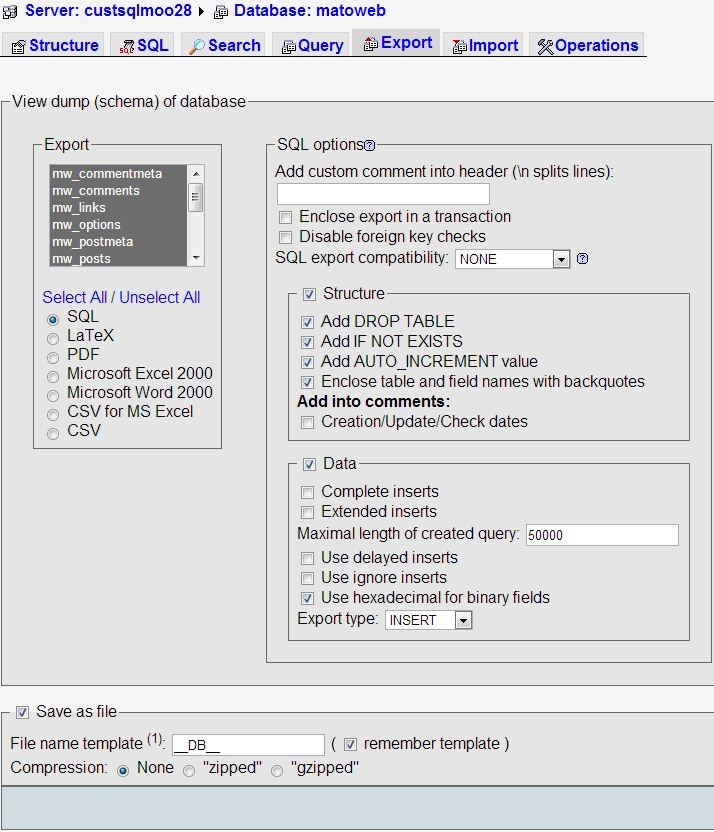
Check the image above and be sure to select all the tables in the database and that the "Save as file" is checked. Click on the button Go, to start the export. After the export is done, you will get a sql file. Save this file to your computer.
More detailed guide on WordPress database export can be found here.
Download the Theme
Now, let's download the Theme from the live website server. You should have FTP access to do this (I like to use FileZilla for this purpose).
Go to wp-content/themes and download the folder of your theme to your computer.
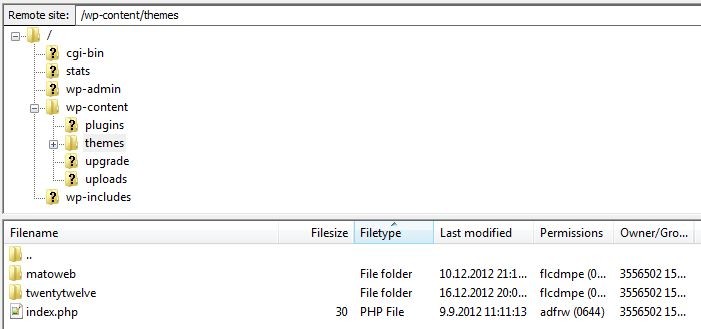
Download the Uploads
This step is very similar to the previous one. This time, go to wp-content and download the folder uploads to your computer.
Download the Plugins
If you have any plugins installed on your WordPress website, you have to download all the subfolders of the plugins folder on the server, to your computer.
We should now have these folder and files ready for our local testing version of the site:
- the theme folder (e.g. twenty-eleven)
- uploads folder
- plugins folder
- database backup sql file
I suggest you put all these in a folder called Testing.
Setting Up the Local Version
Set Up the Local Host with WAMP
Download the WAMP Tool, if you haven't already.
Installing WAMP is very simple. Just double-click on the downloaded installation file and follow the instructions. The local host will be created during the installation. After the installation is complete go to C:\wamp\www and create a new folder; name it as you wish (e.g. my-website-test). This is where your local version of the website will be located.
Set Up the Database
After the successful installation of the WAMP package, we have to set up the database for our local WP installation. Launch the WAMP server if it isn't running yet. Then go to the phpMyAdmin by clicking the WAMP icon in the notification area (bottom right, check the image below).
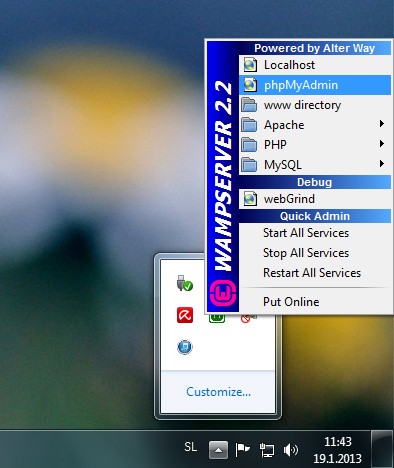
Then click on the Databases tab where we'll add a new database called my-website-test. Fill in the name of your database in the input field under the Create Database and click on Create.
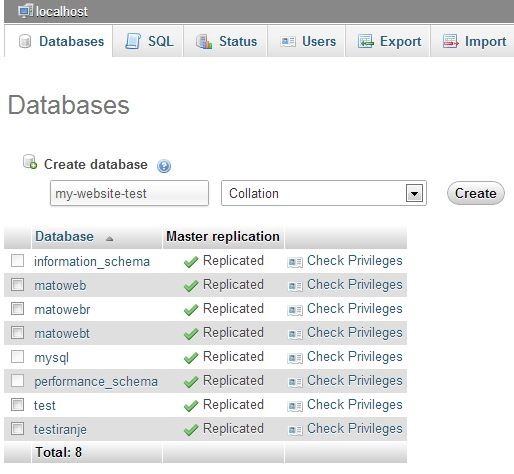
Install WordPress
Extract the latest WordPress zipped file in the folder we created before (C:\wamp\www\my-website-test). Then use your browser to open this URL: http://localhost/my-website-test/. The WordPress installation process should begin.
The WordPress installation process is described in detail in the WordPress Codex. Be careful to use:
- my-website-test for the Database Name,
- root for the User Name,
- leave blank for the Password,
- and localhost for the Database Host.
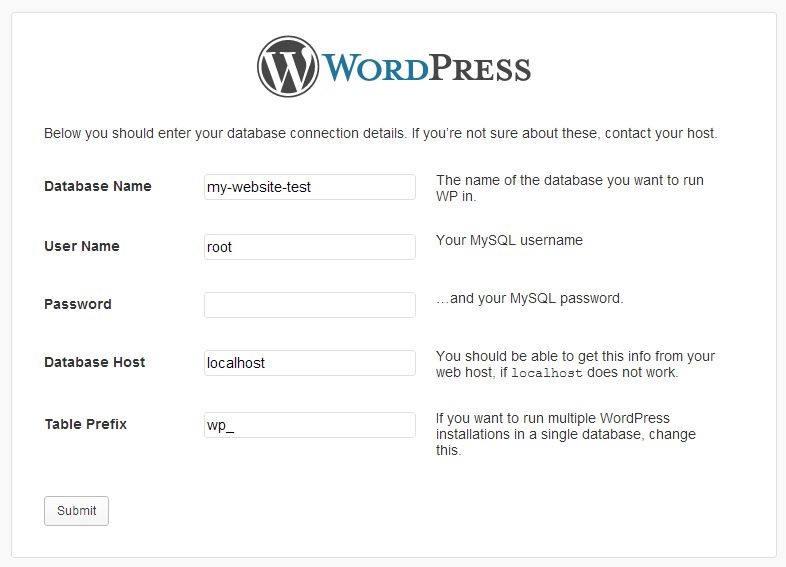
The rest of the installation process is the same as described in the WordPress Codex.
Notice: To make the WordPress permalinks work, you have to activate the rewrite_module by clicking the WAMP icon in the notification area and go to Apache -> Apache Modules. Look for rewrite_module and click on it.
Upload & Activate the Theme
Once WordPress has been installed, we have to copy the folder of our theme to the c:\wamp\www\my-website-test\wp-content\themes folder. Then activate it through the WordPress admin (http://localhost/my-website-test/wp-admin/themes.php), by clicking the Activate link next to the theme thumbnail.
Import the Plugins Files
Copy the whole plugins folder (the backup folder we downloaded in the beginning of the tutorial) to c:\wamp\www\my-website-test\wp-content.
Import the Database
Our database is currently filled with data from the original WordPress installation. We have to import the database from our live website (the sql file we exported at the beginning of the tutorial).
Open the phpMyAdmin on your localhost, by clicking the WAMP icon in the notification area and click on phpMyAdmin. Click on the my-website-test database on the left side of the screen and then click on the tab Import. Click on the Browse button under the File to Import section and find and choose the sql file we exported at the beginning of the tutorial. Click Go at the bottom of the screen and the database will be imported.
Update the WordPress Options
Once the backed up database is imported, we have to change a few settings in the wp_options table. This step is very important.
Click on the wp_options on the left panel in phpMyAdmin. The content of the table will show up. Now we have to go through all these lines and look for the domain name of our live website (e.g. http://mydomain.com) and change it to http://localhost/my-website-test.

Notice: you have to change the url to http://localhost/my-website-test in all the options lines that contain the http://mydomain.com (e.g. http://mydomain.com/wp-admin).
Import the Uploads
Copy the uploads folder (the one we backed up at the beginning of the tutorial) to the c:\wamp\www\my-website-test\wp-content.
Check out the http://localhost/my-website-test. You should now have a working copy of our live website.
Connecting the Local Backup Environment with a Remote WordPress Database
It would be great not to even use a local database but the live database from the live website host. This way we could use the live data in our development & testing environment.
But there's a catch. The host providers usually don't allow connections to hosted databases from remote machines. You can read more about connecting WordPress to a remote database here.
Why is a Local Testing Environment Useful?
Test Plugin Updates
WordPress is so great because of all the plugins that are out there available for free. I tend to use as few as possible but even I use at least 10 of them and they get updated very often.
So when an update is available for a plugin, the best way to test if it works with your WordPress website is to update and test it on the local environment. This way you can avoid having a non-working plugin on your live website. And when you're sure that the updated plugin works fine, you just repeat the update process on the live website.
Test WordPress Updates
The WordPress team strives to make updating as painless as possible. However you have to be sure that updating doesn't break anything (especially if you've written custom code or created the theme yourself). That's why I'll run the update on the local version first to see if everything works fine.
Developing Locally
I do a lot of developing and testing on my website and I used to do it all on the live website. But since I started the Matoweb project, the traffic on my website has increased a lot and I can't do it anymore.
Actually, that's the main reason I set up the local backup environment for my WordPress website. Now I do all the developing and testing there and when I'm done, I upload the updates.
Multiple Environments
Two Environments Scheme
So now we have a local environment for development and testing purposes and a production environment (live website). Any changes you make on the testing environment can be easily uploaded to your production environment. You just upload the changed and new files.
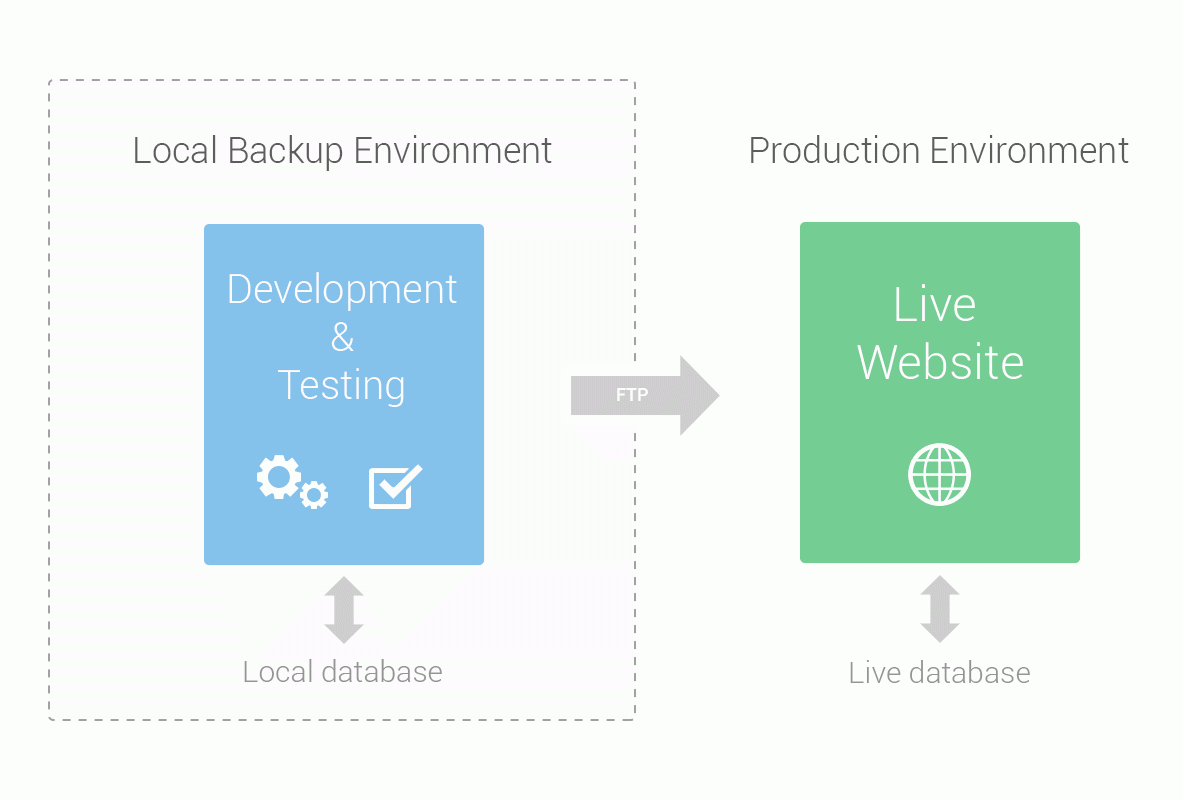
This scheme is great for users who test and upload pretty much all the development projects.
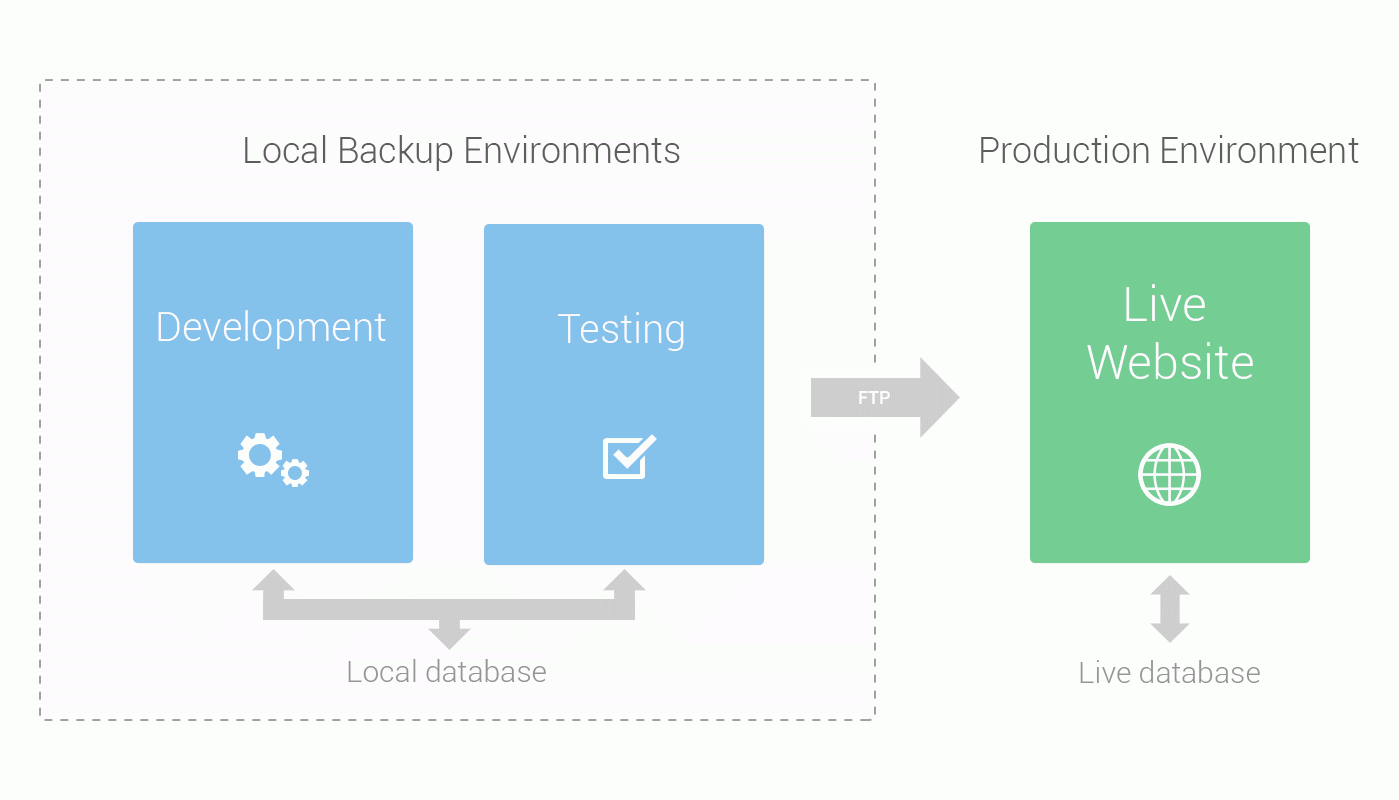
Three Environments Scheme
But, if you have a complex website and / or do a lot of development, you might consider having even more environments. You could split the development & testing environment to one just for development and one for testing. This way you can develop on the first and test on the testing environment and if the tests are completed successfully, you upload the changed and new files to the production (live website).
Notice: the development and testing environments can share the same local database.
Conclusion
So, now you have a local backup copy of your WordPress website you can use for development and testing.
Remember to update the local database every now and then, especially if you can't connect the local environment to your live website database. Importing new posts, pages, uploaded files and comments should be enough to keep your local backup data similar to the data in your production environment (live website).
Bootstrap Studio
The revolutionary web design tool for creating responsive websites and apps.
Learn more
A useful post.
But I would argue for changing the Site_url and home_url thru wp_config.php as this makes subsequent download and import of the database easier.
As you don't need to remember to change the two option values all the time. As per Changing the Site URL
define('WP_HOME','http://example.com');
define('WP_SITEURL','http://example.com');
Thanks for sharing Barry. I tried this a while ago and for some reason it didn't work the way I wanted it to. But I will definitely try this again.
Thanks again.
Thank you for this great tutorial!
I needed exact this :-D
Thanks! very useful for beginner like me.
Thanks.
I also use test version for my blog but instead of having it locally I simply created a subdomain on my server.
Nice tutorial.. Thanks.
Oh great. This was exactly what i was looking for.
I used a second wp installations on my server to create testing environments which sometimes was a hassle.
I'm definately going to check this out today.
Thanks
Thank you for this tutorial. I think it can help a lot of people. I twiit it :)
You can actually do that a lot faster using the WP plugin Duplicator.
I set up my development/testing duplication in 5min with this great plugin.
There is a risk using the same DB as what the live site is using specially when you are test posting contents / images.
I'm not a fan of the environment setup. I have found to many inconsistencies between a testing and production environment that didn't use the same server setup with applicable modules installed.
Maybe you should split the testing & development environment to two separate environments and try to keep the testing the same as the production, while doing all the development separately.
Hi Matej,
I'm a little bit scared when it comes to install wordpress in local. Because when I want to move wordpress online, I always have problems with URL.. so I stopped installing wordpress in local. I immediately put it on the server :)
Hey Fred,
you shouldn't be scared of it... you can change the URLs as described in the Update the WordPress Options section of this tutorial or use the method Barry Carlyon posted in a comment here.
Good luck ;)
Hi Matej, I just wanted to personally thank you for creating a very easy to follow tutorial and I've learnt a lot of new things from following this very well written guide. #wamprox
Thanks Recardo ;) I appreciate the nice words.
useful tips nice.
Matej,
I really would appreciate your advice to a novice.
I already have a localhost site and database (MAMP) which, after many weeks, I have now uploaded to the remote server.
Of course in the process of moving it I made the requisite changes to the address in Settings>General
What i want to do is revert to the local version for experimentation without affecting the remote version directly.
However, when i open localhost dashboard to change the address pointers back to localhost, I realise that the dashboard has redirected to the remote server address.
I am frightened to make the alterations in case i am screwing up the live version.
Could you confirm how I re-use my local version entirely separately from the live version?
Many thanks
Hey David, sorry for the late reply. If I understand you correctly, I think you should change the addresses settings in your local database back to the local addresses, so: http://localhost/test-website/wp-admin and so on.
You had to change these before moving to the live website, but changing them back certainly won't affect the live website.
Let me know if you need more help.
Nice tutorial Matej. It's always a good idea to install WordPress on localhost when you are conducting tests. It might not be useful for everyone but programmers find it easy to test their custom themes (that are in the process of making) on a localhost. :)
Yeah the developers certainly, but even if you are more than just a basic user (which in my opinion everyone with a self-hosted WordPress is), then a testing environment comes very useful. Thanks for the comment Harshh! ;)
Hi Matej,
i prefer to change hosts file, then i can use real domain name http://www.mywebsite.com...
127.0.0.1 www.mywebsite.com
ip_dev www.mywebsite.com ip_prod www.mywebsite.com
i comment/uncomment lines as needed..
thanks for the trick advice... it's a good one.
This would scare the heck out of me. How would you know if you're not making live changes on production?
Matej, nice tutorial!
I set up a lot of local WP environments. I used to do things this way, but now I use InstantWP (http://www.instantwp.com) which I find simply marvelous.
Regards from Argentina!
Excellent article!
Would you please share how or what program you used to creat the 'environment' diagrams? Thx!
Thanks for this tutorial. Once I imported the existing WP database to my test db, I noticed the previous developer renamed all the tables. My test site is reading the wp_posts table, for example, instead of the renamed_post table. Can you suggest a solution?
There's another solution: Instead of installing wordpress with the explain method, just copy all your files from FTP to your local folder. Then import the backup of your database in your local phpMyadmin. Replace the informations of the wp-config.php by the locals informations (name of the database, login and password). Don't try to run your website yet. You will have to replace all the url's mentions in the database with this magic tools : Find and Replace php script on your database (interconnectit.com). That's the better way i have found for quickly duplicating wordpress website with all your plugins.
Whoa, I just found the solutions on the wp-config. Thanks again for the excellent tute.
Worked like a charm, really easy to follow. Thanks greatly!
Nice and simple explanation. Since working in a very corporate environment for a client I have realised the importance of test environments. I'll have to have a look at setting a few local ones up!
Good one for new comers.
Also MAMP https://www.mamp.info/en/downloads/ is helping for MAC user can easy setup local repo, can switch the different folders for different sites.