Tutorial: How to Build an Option Panel for your WordPress Plugin
WordPress is a great platform for building web sites. You can think of it as a PHP framework with a built-in admin panel, user levels, themes and plugins. In this tutorial, we are going to explore the functionality for creating settings panels. We will be building upoin the Todo App WordPress plugin we made a few weeks back, so it will probably be a good idea to read that first.
We will be using the Settings API, which lets us to only define what settings our plugin needs, and let WordPress handle the actual saving and validating itself. Once you learn how this API works, you will be able to add options panels to your themes as well.
Using the Settings API
We will present two settings to users - the first will give them control over the URL on which the todo application is shown, and the second will let them change the title displayed on the app. We will be changing includes/tzTodo.php and app/index.php to accommodate this new functionality.
Both of these options will be saved as elements of an array - this will save us a bit of writing later on, as we will only need to make one function call to retrieve both settings.
The first step is to define two new member variables to the tzTodo class we wrote last time. They will be default values for the settings, and the name of the option array that will be written to the database.
includes/tzTodo.php
// Name of the array
protected $option_name = 'tz-todo';

// Default values
protected $data = array(
    'url_todo' => 'todo',
    'title_todo' => 'Todo List'
);
Why they are declared as protected you ask? Because this way they are not accessible from outside the class, but you can still change them if you decide to extend it.
The next step is to register our plugin options with the settings API. To do this, we first have to attach an action to the admin_init hook:
// In the constructor of the class:
add_action('admin_init', array($this, 'admin_init'));
I am passing array($this, 'admin_init') as a callback, which will execute the aptly named admin_init method of our class:
// White list our options using the Settings API
public function admin_init() {
    register_setting('todo_list_options', $this->option_name, array($this, 'validate'));
}
Using the register_setting [docs] function, we are telling WordPress to process and save the tz-todo variable if it is submitted as part of a form. The 'todo_list_options' string is the name of the group this setting belongs to. This is important, as we will need to pass this name to additional functions of the settings api.
The last argument is the method that will be used to validate whether the settings are correct:
public function validate($input) {

    $valid = array();
    $valid['url_todo'] = sanitize_text_field($input['url_todo']);
    $valid['title_todo'] = sanitize_text_field($input['title_todo']);

    if (strlen($valid['url_todo']) == 0) {
        add_settings_error(
                'todo_url',                     // Setting title
                'todourl_texterror',            // Error ID
                'Please enter a valid URL',     // Error message
                'error'                         // Type of message
        );

        // Set it to the default value
        $valid['url_todo'] = $this->data['url_todo'];
    }
    if (strlen($valid['title_todo']) == 0) {
        add_settings_error(
                'todo_title',
                'todotitle_texterror',
                'Please enter a title',
                'error'
        );

        $valid['title_todo'] = $this->data['title_todo'];
    }

    return $valid;
}
Next, we have to create the settings page itself. I chose to place it as a sub item in the Settings menu. This is the recommended approach when building settings panels with only one screen. If your plugin has lots of settings, you may wish to split them into several screens and group them into a new top level admin menu.
Here is the code that creates the settings menu entry. First, we will listen for the admin_menu hook:
// In the constructor of the class:
add_action('admin_menu', array($this, 'add_page'));
After this, we define a method in the class that will be called:
// Add entry in the settings menu
public function add_page() {
    add_options_page('Todo Options', 'Todo Options', 'manage_options', 'todo_list_options', array($this, 'options_do_page'));
}
This will create a Todo Options entry in the Settings panel of your WordPress admin. The last argument to the add_options_page function [docs] is the name of our method that would return the markup of the options page:
// Print the menu page itself
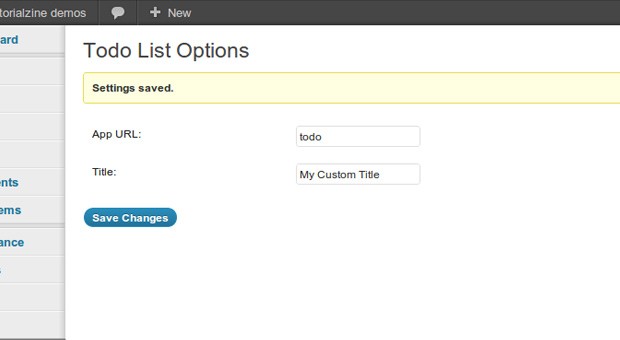
public function options_do_page() {
$options = get_option($this->option_name);
?>
<div class="wrap">
<h2>Todo List Options</h2>
<form method="post" action="options.php">
<?php settings_fields('todo_list_options'); ?>
<table class="form-table">
<tr valign="top"><th scope="row">App URL:</th>
<td><input type="text" name="<?php echo $this->option_name?>[url_todo]" value="<?php echo $options['url_todo']; ?>" /></td>
</tr>
<tr valign="top"><th scope="row">Title:</th>
<td><input type="text" name="<?php echo $this->option_name?>[title_todo]" value="<?php echo $options['title_todo']; ?>" /></td>
</tr>
</table>
<p class="submit">
<input type="submit" class="button-primary" value="<?php _e('Save Changes') ?>" />
</p>
</form>
</div>
}
You can see that we are again using the name of the group - todo_list_options, in the settings_fields call [docs]. This function will output hidden input fields that help WordPress validate the submitted form.
The last thing that is left to do is to fix an issue that might arise when the plugin is first activated - the options will not exist in the database initially, which would cause the code to misbehave. The solution is simple - we will attach an activation hook and create the options with default values.
To attach the hook (in the constructor):
// Listen for the activate event
register_activation_hook(TZ_TODO_FILE, array($this, 'activate'));
This will cause the activate method of our class to be triggered when the plugin is activated. I am using the TZ_TODO_FILE constant, which holds the plugin file path and is defined in tz-todoapp.php.
The activation event will create the options with default values:
public function activate() {
    update_option($this->option_name, $this->data);
}
Similarly, we remove the options when the plugin is deactivated (after subscribing for the deactivate hook):
public function deactivate() {
    delete_option($this->option_name);
}
We now have a working settings panel! But we still need to hook up the settings to the code, so that changing them actually does something. To do this, I am reading the settings with the get_option function [docs] in the init method of the class, and matching the URL against the url_todo property:
public function init() {

    // When a URL like /todo is requested from the,
    // blog (the URL is customizable) we will directly
    // include the index.php file of the application and exit
    $result = get_option('tz-todo');

    if (preg_match('/\/' . preg_quote($result['url_todo']) . '\/?$/', $_SERVER['REQUEST_URI'])) {

        // This will show the stylesheet in wp_head() in the app/index.php file
        wp_enqueue_style('stylesheet', plugins_url('tz-todoapp/app/assets/css/styles.css'));

        // This will show the scripts in the footer
        wp_deregister_script('jquery');
        wp_enqueue_script('jquery', 'http://code.jquery.com/jquery-1.8.2.min.js', array(), false, true);
        wp_enqueue_script('script', plugins_url('tz-todoapp/app/assets/js/script.js'), array('jquery'), false, true);

        require TZ_TODO_PATH . '/app/index.php';
        exit;
    }

    $this->add_post_type();
}
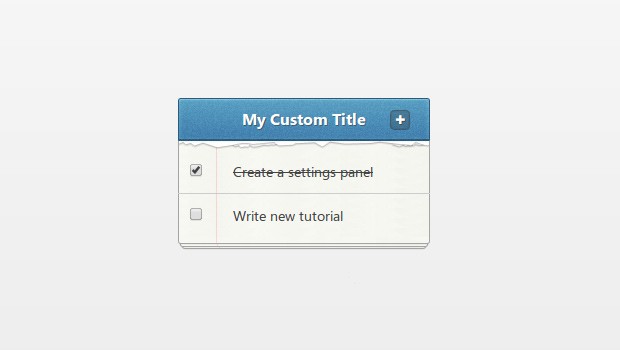
The last thing left to do, is to display the title in app/index.php (around line 27):
<h2><?php echo $result['title_todo']; ?><a href="#" class="add" title="Add new todo item!">✚</a></h2>
Done!
The Settings API is only one of the tools that WordPress gives to developers, so they can create better themes and plugins. It is a great addition to one's developer toolbox and will save you a lots of time in the long run.
Bootstrap Studio
The revolutionary web design tool for creating responsive websites and apps.
Learn more
Great Tutorial.
Nice tutorial
I like this tutorial very much
Really great. I like the way you actually explain why you do something.
I've seen many plugins that have the settings link near where you activate the plugin instead of in the menu. I've also seen code examples of how to do this, but no explanation of how it works.
Any chance you are writing a tutorials on that method of creating a settings page link?
Thank you.
Good tutorial ;)
Hey man- I am writing a plugin for my first time, and this really helped a lot. I still want a better grasp on this stuff though. Can you recommend a good resource for learning the wp hooks, and maybe some ideas to practice writing this stuff? A place to learn php but specifically with wordpress in mind with its use?
Great tutorial
The download link has a wrong path in it. Use this link:
http://demo.tutorialzine.com/2012/10/todo-app-wordpress/tz-todoapp-improved.zip
Thanks Markus, we fixed it!