Making Your First Google Chrome Extension
The Google Chrome web browser is slowly growing in popularity. This is no surprise, as it is a great browser, and is backed by no other than Google. It also provides great tools for web developers and I find myself using it more and more (actually Firebug is the only thing keeping me from crossing to the other side).
With the introduction of extensions, Google Chrome became even more agile and powerful.
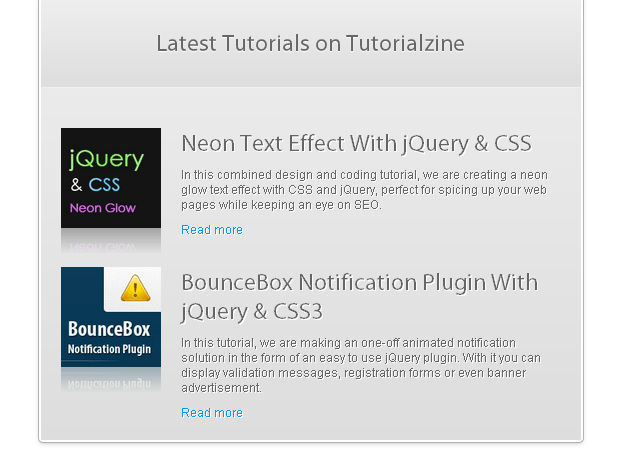
In this tutorial, we are going to create a simple extension, which puts a small icon next to Chrome's address bar, and, when clicked, will fetch Tutorialzine's RSS feed and display a fancy preview of our latest tutorials.
First a few words about extensions.
How Extensions Work
Extensions in Google Chrome are basically webpages. You have javascript files, stylesheets and images. You can even use JavaScript libraries like jQuery.
The extensions are, however, treated a bit differently than your regular webpage, which is displayed in the browser. You can have access to all the opened tabs, to the user's browsing history, you can manipulate all the pages that are opened, send AJAX requests to any website and much more.
You also have the benefit (or the limitation) that your extension runs only on one browser. You can forget all compatibility issues and embrace Google Chrome's hot new HTML5 features.
Developing extensions
Extension are packed in a .crx file (arenamed zip file) but during development, you can map your working folder as an extension. This way you can quickly change and deploy code without the need of repackaging.
This is done by opening the extension page (type chrome://extensions/ in the address bar, or click Wrench icon > Extensions), and clicking Developer mode > Load unpacked extension.. on the page. After you make a change to the extension, just hit the Reload link below it.
After you're done developing, click Pack extension.. and a crx file will be created for you. You can serve this file from your site and enable your site's visitors to install it.
Google Chrome is by far the easiest browser to make extensions for, as you will see from the steps below.
A note about debugging: To debug your extension, right-click on your extension's icon, next to the address bar, and choose Inspect popup. You can also check out this tutorial.
Step 1 - Manifest.json
The first step in creating an extension, is mapping a folder on your hard drive as an extension (as explained the above). You are going to put all your files in this folder.
The only thing required from your extension by Chrome, is the manifest.json file. This is a text file, which holds configuration settings in the form of a json object.
Here is the one we are going to use:
manifest.json
{
    "name": "Tutorialzine Extension",
    "version": "1.0",
    "description": "Making your first Google Chrome extension.",
    "browser_action":   {
        "default_icon": "icon.png",
        "popup": "tutorialzine.html"
    },

    "icons":{
        "128":"icon_128.png"
    }
}
In this file we are specifying the name of the extension and a number of other options, such as browser actions and permissions.
In browser_actions, we put settings that are in relation with the browser window. The popup property tells Chrome, that we are going to show tutorialzine.html as a popup. There are a number of settings you can put in browser_actions. You can read more on Google Chrome's Extension documentation.
For this extension we do not need access to currently opened pages, nor manipulating tabs and windows. If we needed those, however, we would need to include a permissions property, with the addresses of the pages.
For more information about the manifest file, refer to Google Chrome's documentation.
Step 2 - HTML 5
As mentioned above, we told Chrome that tutorialzine.html is going to be opened as a popup. This is a regular html file, complete with stylesheets and js files.
And as Google Chrome has a really good support for HTML5, we can code tutorialzine.html in it. You could, however, use any HTML version you normally code your sites with.
tutorialzine.html
<!DOCTYPE html> <!-- The new doctype -->
<html>
<head> <!-- No title and meta tags are necessary for the extension -->

<link rel="stylesheet" type="text/css" href="style.css" />
<script src="jquery.min.js"></script> <!-- Including jQuery -->
<script src="script.js"></script> <!-- Our script file -->

</head>

<body>

<h1>Latest Tutorials on Tutorialzine</h1>

<div id="content">
<!-- The latest tutorials are going to be inserted here -->
</div>

</body>
</html>
As you can see, we are addressing the css and js files directly. Chrome will include them for us. Just as if we are working on a regular webpage.
Step 3 - CSS3
As the extension is rendered Google Chrome, we do not need to limit ourselves with the least common denominator when it comes to CSS3 support. This is why we can afford to use fancy rules like -webkit-box-reflection and -webkit-gradient.
styles.css - Part 1
*{
    margin:0;
    padding:0;
}

body{
    /* Setting default text color, background and a font stack */
    font-size:12px;
    color:#666;

    /* A webkit gradient: */
    background:-webkit-gradient(linear, 0% 0%, 0% 100%, from(#EEE), to(#DDD));

    text-shadow:1px 1px 0 white;
    font-family:Arial, Helvetica, sans-serif;
    overflow-x:hidden;
}

.tutorial{
    width:500px;
    padding:10px 20px;
    margin-bottom:10px;
}

img{
    width:100px;
    height:100px;
    float:left;

    /* Webkit CSS3 Reflection */
    -webkit-box-reflect: below 0 -webkit-gradient(linear, left top, left bottom, from(transparent), color-stop(0.75, transparent), to(rgba(255, 255, 255, 0.3))) 0 0 0 0 stretch stretch;
}
-webkit-box-reflect creates a pure CSS reflection under the thumbnail images. It takes a number of parameters to generate the reflection - position of the reflection, offset from the bottom of the image, and a mask (which is defined with a gradient).
styles.css - Part 2
p,a{
    padding:10px 0 0 120px;
    display:block;
}

a,a:visited{
    color:#09F;
    text-decoration:none;
}

a:hover{
    text-decoration:underline;
}

h1{
    /* Webkit gradient: */
    background: -webkit-gradient(linear, 0% 0%, 0% 100%, from(#EEE), to(#DDD));

    border-bottom: 1px solid #F0F0F0;
    font-size: 24px;
    font-weight: normal;
    margin-bottom: 30px;
    padding: 30px 0px;
    text-align: center;
    text-shadow: white 0px 1px 1px;
}

h2{
    font-size:24px;
    font-weight:normal;
    right:40px;
    padding-left:120px;
}

h1,h2{
    font-family:"Myriad Pro",Arial,Helvetica,sans-serif;
}
In the second part of the code we are also using a gradient, but this time as a background for the h1 element.
Step 4 - jQuery
The JavaScript is executed as if it was part of a regular web page. This means that we can include the jQuery library and define a $(document).ready() function as we would normally do in a web project.
Clicking the extension icon has the same effect for the scripts on the page, as opening the page in a browser.
Inside $(document).ready(), we fetch the latest results from Tutorialzine's RSS feed, with the help of Yahoo's YQL API. We've used this API a couple of times before, here on Tz. It allows us to use an SQL-like syntax to fetch data in a JSON format.
After fetching the data, we generate the HTML markup and include it in tutorialzine.html. We also save it to localStorage as a simple caching solution. localStorage is a simple way to save persistent data (it survives between page loads). This makes the experience of using the extension a lot faster.
script.js
$(document).ready(function(){

    var query = "SELECT * FROM feed WHERE url='http://feeds.feedburner.com/Tutorialzine' LIMIT 2";

    // Storing the seconds since the epoch in now:
    var now = (new Date()).getTime()/1000;

    // If there is no cache set in localStorage, or the cache is older than 1 hour:
    if(!localStorage.cache || now - parseInt(localStorage.time) > 1*60*60)
    {
        $.get("http://query.yahooapis.com/v1/public/yql?q="+encodeURIComponent(query)+"&format=json&callback=?",function(msg){

            // msg.query.results.item is an array:
            var items = msg.query.results.item;
            var htmlString = "";

            for(var i=0;i<items.length;i++)
            {
                var tut = items[i];

                // Extracting the post ID from the permalink:
                var id = tut.guid.content.match(/(\d+)$/)[0];

                // Looping and generating the markup of the tutorials:

                htmlString += '<div class="tutorial">\
                                <img src="https://tutorialzine.com/img/posts/'+id+'.jpg" />\
                                <h2>'+tut.title+'</h2>\
                                <p>'+tut.description+'</p>\
                                <a href="'+tut.link+'" target="_blank">Read more</a>\
                                </div>';
            }

            // Setting the cache
            localStorage.cache  = htmlString;
            localStorage.time   = now;

            // Updating the content div:
            $('#content').html(htmlString);
        },'json');
    }
    else{
        // The cache is fresh, use it:
        $('#content').html(localStorage.cache);
    }
});
In localStorage we also store a timestamp. We use it to determine how old the cache in localStorage is. If it is older than an hour, we ignore it and fetch the data again.
Here is a sample of the data that is returned from YQL.
{
    "query": {
        "count": "1",
        "created": "2010-06-09T12:02:33Z",
        "lang": "en-US",
        "results": {

            "item": {
                "title": "Neon Text Effect With jQuery & CSS",
                "link": "http://feedproxy.google.com/..",

                "comments": [
                    "https://tutorialzine.com/2010/06/neon-text-effect..",
                    "11"
                ],

                "pubDate": "Tue, 01 Jun 2010 20:11:54 +0000",
                "creator": "Martin Angelov",

                "category": [
                    "CSS",
                    "jQuery"
                ],

                "guid": {
                    "isPermaLink": "false",
                    "content": "https://tutorialzine.com/?p=925"
                },

                "description": "In this combined design and coding tutorial..",
                "commentRss": "https://tutorialzine.com/2010/06/neon-text-e..",
                "origLink": "https://tutorialzine.com/2010/06/neon-text-eff.."

            }
        }
    }
}
This structure is made available to us in the msg variable on line 11 of script.js.
With this your first Google Chrome extension is complete!
Conclusion
You can read more about extensions (including advanced features not covered in this tutorial) on Google Chrome's Extension documentation page. I hope that this tutorial has given you a great start in extending the browser's functionality.
What do you think? Would you make a Chrome extension for your website?
Bootstrap Studio
The revolutionary web design tool for creating responsive websites and apps.
Learn more
Excellent tutorial and very intriguing content!
Unique tutorial, as usual!
The outcome is pretty neat - just installed it - looks fabulous!
Keep up the good work.
Awesome job like always.
good work!!!
Good job !!! thank you
how would I get the pictures from my wordpress blog? I can't get it to work.
Thank you for the comments folks!
@Zach, it depends on where you store them. On Tutorialzine I store the thumbnails at
and this is why I extracted the id from the guid (you can see it on line 27 in the sample YQL response at the bottom of the tutorial).
If you choose random names for the post thumbnails, I am afraid that you won't be able to show them this way as the feed does not contain any data about the address of the images.
Great tutorial. Much appreciated.
I noticed that in step 2, you reference the stylesheet as "style.css":
However, in step 3, you call it "styles.css"
The downloadable file is correctly named style.css.
Cheers,
John
hi,
You did a good job , grate thanks for the grate tips
good luck
Great job..! Its really helpful for beginners.
Thanks
Very good tutorial!
Firebug for chrome https://chrome.google.com/extensions/detail/bmagokdooijbeehmkpknfglimnifench?hl=en
Wow! nice tutorial and explained very well panning to creat my own extension. Thanks
Awesome tutorial !
I will study and create my special extension for Chrome.
damn thats unique !
Thanks for the help but mine is almost like your thumbnails except it has the date in front like this:
http://techin.me/blog/wp-content/uploads/2010/06/77701-imac-164x164.jpg
How could I display them with this type of link?
The address of your thumbnails cannot be determined from the feed, as your thumbnail images use keywords in the filename (and not just a post id).
You can go a different path - you can create a PHP script to generate a list of your latest posts and upload it somewhere on your site. This script will read your wordpress database, and output all the html.
The extension can fetch that page (instead of fetching the feed) and just insert the html in the #content div.
Wow! nice tutorial and explained very well panning to creat my own extension. Thanks
Hello. Thanks for this excellent tutorial. I was just wondering i see some extensions with the icons inside the omnibar. So how to do that?
Just what I was looking for - thanks for the tutorial. Did you switch over to Chrome yet? I have just recently (firebug included) and love the speed / memory that chrome runs with. There is problems with some extensions still being ported over to Chrome but they don't outweigh the problems I had with Firefox (huge memory footprint, crashed at least once a day) .
Awesome tut buddy :)
Thanks for sharing
Greate tutorial !
I will try to create my special extension for Chrome.
hi,
this tutorial convinced me to learn JSON
in 1 day I managed to create
application + extension
jQuery + HTML 5 is pure power :]
Great job! Its really helpful for beginners
Thanks!
i want to make an extension that does the following
i think it is possible when u have the ctrl+L where it adds www and com at the end so please help me on this,i need this extension very much
anyways thanks.
Wow, it was so easy. I didn`t expect to be done with the tutorial in 5 only minutes. You did a perfect job by animating people to learn. Thanks.
Anyone know what would change if I just want to show me the query my database? I can't.. Thanks
I use the SEO Site Tools extension on chrome. You must click on the extension's icon to get it to provide SEO metrics for the currently loaded page. What I'd like to do is create an extension that gets it to popup with metrics when I mouseover a link that exists on any given page. It seems easiest to do by writing my own extension rather than editing the existing .crx. I understand js basics but am having trouble understanding how to get this to execute. Ideas? Thanks!
Notes:
Does it work for others ? Seems like there's a new API version. After adding '"manifest_version": 2' still nothing happens.
I do not know whys ... but I did exactly what it said, I even downloaded your project what I get is a small clickable icon in the right corner no effect .. I click it several times without result
Chrome Version 24.0.1312.2 m
win 7
We have a few problems in this tutorial.
Google has actualized the API, and it may just not work for some developers.
To fix the problems, here is the new version of the manifest.json:
{
"name": "Tutorialzine Extension",
"version": "1.0",
"description": "Making your first Google Chrome extension.",
"browser_action": {
"default_icon": "icon.png",
"default_popup": "tutorialzine.html"
},
"manifest_version": 2,
"icons":{
"128":"icon_128.png"
}
}
This is awesome and important for every blogger to growing up his/her blog . thx Martin
while converting this app to manifest version 2 im getting a error i.e)
Refused to execute inline script because it violates the following Content Security Policy directive: "script-src 'self'".
in jquery.min.js:35
Thanks for writing up this tutorial man - gave me the guts to try making a Chrome app myself!
https://chrome.google.com/webstore/detail/searchr/phldilnakifhbgllkiopclbdchkdcfoc
This tutorial is a little outdated. I created a screencast fixing the errors and making this tutorial work at http://ibuildmvps.com/blog/fixing-the-tutorialzine-how-to-build-a-chrome-extension-tutorial