Automating Google Chrome with Node.js
Did you know that Chrome now ships with the option to run in headless mode? The feature is called Headless Chrome and it makes it super easy for developers to configure a headless browser environment and run powerful automated tests.
In this tutorial we are going to talk about its various features and run a couple of cool examples. Let's begin!
What is Headless Chrome
Headless Chrome allows us to run the browser from the command line without actually opening a Chrome window. The simulated browser environment has the same features as regular Chrome and can load any website or app we tell it to.
On top of that, we have a large number of controls for interacting with the page. We can click on elements, simulate keyboard input, resize the browser, and a lot more. Using these controls we can write a variety of helpful scripts.
Here are some examples of tasks usually done in a headless environment:
- Generate screenshots and PDFs.
- Navigate between links and app states.
- Automate user input and form validation testing.
- Scrape data from websites and SPAs.
- Monitor performance.
Because Headless Chrome has a rather low-level API, it's preferred to access it via a library. For this tutorial we are going to use Puppeteer. The project is maintained by the Chrome DevTools team and has an excellent API that is super easy to work with.
Installation
To use Puppeteer you will need to have Node.js installed. You can find out how to do it here. Note that all the examples in this tutorial rely heavily on the async/away syntax. It's available only in the more recent Node.js releases, so make sure you are running a version above v7.6.0.
node --version
v8.3.0
If you are not familiar with the concept of async/await, we highly recommend reading our article JavaScript Async Await Explained in 10 Minutes.
Go to your project's directory, initialize npm and install Puppeteer. You might need sudo access.
npm init
npm i puppeteer
Installation may take a couple of minutes. This is because unlike most other frameworks for headless testing, Puppeteer automatically downloads a version of Chromium for you (about 100mb). That's actually a very nice feature since you won't have to setup and maintain a local instance of Chrome manually.
Create a index.js file to work on and we are ready to go!
Screen Capture
Taking screenshots with puppeteer is very easy and there are plenty of options available for getting the exact results we need. We'll start off with a basic example and built upon that.
Below we simply start a headless browser, open a page, and take a screenshot of all of its contents.
const puppeteer = require('puppeteer');

(async () => {
  const browser = await puppeteer.launch();
  const page = await browser.newPage();

  await page.goto('https://tutorialzine.com');
  await page.screenshot({
    path: 'landing-page.png',
    fullPage: true
  });

  browser.close();
})();
To run our Puppeteer app we'll just call the index.js file with node. In a real project you will probably need to have some npm scripts that automate the process even further.
node index.js
If there weren't any errors we should have a langing-page.png file in our working directory. By default the dimensions of a screenshot are 800px by 600px, but since we've set the fullPage flag to true, our image has a width of 800px and a height that fits all the content on the page.
When taking the screenshot, Puppeteer will simulate a browser window with the desired width. If the page we are testing is responsive, we'll get a snapshot of what it looks like at that viewport. We can change its dimensions via the setViewport method.
await page.setViewport({
  width: 1600,
  height: 1000
});
Using this method we can modify our script to take multiple screenshots of various device sizes. This will allow us to quickly see if the responsiveness of our page is working as intended.
const puppeteer = require('puppeteer');

(async () => {
  const browser = await puppeteer.launch();
  const page = await browser.newPage();

  // Ann array of viewport sizes for different devices.
  const viewports = [1600, 1000, 800, 600, 500];

  await page.goto('https://tutorialzine.com');

  for(let i=0; i < viewports.length; i++) {
    let vw = viewports[i];

    // The height doesn't matter since we are screenshotting the full page.
    await page.setViewport({
      width: vw,
      height: 1000
    });

    await page.screenshot({
      path: `screen-${vw}.png`,
      fullPage: true
    });
  }

  browser.close();
})();
Running this script will generate 5 images, one for each viewport we've defined.
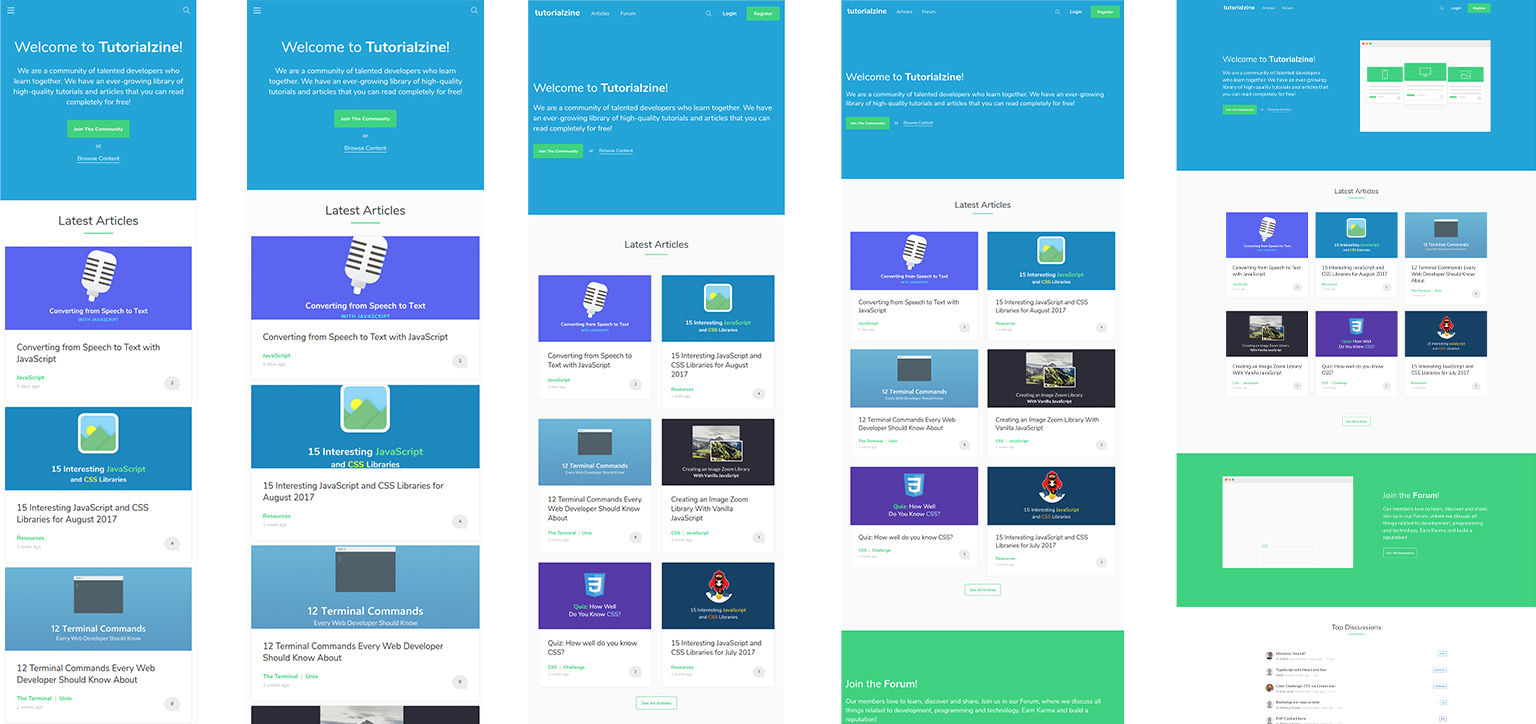
There are many other things you can do with the screenshot() method. You can snap an isolated portion of the page, change the quality and format of the image, and more. Check out the docs here.
Interacting With The UI
With Puppeteer we can access all of the elements on the page. This includes all static content like text and images, as well as interactive elements such as links, input fields, buttons, etc. Using automated controls we can scrape websites, test links, and validate forms.
For example, here is a script that loads our landing page, opens the search form and searches for the term 'JavaScript'. We will run this example with headless mode turned off so that we can see what's going on.
const puppeteer = require('puppeteer');

(async () => {
  const browser = await puppeteer.launch({
    headless: false
  });
  const page = await browser.newPage();

  // Open page.
  await page.goto('https://tutorialzine.com');

  // Show search form.
  await page.click('.search-trigger');

  // Focus input field.
  await page.focus('#search-form-top input');

  // Type in query.
  await page.type('JavaScript', {delay: 200});

  // Submit the form.
  const searchForm = await page.$('#search-form-top');
  await searchForm.evaluate(searchForm => searchForm.submit());

  // Keep the browser open.
  // browser.close();
})();
Since we are using the async/await syntax, all the steps will execute in the correct order and wait for each other to finish.
Conclusion
If you are looking for a way to automate your browser tests, Puppeteer is probably the most user-friendly tool out there. It has a very well structured API and a clear, essentials-only documentation that is very easy to follow.
Since Puppeteer is based on Headless Chrome, you won't be able to test any browsers other than Chrome. For automating other platforms you might want to try the Selenium framework.
Bootstrap Studio
The revolutionary web design tool for creating responsive websites and apps.
Learn more
Comments 5
Interesting! I used only Selenium so far but will try this lib as well.
I've learned Node but never actually used it. This was fun, thank you!
Do you have a sample of "Monitor performance"?
automated responsive testing is neat!
How did you get this line to work?
path: 'screen-${vw}.png'