Making an Impressive Product Showcase with CSS3
A product page is any page on your website that showcases a product. It has to describe its features, give some screenshots, and be descriptive. Naturally, this is the place where you build up the visitor's interest towards your product, but it is getting increasingly difficult to be original in grabbing their attention. Luckily, a new compact JavaScript library can help you make a splash.
impress.js is a small, standalone library that makes it easy to design advanced CSS3 presentations with eye-catching effects. But what if we used impress.js for something other than a presentation? This is what we are doing today - we will be spicing up a plain old product page with some CSS3 magic!
The HTML
We start of with a simple HTML5 document that will be the backbone of today's example.
index.html
<!DOCTYPE html>
<html>
<head>
<meta charset="utf-8" />
<title>Impressive CSS3 Product Showcase | Tutorialzine Demo</title>
<!-- Google Webfonts and our stylesheet -->
<link rel="stylesheet" href="http://fonts.googleapis.com/css?family=PT+Sans+Narrow|Open+Sans:300" />
<link rel="stylesheet" href="assets/css/styles.css" />
<!--[if lt IE 9]>
<script src="http://html5shiv.googlecode.com/svn/trunk/html5.js"></script>
<![endif]-->
</head>
<body>
<div id="impress" class="impress-not-supported">
<!-- The Slides Will Go Here -->
</div>
<a id="arrowLeft" class="arrow"><</a>
<a id="arrowRight" class="arrow">></a>
<!-- JavaScript includes -->
<script src="http://code.jquery.com/jquery-1.7.1.min.js"></script>
<script src="assets/js/impress.js"></script>
<script src="assets/js/script.js"></script>
</body>
</html>
Nothing unusual here. Along with the Google Webfonts include in the head, we also have our main stylesheet (we will go back to it in the next section) and a number of JavaScript source files before the closing body tag.
The #impress div will hold the slides. The id is required in order to be recognized by impress.js (you can override this by passing a different id to the impress function call in script.js). After this, we have the arrows that initiate the slide transitions.
Last on the page, we have our JavaScript source files. impress.js is standalone and does not need jQuery to work, but we will be including it so we can listen for clicks on the arrows in our script.js file.
Each of the slides of our showcase contains three elements - a title, a paragraph of text, and a smartphone image. These are all positioned uniquely for each slide. The promo images and text for this example were taken from Google's Galaxy Nexus web site.
The elements of the slides are grouped into individual "step" divs inside the #impress container. With this we have set the stage for impress.js!
Using impress.js
With this tiny library, we can create smooth CSS3 transitions between the slides of our showcase. To do this, we have to instruct impress.js on how to orient the slides. This is easy to do - we will use data attributes on the step divs. These attributes are translated into real CSS3 transformations by the library, depending on the current browser, and affect the slide.
Impress.js supports a number of attributes:
- data-x, data-y, data-z will move the slide on the screen in 3D space;
- data-rotate, data-rotate-x, data-rotate-y rotate the element around the specified axis (in degrees);
- data-scale - enlarges or shrinks the slide.
You can see the markup for the slides below:
<!-- The first slide retains its default position. We could omit the data attributes -->
<div id="intro" class="step" data-x="0" data-y="0">
<h2>Introducing Galaxy Nexus</h2>
<p>Android 4.0<br /> Super Amoled 720p Screen<br />
<img src="assets/img/nexus_1.jpg" width="232" height="458" alt="Galaxy Nexus" />
</div>
<!-- We are offsetting the second slide, rotating it and making it 1.8 times larger -->
<div id="simplicity" class="step" data-x="1100" data-y="1200" data-scale="1.8" data-rotate="190">
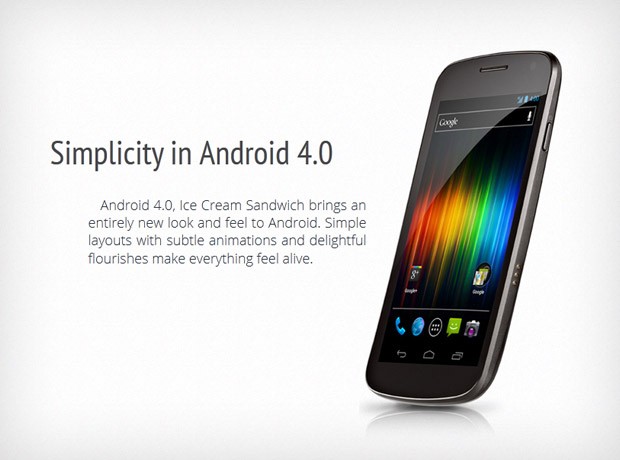
<h2>Simplicity in Android 4.0</h2>
<p>Android 4.0, Ice Cream Sandwich brings an entirely new look and feel..</p>
<img src="assets/img/nexus_2.jpg" width="289" height="535" alt="Galaxy Nexus" />
</div>
<!-- Same for the rest.. -->
<div id="connect" class="step" data-x="-300" data-y="600" data-scale="0.2" data-rotate="270">
<h2>Connect & Share</h2>
<p>Real-life sharing is nuanced and rich. Galaxy Nexus makes sharing.. </p>
<img src="assets/img/nexus_3.jpg" width="558" height="329" alt="Galaxy Nexus" />
</div>
<div id="upload" class="step" data-x="-200" data-y="1500" data-rotate="180">
<h2>Instant Upload</h2>
<p>Your photos upload themselves with Instant Upload, which makes ..</p>
<img src="assets/img/nexus_4.jpg" width="248" height="510" alt="Galaxy Nexus" />
</div>
<div id="music" class="step" data-x="-1200" data-y="1000" data-scale="0.8" data-rotate="270">
<h2>Jam on with Google Music</h2>
<p>Google Music makes discovery, purchase, and listening effortless and..</p>
<img src="assets/img/nexus_5.jpg" width="570" height="389" alt="Galaxy Nexus" />
</div>
When the slideshow starts, impress.js will compensate for these transformations, and apply the reverse rules to the #impress div with a smooth CSS transition. The result is the eye-catching presentation you see in the demo. Of course, this comes at the price that you have to manually tweak the data attributes of each slide for the best result.
The CSS
To make the presentation work, we will have to apply some CSS rules. The first step is to style the presentation container and declare default styling for the slide elements.
assets/css/style.css
/*----------------------------
    Styling the presentation
-----------------------------*/

#impress:not(.impress-not-supported) .step{
    opacity:0.4;
}

#impress .step{
    width:700px;
    height: 600px;
    position:relative;
    margin:0 auto;

    -moz-transition:1s opacity;
    -webkit-transition:1s opacity;
    transition:1s opacity;
}

#impress .step.active{
    opacity:1;
}

#impress h2{
    font: normal 44px/1.5 'PT Sans Narrow', sans-serif;
    color:#444648;
    position:absolute;
    z-index:10;
}

#impress p{
    font: normal 18px/1.3 'Open Sans', sans-serif;
    color:#27333f;
    position:absolute;
    z-index:10;
}

#impress img{
    position:absolute;
    z-index:1;
}
As you can see in the rules above, and in the HTML fragment in the beginning of this tutorial, the #impress container is assigned a .impress-not-supported class. The class is removed only if the current browser supports the functionality required for the library to run successfully.
Now we need to style the individual slides. I will only include the classes for the first slide here, you can find the rest in assets/css/styles.css.
/*----------------------------
    Slide 1 - Intro
-----------------------------*/

#impress #intro{
    width: 500px;
}

#intro h2{
    text-align: center;
    width: 100%;
}

#intro p{
    font-size: 22px;
    left: 290px;
    line-height: 1.6;
    top: 220px;
    white-space: nowrap;
}

#intro img{
    top: 120px;
}
All that is left is for a quick JS snippet to initiate impress.js, and listen for clicks on the arrows.
jQuery
To initialize the impress library we need to call the method of the same name. This will also return a new object, with methods for showing the previous / next slides.
script.js
$(function(){

    var imp = impress();

    $('#arrowLeft').click(function(e){
        imp.prev();
        e.preventDefault();
    });

    $('#arrowRight').click(function(e){
        imp.next();
        e.preventDefault();
    });

});
With this our impress-ive product showcase is complete!
Done!
You can use this example for product and landing pages, feature showcases and with some randomization you could even turn it into an image gallery.
Bootstrap Studio
The revolutionary web design tool for creating responsive websites and apps.
Learn more
Waou, realy impressive!
Awsome, hi quality and easy to understand ....so cool
Bad. Ass.
Wow! that is really cool, clever usage of impress.js
Wohhh Unbelievable! GREAT! (sorry for shout it! hehehe)
Thanks!!
really great tutorial. Thanks for sharing this
Amazing!
I also noticed that clicking on any "step" div make it active and do the css3 transformation. It's beautiful! :)
I like this! A new way to presents things... Super cool!
Thanks for this precise tut, and for sharing it.
You made my day.
Impressive ;)
Really nice use of impress.js and a great idea. Simple, but effect is jaw dropping.
Thanks
Very cool stuff.
This is actually quite impressive!
I don't get it... where's the effect at? I have FF 9 and I'm clicking on the images. No effects, and I see all the images on one page, no slideshow.
Thank you
You need FF 10, Safari or Chrome to see it. I recommend trying it in Safari - the animation looks best there.
Agree!
Looks perfect in Safari.
Thank you for the awesome comments folks!
Hello, Just wondering if you might be able to tell me how to get the gallery to automatically click through to the next after so long, without the user actually having to click next/prev?
I ask as I would love to use that effect as a slideshow effect rather than the boring transitions that are so overused, any ideas would be great thanks a bunch!
To make it auto-advance, do something like this:
var seconds = 5; setInterval(function(){ impress().next(); },seconds*1000);Man this is really impressive!! Good job with the tutorial.
Amazing! Thanks a lot!
This looks amazing, i've testet it on both Chrome and Firefox.
But in firefox on the "Instant Upload" part it shows the other images with black boxes around it [link].
Hell yeah! This IS impressive. Thx for sharing this awesome work.
Oh!!! Buddy it's realy realy impressive. Tutorialzine is the best.
argh..
why opera can't show animation.. :(
damn opera..
very impresive and awsome work
flash is going down ;)
How do add additional elements. I have tried adding a new impress div with the corresponding CSS. The new items appears superimposed on the previous one. Ideas anyone...
Be sure to set unique data- properties. This is what impress.js uses to position and rotate your slides.
Hi,
Just one question : do you authorize us to use your code and script for any kind of site (i am very interesting to put it in a commercial website, a website built to make advertisement for a real little shop).
Thank you for you answer.
Whatever : very good job and tutus !
Of course - you can use it as you wish. You can read the license for more info.
Absolutely awesome!
Wow, that's awesome!
I actually said "wow" when I saw the demo!
Wooow
Very very nice!!!
Hmmm, how come it works fine when I test it localy, but when I upload it to my site the effects don't show? :/ Could it be my cache plugin that f*** it up?
Figured it out. It was the cache plugin. Weird.
Martin, thank you for publishing the plugin and tutorial. It's truly cool, - mr. Flash totally fades in comparison to this script.
One question. I see you skipped on adding an overview state, when all of the slides are being seen and can be clicked. And for some reason when i add empty overview slide with correct zoom set to data-y="800" data-scale="3" - all steps are seen indeed, but transparently styled with 'non-active opacity of 0.4, despite overview's declaration of opacity 1. When i add, say, h2 to overview slide - it renders black (opacity 1). but other grayed out. How in overview .step { opacity 0.4 } can be disabled/overridden?
:-)
Vlad
@Martin -
nevermind, found it.
Here it goes:
#overview { z-index: -1; padding: 0; } #impress.step-overview .step { opacity: 1; cursor: pointer; } #impress .step#overview { border:0; /* for design stage only,i added border property to .step{} for easier layout display */ }Simple & elegant – thank you for sharing this. I have a question: in this example, which script is handling the deep linking?
It is all handled by impress.js.
HI im just somehow intermedian in this about the web desing i wanted to ask if you can put this as a slideshow in iweb.And if there is a video tutorial
But for the rest i think this tutorial is awesome thanks .
Awesome example!
Just one question if anyone can help, if I wanted to create a button to navigate to say the 3rd slide. What would be the javascript call for that..is it even possible?
Great work Martin!
Oh just figured it out,
<a href="#/intro">Your Link to Intro</a>
Woo..this is awesome !!!
I have a question that , how can it run auto advance ?
thanks !!!
Awesome effect!
This effect looks some what like Apple's iPhone 4S site.
I was wondering about this effect for so long, thanks for this valuable post.
Crazy, I love this! :)
And best of all it has a nice fall back, so you can actually use it too!!! :)
WTF OMG :-O .. Thats amazing
Wow! I didn't know this was possible without Flash!
Sorry if this has been mentioned, but couldnt find it;
But it doesnt work in Internet Explorer?
It doesn't work, but is still usable - you can browse though all the slides. Once IE implements the features that are needed by impress.js, it will start working automatically.
hi Martin, thanks for giving this opportunity to all, slide is amazing, but it's not working IE 7,8,9 versions, please give me suggestion immediately..
Thanks..
Awsome!! Is there a way to make it auto advance? What's the purpose of the html5.js for IE9? I see no diff. Thanks!!
Really amazing & simple!
Just one question/
How to make a links, directly to every slide in a right way?
I downloaded the files and I noticed that the right arrow doesn't show onload until the cursor hovers over the left arrow. The left arrow seems to activate the right arrow for some reason.
Any ideas?
when you turn in the order of html and the first right turn arrow will be displayed instead of the left arrow to the right.
This is simply AMAZING!
One thing,I have same problem as Nick where the right arrow isn't showing onload until you hover over the left.Any fix for this? (viewing on Chrome 18.0.1025.142)
LOOKS like someone is selling this
http://codecanyon.net/item/ipresenter/1939414
:))
Amazing script - How extract the ID of actual scene viewing ?
I just want add an effect on my text menu for the page who is viewing ...
Thx a lot !
Marco,
I noticed that code canyon were able to fix the right progress arrow bug too.
really awesome Martin!
I was wondering if modernizr would fix older browsers issue.
Thanks for the tutorial! :) Looks awesome!
OMG...I'm really...really...realy glad for clicking that demo's of your dude...coz first i was here for somthing else...but this is wayyyy better then any other what ever i'm here for...t.h.a.n.k.y.o.u..
how can i pass a different id to the impress.js or how can i override the impress fucntion call....
Super duppperr tutorial!! I will sure use it in my next upgrade!!!! Awesome!! Tnx for sharing with us bro'!
Hey Martin, Amazingly elegant work - thanks for sharing!
I have a question regarding the initial state of the 'next' arrow. It seems that when the page was first loaded, only the left 'previous' arrow is displayed by default, but the right arrow is hidden. If the mouse was hovered over the left arrow, that right arrow will display. This seems to happen for both Chrome and iOS Safari. Is that related to the arrow bg CSS?
Thanks a ton!
Awesome work...:)..it is super "ImpResSive"...:)
This is amazing! My problem is that I want the animation to sit underneath my header. Everything works fine with the animation but the entire animation is sitting on top of my website instead of being nestled inside the page.
any ideas?
Hello!
I would like to add a navigation menu to the page. In HTML and CSS it's simple, just add links, with href pointing to #introduction, for example.
But is possible that each slide is showing, to apply a change in a css property for the corresponding link?
For example, when I load slide2, change color of link2.
Any idea of how can this be done?
Thank you!!!!
First u need to bind click function to your links a or li as you like
$("a[id^=nav]").bind(click, function (){
//handler code
});
next all you have to do is change the background of that element (a or li)
//handler code-->
changing bg on 'a'
$(this).css('background': '#acacac', 'color': '#1b1b1b');
changing bg on 'li'
$(this).parent().css('background': '#acacac', 'color': '#1b1b1b');
how add more slide?
my chin dropped when i saw this haha, man these tutorials are amazing
Great tutorial. Stumbled across impress.js and this tutorial helped me to understand some features of impress.js better.
Curious about autoplay for a .mp4 video.
<p align="center" style="padding-top:2em">
<video controls="controls" autoplay="autoplay" loop="loop">
<source src="images/myVideo.mp4" type="video/mp4" />
Your browser does not support the video tag.
</video>
When I do this on a page that is not using impress it autoplays as it should. Same code on a page with impress does not work. Anyone have any suggestions?
You work is always great. Thanks a lot!
Have you been able to work out the kink for IE9?
Every designer should know this thanks for sharing.
Incredible showcase, love it.
Hey Martin,
Too good. Even much better than any other flash player slides.
Great work.
Thanks for sharing this.
Great tutorial, like it. Thanks!
How can I convert it to a wordpress plugin?
That is a very nice Work. We changed it into Prestashop, a ecommerce system. Now we use that Showcase as the category frontend. Very nice work!
Pretty good for a quick showcase :)
Does anyone know a fallback for this to work on tablets and/or mobile devices?????
What are the options to overcome the limitations with IE?
Write a script or handler to redirect to an entirely different page? (don't like the divs just stacked on top of each other without the animation in IE)
Neat! Thank you for sharing!
This is such as great work.
Would like to ask on 1 thing, is it possible to stop the autoplay function when it reaches certain page as if that's the last page?
Would really appreciate some help here. Thanks a bunch!
For auto-running(script.js)...
$(function(){ var imp = impress(); $('#arrowLeft').click(function(e){ imp.prev(); myStopFunction(); e.preventDefault(); }); $('#arrowRight').click(function(e){ imp.next(); myStopFunction(); e.preventDefault(); }); var varTimerSpeed = 5000; var myVar = setInterval(function(){myTimer()}, varTimerSpeed); function myTimer(){ imp.next(); e.preventDefault(); var d=new Date(); var t=d.toLocaleTimeString(); document.getElementById("demo").innerHTML=t; } function myStopFunction(){ clearInterval(myVar); myVar=setInterval(function(){myTimer()},varTimerSpeed); } });Hi. I seem to have a problem with the overflow of the div I made which will hold together all my #impress slides. I've already set the overflow attribute to hidden but still the vertical scrollbar would keep on showing instead of the expected result which is not scrollable. Where could have I done wrong? I would appreciate much your help! Thanks :)
Very good! I would like to use a form in it, so I need to withdraw due to change "slide" by pressing "space" and "tab", is it possible?
Hi martin, this is amazing, but I would like to embebed this into a content panel of this (http://tympanus.net/codrops/2012/04/12/animated-content-tabs-with-css3/).
Its seems that there is some conflicts, would you mind help?
thanks.