Learn Webpack in 15 Minutes
Build tools have become an integral part of web development, mainly due to the ever-increasing complexity of JavaScript apps. Bundlers allow us to package, compile, and organize the many assets and libraries needed for a modern web project.
In this tutorial we will take a look at webpack, a powerful open-source bundler and preprocessor that can handle a huge variety of different tasks. We'll show you how to write modules, bundle code, and use some of the loader plugins. The tutorial is designed for total beginners to webpack, but having some JavaScript knowledge is advised.
![]()
Why webpack?
Much like any other aspect of web development, there isn't a standard for which build tool to use. Right now, developers have to choose between webpack, Gulp, Browserify, NPM scripts, Grunt, and like 10 others. There are many in-depth comparisons out there, but all of these tools are very similar, so most of the time it comes down to personal preference and what project you are working on.
Here are some pros and cons to help you decide whether webpack is the tool for you:
Pros:
- Great for working with singe-page apps
- Accepts both
require()andimportmodule syntaxes - Allows for very advanced code splitting
- Hot Reload for quicker development with React, Vue.js and similar frameworks
- Мost popular build tool according to the 2016 JavaScript survey
Cons:
- Not suitable for beginners in web development
- Working with CSS files, images, and other non-JS resources is confusing at first
- Documentation could be better
- Changes a lot, even most 2016 tutorials are already outdated
1. Installation
The easiest way to install webpack is by using a package manager. We will go with npm but feel free to use Yarn or another hip alternative. In both cases you need to have Node.js on your machine and a package.json ready to go.
It is preferred to install it locally (without the -g tag). This will make sure everyone working on your project has the same version of webpack.
npm install webpack --save-dev
Once we have it installed, it's best to run webpack via a Node.js script. Add these lines to your package.json:
//...
    "scripts": {
        "build": "webpack -p",
        "watch": "webpack --watch"
    },
//...
Now by calling npm run build from the terminal we can make webpack bundle our files (the -p option stands for production and minifies the bundled code). Running npm run watch will start a process that automatically bundles our files when any of them change.
The last part of the setup is to tell webpack which files to bundle up. The recommended way to do this is by creating a config file.
2. Webpack Config File
Here we will look at the config file in its most basic form but don't let that fool you - the webpack config file is quite powerful, varies a lot from project to project, and can become super complex in some cases.
In the root directory of your project add a file called webpack.config.js.
webpack.config.js
var path = require('path');

module.exports = {
  entry: './assets/js/index.js',
  output: {
    filename: 'bundle.js',
    path: path.resolve(__dirname, 'dist')
  }
};
The entry option tells webpack which is our main JavaScript file. There are many different strategies for configuring entry points but in most cases a single entry is enough.
In output we specify the name and path of our bundle. After running webpack we will have all our JavaScript in a file called bundle.js. This is the only script file that we will link in our HTML:
<script src="./dist/bundle.js"></script>
This setup should be enough to get us started. Later we will add some more stuff to it, but first let's see how modules work.
3. Webpack Modules
Webpack provides multiple ways to work with modules, and most of the time you are free to go with whichever one you like. For this tutorial we will use the ES6 import syntax.
We want to add a module that greets our users. We create a file called greeter.js and make it export a simple function:
greeter.js
function greet() {
    console.log('Have a great day!');
};

export default greet;
To use this module, we have to import it and call it in our entry point, which if you look back at the config file is index.js.
index.js
import greet from './greeter.js';

console.log("I'm the entry point");
greet();
Now when we run the bundler with npm run build, and open our HTML in the browser, we see this:
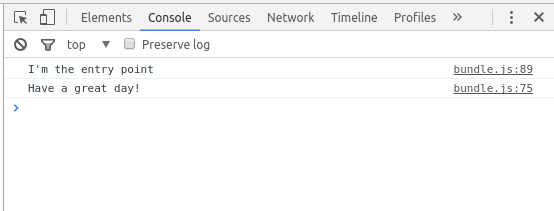
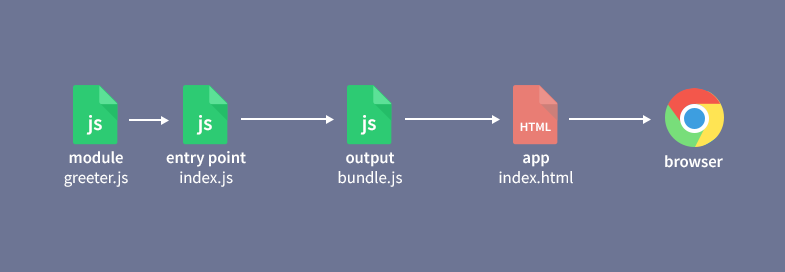
Our entry point and our greeter module were compiled into one file called bundle.js and it was executed by the browser. Here is a simple flow chart of what's happening so far:
4. Requiring Libraries
We want our app to specify which day of the week it is when it greets users. To do so we will use moment.js by directly importing it into our greeter module.
First we need to install the library via npm:
npm install moment --save
Then in our greeting module, we simply import the library exactly the same way we imported local modules in the previous point:
greeter.js
import moment from 'moment';

function greet() {
    var day = moment().format('dddd');
    console.log('Have a great ' + day + '!');
};

export default greet;
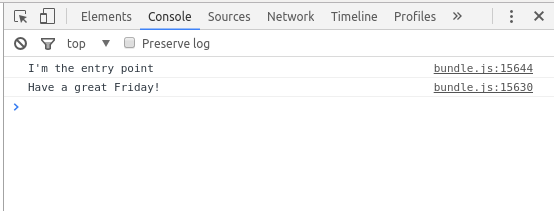
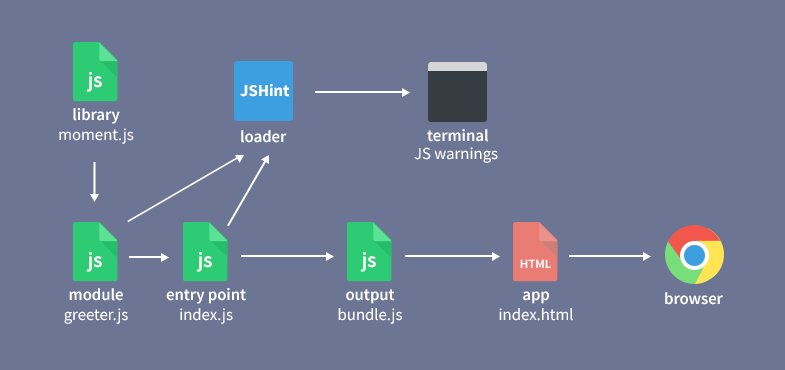
After we bundle up again to apply the changes, in the browser console we will have the following messages:
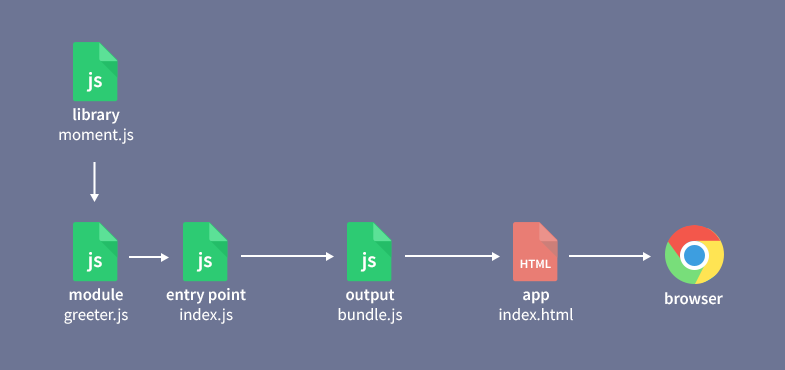
Our flow diagram now looks like this:
Note: There are other, more advanced techniques for including libraries but they are outside the scope of this article. You can read more about them here.
5. Loaders
Loaders are webpack's way to execute tasks during bundling and pre- or post-process the files in some manner. For example, they can compile TypeScript, load Vue.js components, render templates, and much more. Most loaders are written by the community, for a list of popular loaders go here.
Let's say we want to add a linter to our project that checks our JS code for errors. We can do so by including the JSHint loader, which will catch all kinds of bad practices and code smells.
First we need to install both JSHint and the webpack JSHint loader:
npm install jshint jshint-loader --save-dev
Afterwords, we are going to add a few lines to our webpack config file. This will initialize the loader, tell it what type of files to check, and which files to ignore.
webpack.config.js
var path = require('path');

module.exports = {
  entry: './assets/js/index.js',
  output: {
    filename: 'bundle.js',
    path: path.resolve(__dirname, 'dist')
  },
  // Add the JSHint loader
  module: {
    rules: [{
      test: /\.js$/, // Run the loader on all .js files
      exclude: /node_modules/, // ignore all files in the node_modules folder
      use: 'jshint-loader'
    }]
  }
};
Now when webpack is started, it will show us a list of warnings in the terminal (which we will ignore):
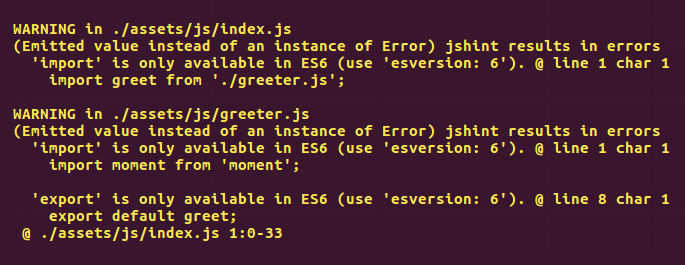
Since moment.js is located in the node_modules folder, it won't be linted by the JSHint loader:
Further Reading
This concludes our introduction to webpack! Since this is a lesson for beginners, we tried to cover only the most useful and must-know concepts of webpack. We hope the tutorial has been helpful, not too confusing, and within the 15 minute limit from the title.
In the near future, we are planning to add a second part to this tutorial, explaining how to work with CSS modules and other more-advanced features. In the meantime, if you want to learn more about webpack (and there is a lot more) we recommend checking out these awesome resources:
- webpack.js.org - The official website for the project, lots of guides and docs available there.
- Awesome webpack - Curated list of webpack resources.
- Webpack 2 - A full tutorial - Almost two-hours-long free video tutorial.
- Webpack Examples - List of various webpack configurations.
Bootstrap Studio
The revolutionary web design tool for creating responsive websites and apps.
Learn more
Comments 7
Great post :)
I have a question, How to configure webpack to accepts ES6
I have tried this, but it doesn't work:
Create a .jshintrc file in your project's root and add the following:
{
"esversion": 6
}
Thks Danny its helpful
Created an account just to say: you guys are awesome! i've been coming here every day to see the updates and i'm liking every post you write, keep the good work :)
This is a great intro to Webpack. One thing I didn't understand is why you use the
--saveflag :npm install jshint jshint-loader --saveIsn't jshint a dev-dependency?
That's a fair point, JSHint is better off as a devDependency. Webpack itself should also be a devDependency if it's going to be used only as a build tool.
Good job man. There are a few updated and simple Webpack 2 tutorials out there.