Question of the Day with CodeIgniter and MySQL
In this tutorial we will build a small application with CodeIgniter that will be backed by a MySQL database. It will present questions and give visitors the ability to post answers. There isn't an admin interface for adding or changing questions, but if you follow and understand this tutorial, you will be able to create one yourself.
As this might be the first exposure to CodeIgniter for some of you, we will start with a brief intro. If you know what CI is, you can skip directly to the code.
Note: This tutorial is quite old and doesn't work in PHP7 and above. We are keeping it online only as a reference.
First, what is CodeIgniter?
CodeIgniter is a framework for developing web applications in PHP. It will help you properly organize your code using the model-view-controller (MVC) pattern, and give you useful functionality for getting your site up and running quickly. It hides away the tedious work like building and validating forms, communicating with a database, managing error pages and much more.
There are certainly a lot of frameworks to choose from, but CI has the winning combination of a big community, nice documentation and good performance. Unless you enjoy spending time building sites from scratch (which is not a bad thing), using a framework is the smarter way to go.
You should probably start by reading the CodeIgniter introductory guide, which will give you a better understanding of how CI works. Of course, if you are experienced with PHP you can grab the zip and jump directly to the code.
Let's begin!
The database
Naturally, we will need a table for the questions, and a table for the answers.
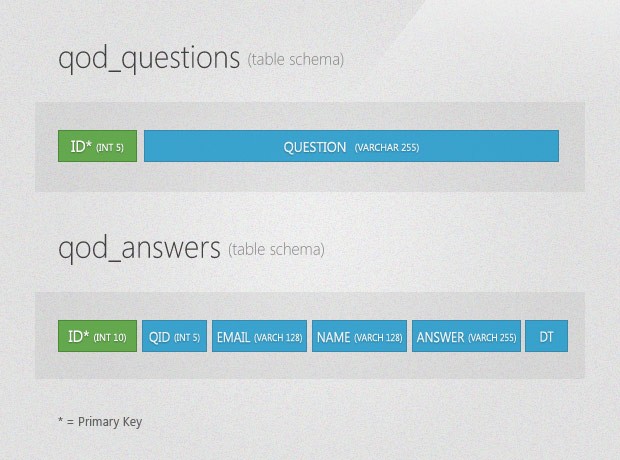
The questions table has only two fields - the ID of the question (automatically assigned with auto_increment) and the question body field. The answers also have an ID column, but they also have a qid field for the id of the question they relate to. The rest of the fields are the email and name of the author, along with the answer body and a timestamp (the dt field).
It is possible to create these tables with PHP code (CI gives us the ability to manipulate tables), but we will keep things simple and design them using a database management system like phpMyAdmin. It is even simpler for you, as I've included an export of the tables as an SQL file (tables.sql in the download archive). Import it into your database or copy/paste the code into the SQL tab of phpMyAdmin and you should be ready to go.
Setting up CodeIgniter
At this point you should download CodeIgniter. In this tutorial I am using version 2.1.0, the latest at the time of writing. Extract it in the directory where you are developing your website (move the files outside the CodeIgniter_2.1.0 folder and remove it). We will need to edit a few settings so the framework works the way we want it.
Important: This section assumes that you are downloading a fresh copy of CodeIgniter. If you only want to make the downloaded demo work, you will only need to change your $config['base_url'] setting in config.php, and add your MySQL login details to database.php. The other changes are already made (you still need to create the MySQL tables).
Edit routes.php
The application/config/routes.php file determines which controller is called by default. We need to set this to questions, which we will be creating in a moment.
// Find this line:
$route['default_controller'] = "welcome";
// Replace it with this:
$route['default_controller'] = "questions";
This will show the questions controller as the start page of the application.
Edit config.php
The application/config/config.php file holds much of the configuration settings of the framework.
// Find this line:
$config['base_url'] = '';
// Replace it with the following:
$config['base_url'] = 'http://example.com/';
The above setting, base_url, tells CI where your site is located. This information is used when forming links and including resources like stylesheets and images.
The following setting is optional. CodeIgniter adds index.php to every URL by default (like so: http://example.com/index.php/products/). If you want to hide it (so that the url becomes http://example.com/products/), you will need to edit the index_page setting:
// Find this line:
$config['index_page'] = 'index.php';
// Replace it with the following:
$config['index_page'] = '';
You will also need to create an .htaccess file, which rewrites the URLs so that they still get to index.php, although it is not included explicitly. The .htaccess I use in the demo follows:
.htaccess
Options +FollowSymLinks
Options +Indexes
RewriteEngine On

RewriteCond %{REQUEST_FILENAME} !-f
RewriteCond %{REQUEST_FILENAME} !-d

RewriteCond $1 !^(index\.php)
RewriteRule ^(.*)$ index.php/$1 [L]
Now you only need to add your MySQL connection settings so that your application can connect to your database.
Edit database.php
Find these four lines in application/config/database.php and change them to reflect your connection settings:
$db['default']['hostname'] = 'localhost';
$db['default']['username'] = 'user';
$db['default']['password'] = 'pass';
$db['default']['database'] = 'your_database_name';
Great! We are done setting up CodeIgniter, so we can now move on with the code.
Showing the questions
To show the questions we will need to create two files - a controller, which will be called when we visit the /question/ URL, and a view, which outputs the HTML code of the page. The controller will handle selecting records from the database and passing them to view. Note that we are not using any models in this app (the M in MVC). For simple applications like this one, they are purely optional and you can write CI apps without them.
/application/controllers/questions.php
if ( ! defined('BASEPATH')) exit('No direct script access allowed');

class Questions extends CI_Controller {

    public function index(){

        // Loading only the libraries and helpers that we need.
        // This is one of the things that make CI fast.

        $this->load->database();
        $this->load->helper(array('date','url'));

        // Get the id of the last question

        $res = $this->db->
                select_max('id')->
                get('qod_questions')->
                result_array();

        $id = $res[0]['id'];

        $this->show($id);
    }

    public function show($id = -1){

        $this->load->database();
        $this->load->helper(array('date','url'));

        // Select the question

        $q = $this->db->
                where(array('id'=>$id))->
                get('qod_questions')->
                result_array();

        if(empty($q)){
            // Show an error page
            show_404();
        }

        $a = $this->db->
                where(array('qid'=>$id))->
                order_by('id','desc')->
                get('qod_answers')->
                result_array();

        // Get the ids of the previous
        // and next questions

        $prev = 0;
        $next = 0;

        $res = $this->db->
                select_min('id')->
                where("id > $id")->
                get('qod_questions')->
                result_array();

        if(!empty($res)){
            $next = $res[0]['id'];
        }

        $res = $this->db->
                select_max('id')->
                where("id < $id")->
                get('qod_questions')->
                result_array();

        if(!empty($res)){
            $prev = $res[0]['id'];
        }

        $this->load->view('question_of_the_day',array(
            'question'  => $q[0]['question'],
            'answers'   => $a,
            'previous'  => $prev,
            'next'      => $next,
            'id'        => $id
        ));
    }
}
The controller is basically a class that extends CI_Controller and resides in the controllers folder. The class methods are called by the framework depending on the URL. For example http://example.com/questions/ will execute the index method, and http://example.com/questions/show/213 - the show method. In the latter case, 213 will be passed as the id parameter.
In the show method we select the question with the passed ID and display it in the view. What the index method does, is to select the id of the newest question, and also call the show method. Because it is set as the default controller, this would mean that when you visit the start page of the application (the base url you set in the previous section), the latest question will be shown.
Read more about the URLs, controllers, views, helpers and the database class of CodeIgniter in the docs.
Now let's see how the view works. When we load it, we pass an array. Each of the array keys (question, answers, previous, next and id) will be extracted and transformed into a variable. Instead of a class, the view is a simple PHP file.
/application/views/question_of_the_day.php
<!DOCTYPE html>
<html>
<head>
<meta charset="utf-8" />
<title><?php echo $question?> - Question of the day | Tutorialzine Demo</title>
<!-- Our CSS stylesheet file -->
<link rel="stylesheet" href="http://fonts.googleapis.com/css?family=Rancho" />
<link rel="stylesheet" href="<?php echo base_url()?>assets/css/styles.css" />
<!--[if lt IE 9]>
<script src="http://html5shiv.googlecode.com/svn/trunk/html5.js"></script>
<![endif]-->
</head>
<body>
<header id="blackboard">
<h1><?php echo $question?></h1>
<?php if($previous) echo anchor("questions/show/$previous",'«','class="arrow left"')?>
<?php if($next) echo anchor("questions/show/$next",'»','class="arrow right"')?>
</header>
<?php
// This method will create a link to the answer form. It is given relative
// to your index page, but will be transformed depending on your base in config.php
echo anchor("answers/add/$id",'Add your answer','class="addAnswer"');
?>
<ul id="answers">
<?php foreach ($answers as $ans): ?>
<li>
<?php
// Forming the URL of the gravatar image.
$gravatar = 'http://www.gravatar.com/avatar/'.md5( strtolower( trim($ans['email']) ) ).'?d=mm';
?>
<span class="avatar" style="background-image:url(<?php echo $gravatar?>)"></span>
<span class="meta">
<a href="#" class="author"><?php echo $ans['name']?></a>
<?php
// We are using the built-in timestamp method. We are using
// array slice to limit the shown time divisions.
$ts = explode(',', timespan(strtotime($ans['dt'])));
$t = implode(',',array_slice($ts,0,2));
?>
<i><?php echo $t?> ago</i>
</span>
<p class="answer"><?php echo $ans['answer']?></p>
</li>
<?php endforeach; ?>
</ul>
</body>
</html>
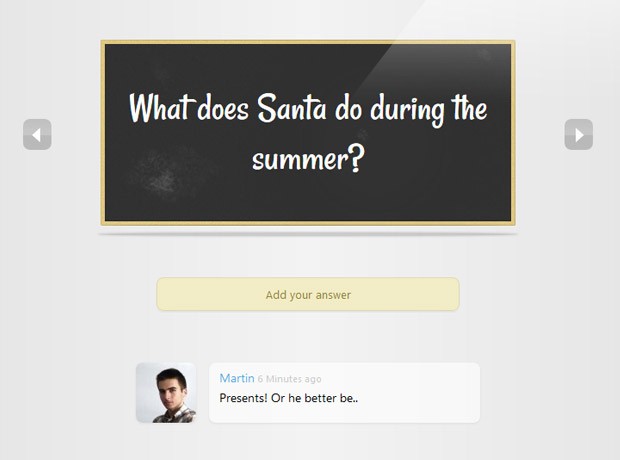
The script loops through the $answers array and outputs a li element for each answer. It assembles a gravatar URL by generating an md5 hash of the email and includes it as the background-image of a rounded span element.
This gives us a functional answer browsing page. But how do we let people answer these questions?

Posting answers
We will again need to write a controller and a view for adding answers. Here we will use a few more of the neat CodeIgniter features - generating forms and validating them. The generation is handled by the form helper, and the validation - by the form validation class.
You can see the answers controller below.
/application/controllers/answers.php
if ( ! defined('BASEPATH')) exit('No direct script access allowed');

class Answers extends CI_Controller {

    public function add($id = -1){

        $this->load->database();
        $this->load->helper(array('url','form'));
        $this->load->library('form_validation');

        // Check if there is such a question

        $q = $this->db->
                where(array('id'=>$id))->
                get('qod_questions')->
                result_array();

        if(empty($q)){
            // Show an error page
            show_404();
        }

        // Adding validation rules.

        $this->form_validation->set_rules('name', 'Name', 'required|min_length[2]|max_length[32]');
        $this->form_validation->set_rules('email', 'Email', 'required|valid_email');
        $this->form_validation->set_rules('answer', 'Answer', 'required|min_length[5]|max_length[255]');

        // If there are errors, show the form
        if ($this->form_validation->run() == FALSE){

            $this->load->view('add_answer',array(
                'question'  => $q[0]['question'],
                'qid'       => $q[0]['id']
            ));

        }
        else{

            // Otherwise insert the answer to the database

            $this->db->insert('qod_answers', array(
                'qid'   => $q[0]['id'],
                'email' => htmlspecialchars($this->input->post('email')),
                'name'  => htmlspecialchars($this->input->post('name')),

                // preserving new lines:
                'answer'=> nl2br(htmlspecialchars($this->input->post('answer')))
            ));

            redirect('questions/show/'.$q[0]['id']);
        }

    }
}
With the help of the form validation class, we are able to add rules by which the data should be validated. We will insert the answer in the database only when presented with correct data. I am using the htmlspecialchars() PHP function to escape any HTML code that might have been typed in the form fields. When the answer is inserted, we redirect to the question page. If everything went as it should, the newly added answer should be at the top.
Equally interesting is how the answer form is generated. For this we will take a look at the view file.
/application/views/add_answer.php
<!DOCTYPE html>
<html>
    <head>
        <meta charset="utf-8" />
        <title><?php echo $question?> - Add Answer | Tutorialzine Demo</title>

        <!-- Our CSS stylesheet file -->
        <link rel="stylesheet" href="http://fonts.googleapis.com/css?family=Rancho" />
        <link rel="stylesheet" href="<?php echo base_url()?>assets/css/styles.css" />

        <!--[if lt IE 9]>
          <script src="http://html5shiv.googlecode.com/svn/trunk/html5.js"></script>
        <![endif]-->
    </head>

    <body>

        <header id="blackboard">
            <h1><?php echo $question?></h1>
        </header>

        <?php

        // This will print a link to the question page
        echo anchor("questions/show/$qid",'Back to the question','class="addAnswer"');

        // Creating the form using the form helper

        echo form_open('');

        echo form_label('Name','name');
        echo form_input(array(
          'name'        => 'name',
          'id'          => 'name',
          'value'       => set_value('name'),
          'maxlength'   => '64'
        ));

        echo form_label('Email (gravatar enabled)','email');
        echo form_input(array(
          'name'        => 'email',
          'id'          => 'email',
          'value'       => set_value('email'),
          'maxlength'   => '128'
        ));

        echo form_label('Answer','answer');
        echo form_textarea(array(
          'name'        => 'answer',
          'id'          => 'answer',
          'value'       => set_value('answer'),
        ));

        echo form_submit('subm', 'Add Answer!');

        // Showing the validation errors
        $validation = validation_errors();

        if($validation):
        ?>
            <div class="errorMessages">
                <?php echo $validation?>
            </div>

        <?php endif;?>

        <?php echo form_close()?>

    </body>
</html>
As we included the form helper in the controller, we have access to all of its functions here, in the view. These functions make it easier to create forms and form fields. Of course, you can directly write the HTML of the forms, but you will have to update the code if you change the URL of your site.
At the bottom of the file we are accessing the validate_errors() function which will return a string with error messages, generated by the validation class. If there are any errors, we show them in a .errorMessages div.
That is it! All that is left is to add a pretty stylesheet and some images.
The styling
To finish this application, we need to add a stylesheet and images. Where we put them is more a matter of personal preference. I have chosen to go with an assets folder in the base directory of the application (you can see it in the zip file).
In the views I have specified the URL of the stylesheet like this: <?php echo base_url()?>assets/css/styles.css which gives us the correct location. base_url() is a function defined in the URL helper of the framework, which we've included in the controller.
As the tutorial is already quite lengthy, I won't be discussing the styling here. You can see it for yourself by opening /assets/css/styles.css in your code editor.
We're done!
I am hoping that you learned a lot in this tutorial. If you decide to go with CodeIgniter for your next website, it will be a useful experience for you. Although there is a learning curve, once you understand the basics, you will appreciate just how much time you can save. And with Sparks, you will become even more productive by adding easy to use open source modules to your projects.
Bootstrap Studio
The revolutionary web design tool for creating responsive websites and apps.
Learn more
I do not speak English, but I'm always checking the news to your site, great job.
I would like to see more posts about CodeIgniter, Thanks Martin Angelov!
Amazing script, I like your site.
Thanks for such a great Tut, I would like to see more like this about CodeIgniter and Python for the web.
Great tutorial!
More Codeigniter please!
Great Stuff Martin,
Always waited something from codeigniter.. :)
I'm using Apache on localhost, and give "internal error", follow the tutorial step by step, with the installation of MySQL database and is still giving error, I thank the help!
This could be caused by the .htaccess. Make sure that the rewrite module is enabled. If you have installed apache yourself on Linux / Mac you might need to execute
sudo a2enmod rewritein the command line.enable rewrite module and it worked right, my platform is Windows
Waiting for some nice HTML5 stuffs!
Nice! More codeigniter tuts :)
me too, waiting next codeigniter..
Great work! Tanks!
Martin, once again, awesome tutorial! You literally teach exactly what I want to learn in web development. The swiss army knife of HTML/CSS/JS(jQuery), and PHP!
One thing that held me up: on the answers controller, you put "/application/controllers/add_answer.php". I realized in the download you had that controller named "answers.php". Changing the filename to that fixed the problem :)
Thank you for catching that!
Great TUTORIAL. Explained Well. Thanks :)
More CI Tuts
Great tut but I don't think it's a good practice to use database operations on the controller. Instead they should be used in the models.
Yes, this is the generally approved method - models handle the communication with the database, and export an API for the controllers.
However, as I said in the article, as the application was small I decided to not make the example too complicated - this might be the first contact with CodeIgniter for some readers.
is there a way to make the answer section collapsible sort of like the Facebook comments that only display the 3 latest comments and you can expand to see the rest.
Hi !
Nice tutorial , but I can't make it work properly.
I did everything you said above and still does not work.
There is one arrow (left) instead of 2 (left and right, to choose the question) ..when I click it, it happens nothing, same on "Add you answer" button.
I click it and nothing happens.. and the link changes in "http://link/answers/add/9" and when I click the left arrow "http://link/questions/show/8"
What should I do?
Thank you.
the same problem .... don't know what to do((
I think you forget to set the "base_url" in your config.php
Really awesome application!
I transformed this application into my own version!
link
Only admins can post answers! Added hints and stuff! Will integrate forums (Simple Machines) with this awesome app soon :)
thanks,i learn lots from your site. please more about CI
For some reason I can't get rid of the index.php without getting a 404 on my localhost machine. Here is what I have for my .htaccess. I also tried all the settings for 'uri_protocol'. None works. Someone please advise. Thanks.
RewriteBase /question-of-the-day/
Options +FollowSymLinks
Options +Indexes
RewriteEngine On
RewriteCond %{REQUEST_FILENAME} !-f
RewriteCond %{REQUEST_FILENAME} !-d
RewriteCond $1 !^(index.php)
RewriteRule ^(.*)$ index.php?/$1 [L]
OK. I fixed my issue. It was the RewriteBase rule. I didn't have the full path to my codeigniter folder.
I need assistance again. I got the script working on my localhost, but when I upload it to a live server, I am getting a fatal error when access the page. I do not know what is wrong. Please help. Thank you.
Fatal error: Call to a member function result_array() on a non-object in /home/a1916132/public_html/members-area/question-of-the-day/application/controllers/questions.php on line 15
Nevermind. My bad. My password to db was incorrect.
Great tut ... need to use the script for a simple post system where user can make post ... this means that my focus is not on the game... i am looking for a way to add a POST WALL to my website , need help please
Loving your tutorials mate. More codeIgniter please
Wow, nice tutorial. Years have past, still a great tutorial. Nice one.