Quick Feedback Form w/ PHP and jQuery
When releasing a web product, there is nothing more beneficial than receiving early feedback from your users. Unfortunately, many websites make it unnecessarily difficult to send your feedback or lack this functionality altogether
Today we are making a simple solution to this problem. Powered by jQuery, PHP and the PHPMailer class, this form sends the users' suggestions directly to your mailbox.
The HTML
Lets start with the HTML markup. The stylesheet is included in the top of the document, and the JavaScript source files in the bottom. This improves the perceived performance of the page, as the scripts are loaded last, thus allowing for the design of the site to be displayed.
feedback.html
<!DOCTYPE html>
<html>
<head>
<meta http-equiv="Content-Type" content="text/html; charset=utf-8" />
<title>Quick Feedback Form w/ PHP and jQuery | Tutorialzine Demo</title>
<link rel="stylesheet" type="text/css" href="styles.css" />
</head>
<body>
<div id="feedback">
<!-- Five color spans, floated to the left of each other -->
<span class="color color-1"></span>
<span class="color color-2"></span>
<span class="color color-3"></span>
<span class="color color-4"></span>
<span class="color color-5"></span>
<div class="section">
<!-- The arrow span is floated to the right -->
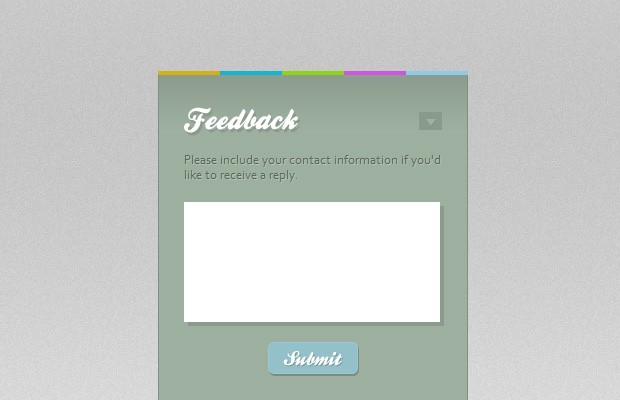
<h6><span class="arrow up"></span>Feedback</h6>
<p class="message">Please include your contact information if you'd like to receive a reply.</p>
<textarea></textarea>
<a class="submit" href="">Submit</a>
</div>
</div>
<script src="http://ajax.googleapis.com/ajax/libs/jquery/1.4.2/jquery.min.js"></script>
<script src="script.js"></script>
</body>
</html>
Inside the body you can see the #feedback div. It is anchored to the bottom-right of the window with a fixed positioning, as you will see in the next section of the tut.
Inside it reside the five color spans. These are 20% wide and floated to the left. This way they fill the exact width of the #feedback div.
Lastly is the .section container, which holds the heading, the textarea and the button.
The CSS
Moving on to the styling of the form, we first have to say a couple of words about how the stylesheet is structured. As you can see from the CSS definitions below, each rule begins with #feedback. This way we achieve the CSS equivalent of namespaces, which makes it easier to add the code to an existing site without conflicts.
styles.css - Part 1
#feedback{
    background-color:#9db09f;
    width:310px;
    height:330px;
    position:fixed;
    bottom:0;
    right:120px;
    margin-bottom:-270px;
    z-index:10000;
}

#feedback .section{
    background:url('img/bg.png') repeat-x top left;
    border:1px solid #808f81;
    border-bottom:none;
    padding:10px 25px 25px;
}

#feedback .color{
    float:left;
    height:4px;
    width:20%;
    overflow:hidden;
}

#feedback .color-1{ background-color:#d3b112;}
#feedback .color-2{ background-color:#12b6d3;}
#feedback .color-3{ background-color:#8fd317;}
#feedback .color-4{ background-color:#ca57df;}
#feedback .color-5{ background-color:#8ecbe7;}

#feedback h6{
    background:url("img/feedback.png") no-repeat;
    height:38px;
    margin:5px 0 12px;
    text-indent:-99999px;
    cursor:pointer;
}

#feedback textarea{
    background-color:#fff;
    border:none;
    color:#666666;
    font:13px 'Lucida Sans',Arial,sans-serif;
    height:100px;
    padding:10px;
    width:236px;

    -moz-box-shadow:4px 4px 0 #8a9b8c;
    -webkit-box-shadow:4px 4px 0 #8a9b8c;
    box-shadow:4px 4px 0 #8a9b8c;
}
The first element to be styled is the #feedback div. It is applied a fixed positioning, and anchored to the browser window. After this comes the definition of the .section div, and the five color spans. These spans differ only in their background colors, which are assigned separately for each class.
At the bottom are the CSS rules which define the looks of the textarea.
styles.css - Part 2
#feedback a.submit{
    background:url("img/submit.png") no-repeat;
    border:none;
    display:block;
    height:34px;
    margin:20px auto 0;
    text-decoration:none;
    text-indent:-99999px;
    width:91px;
}

#feedback a.submit:hover{
    background-position:left bottom;
}

#feedback a.submit.working{
    background-position:top right !important;
    cursor:default;
}

#feedback .message{
    font-family:Corbel,Arial,sans-serif;
    color:#5a665b;
    text-shadow:1px 1px 0 #b3c2b5;
    margin-bottom:20px;
}

#feedback .arrow{
    background:url('img/arrows.png') no-repeat;
    float:right;
    width:23px;
    height:18px;
    position:relative;
    top:10px;
}

#feedback .arrow.down{ background-position:left top;}
#feedback h6:hover .down{ background-position:left bottom;}
#feedback .arrow.up{ background-position:right top;}
#feedback h6:hover .up{ background-position:right bottom;}

#feedback .response{
    font-size:21px;
    margin-top:70px;
    text-align:center;
    text-shadow:2px 2px 0 #889889;
    color:#FCFCFC;
}
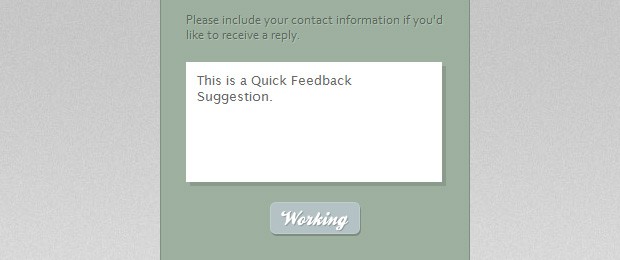
In the second part of the stylesheet, you can see the definition of the submit button. Notice that there are three button states, which are contained withing the same background image - submit.png - and shown only when necessary. These are the default state of the button, the hover state, and the "Working" version. When the button is in its "working" mode, the hover effect is disabled.
The jQuery
The feedback form has two states - minimized and maximized. When loaded, by default it is minimized to the bottom right of the screen. It is up to jQuery to maximize it when the user clicks the heading. This is done by binding an event listener and running a simple animation, as you can see from the code below.
script.js - Part 1
$(document).ready(function(){

    // The relative URL of the submit.php script.
    // You will probably have to change it.
    var submitURL = 'submit.php';

    // Caching the feedback object:
    var feedback = $('#feedback');

    $('#feedback h6').click(function(){

        // We are storing the values of the animated
        // properties in a separate object:

        var anim    = {
            mb : 0,            // Margin Bottom
            pt : 25            // Padding Top
        };

        var el = $(this).find('.arrow');

        if(el.hasClass('down')){
            anim = {
                mb : -270,
                pt : 10
            };
        }

        // The first animation moves the form up or down, and the second one
        // moves the "Feedback" heading, so it fits in the minimized version

        feedback.stop().animate({marginBottom: anim.mb});

        feedback.find('.section').stop().animate({paddingTop:anim.pt},function(){
            el.toggleClass('down up');
        });
    });
To keep the code clean, I've moved the if statements to the top and created the anim object, which holds the values fed to the animate method. Depending on whether the 'down' class exists on the arrow, we maximize or minimize the form.
The second part of script.js handles the AJAX interactions with submit.php.
script.js - Part 2
    $('#feedback a.submit').live('click',function(){
        var button = $(this);
        var textarea = feedback.find('textarea');

        // We use the working class not only for styling the submit button,
        // but also as kind of a "lock" to prevent multiple submissions.

        if(button.hasClass('working') || textarea.val().length < 5){
            return false;
        }

        // Locking the form and changing the button style:
        button.addClass('working');

        $.ajax({
            url        : submitURL,
            type    : 'post',
            data    : { message : textarea.val()},
            complete    : function(xhr){

                var text = xhr.responseText;

                // This will help users troubleshoot their form:
                if(xhr.status == 404){
                    text = 'Your path to submit.php is incorrect.';
                }

                // Hiding the button and the textarea, after which
                // we are showing the received response from submit.php

                button.fadeOut();

                textarea.fadeOut(function(){
                    var span = $('<span>',{
                        className    : 'response',
                        html        : text
                    })
                    .hide()
                    .appendTo(feedback.find('.section'))
                    .show();
                }).val('');
            }
        });

        return false;
    });
});
We are using jQuery's lower-level AJAX method - $.ajax(), to interact with submit.php. This method gives us a bit more control on the connection than the $.get() and $.post() wrappers.
One benefit of using this method is visible in the "complete" callback function. There we match the response status for the 404 not found error, and output a friendly error message to the user reminding them to check their submitURL path.
Now lets continue with the final part of the tutorial - the PHP step.
The PHP
PHP handles the data, passed with AJAX, sanitizes it, and sends an email message to your email address.
submit.php
// Enter your email address below
$emailAddress = '[email protected]';

// Using session to prevent flooding:

session_name('quickFeedback');
session_start();

// If the last form submit was less than 10 seconds ago,
// or the user has already sent 10 messages in the last hour

if( $_SESSION['lastSubmit'] && ( time() - $_SESSION['lastSubmit'] < 10 || $_SESSION['submitsLastHour'][date('d-m-Y-H')] > 10 )){
    die('Please wait for a few minutes before sending again.');
}

$_SESSION['lastSubmit'] = time();
$_SESSION['submitsLastHour'][date('d-m-Y-H')]++;

require "phpmailer/class.phpmailer.php";

if(ini_get('magic_quotes_gpc')){
    // If magic quotes are enabled, strip them
    $_POST['message'] = stripslashes($_POST['message']);
}

if(mb_strlen($_POST['message'],'utf-8') < 5){
    die('Your feedback body is too short.');
}

$msg = nl2br(strip_tags($_POST['message']));

// Using the PHPMailer class

$mail = new PHPMailer();
$mail->IsMail();

// Adding the receiving email address
$mail->AddAddress($emailAddress);

$mail->Subject = 'New Quick Feedback Form Submission';
$mail->MsgHTML($msg);

$mail->AddReplyTo('noreply@'.$_SERVER['HTTP_HOST'], 'Quick Feedback Form');
$mail->SetFrom('noreply@'.$_SERVER['HTTP_HOST'], 'Quick Feedback Form');

$mail->Send();

echo 'Thank you!';
First we use PHP's session management to keep track of how many times the user has submitted the form in the last hour, and the time stamp of the last submission. If the difference between the last form submit and the current one is less than 10 seconds, or the user has sent more than 10 messages in the last hour, he is shown an error message.
The emails are sent with the PHPMailer class. It only works with PHP5, so to use the form you would need to be running that version of PHP.
A number of PHPMailer's methods are used to configure the outgoing email. With IsMail() we are telling the class that it should use the internal mail() PHP function. AddAddress() ads the receiving email addresses (you can add more than one receiver with additional calls to the method). After adding the subject and the body, we specify the reply to address and send the message.
With this our Quick Feedback Form is complete!
Final words
You can use this form to gather quick feedback from your visitors. With such a low barrier to entry - just filling a single texbox, you will make it considerably easier for users to share their opinions and give ideas. The script is also structured so it is easy to customize and have minimal impact on your page.
Bootstrap Studio
The revolutionary web design tool for creating responsive websites and apps.
Learn more
Nice one martin!
Simply the best thing ever. Beating KissInsights!!
Great! anyone want to make a wordpress plugin? ha.
Very good!!! =)
Very nice, but if the user uses Firebug to define a function like this:
function something() {

$('div#feedback textarea').show();

$('a.submit').show();

$('a.submit').removeClass('working');

$('span.response').remove();

$('div#feedback textarea').val('12345');

$('a.submit').click();

}

setInterval('something()',100);
A load of Ajax requests sent to the server. If you use a variable stroing the working status, and not a simple class, the problem disappears.
Correct.
However that same user could just send a bunch of AJAX requests directly to submit.php with $.post.
I updated the tutorial with a fix using $_SESSION to keep track of the form submissions, which will prevent flooding.
A captcha could also be an option, but it will significantly worsen the experience.
very good work ;)
A nice and quick way to gather some feedback, thanks Martin
Martin, really nice tutorial. Thanks
very useful tut, keep them coming ;)
This is pretty friggin' awesome. =)
another awesome work. slick and efficient!
Really nice, I'd like to do something similar for python.
Eagerly waiting for this week's article. :-(
Can spam bots spam this? I know that you mentioned you changed it to prevent flooding? But is this spam bot proof? (I'm guessing not) Its a great Feedback form thoe :)
It is unlikely. The URL of submit.php is not visible in the HTML markup, so you should be protected from spam bots.
i just put this kool feedback form as testing on my website everything is going well but in the end there is problem in echo thankyou and automatically hide feedback form i still get feedback in my mail address please help me martin
I like it. I take it maybe for my other side.
You guys continually do great looking Tuts. I love it!
Hey Guys,
Thanks.
This a very clean and simple way to add a form to your site. Thanks!
oh my, just awesome. good to be here :)
keep up the good work
I have been known to be overly picking in semantics before, and for this example I don't see the point in marking up 5 empty spans for the border at the top. If you're putting markup then surely that should be an image?
However, love the article and final effect!
I agree with Alex on this one. The rainbow-like colored border should definitely be an image background in this case. No extra span tags needed.
Again, KUDOS to Martin for the tutorial!
I really like how easy this was to put together and how great it works! Thank you.
Really nice tutorial - yes was wondering about the capture. On my sites anything without it just attracts too much spam. The user experience is worse for sure but thats the price of the spammer. Anyone know a spammer ?
@Martin Angelov - from your footer I thought MY MEMORY WAS BAD !
I am a starter and i like the tutorial, i downloaded the files and i changed in the submit.php the first line, my emailadresse, I have on my server PHP5 working, But something is going wrong, It is not working ,i can type a message ,there is not an alert Thank you, and also i do not get a mail, Is there somebody that will help me, thanks ellen from holland
It is oke now , i work with windows so maby that was the problem, i just took an old php sendmail script and all worked fine, thank you for the tutorial, ellen
Where do we configure the e-mail id to which the feedback will be sent to?
Invalid address: You must provide at least one recipient email address. Thank you!
got it thanks !
Please notice, on loading of the website, the feedback sits up too high, If you click the open and close it goes back to where it belongs? Can someone clarify this anomaly for me please and tell me where I can rectify this.
Thank you
I tried to get it to the work. After clicking 'Send' it shows 'Working' and then the ontent of the form disappear, have no idea I sent it and where - my email box was empty.
Hi again, Martin:
It would be nice to hear from you on this. I'm sure that it's a very small problem, but try as I might, I can't find it.
Thanks a million.
Denise
" This site is the place where I get to teach and share my passion for the web."
Really? I waited for more than two weeks. Finally you published my second request for a response but killed my first query and offered not a peep of help. Apparently I've wasted many hours.
Very nice..! is possible integrate this in my wordpress website?
Method jquery live() is depreciated now. Use on(). (script.js)