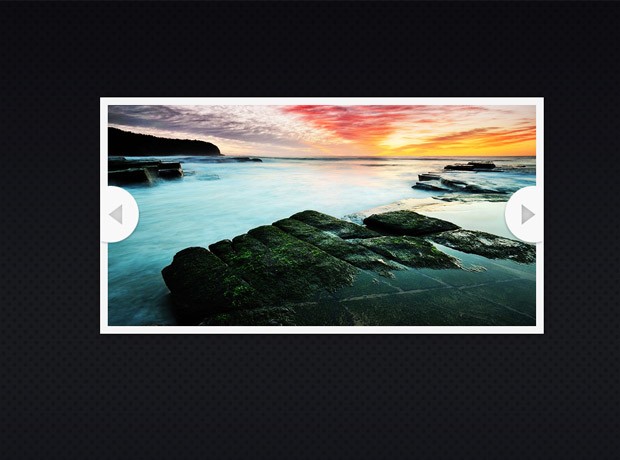
An HTML5 Slideshow w/ Canvas & jQuery
You've probably heard a lot about the new HTML5 canvas element. As the name implies, this is a special element that allows us to create and modify graphics. In addition, we can also use it like any other element on the page - apply jQuery animations on it, listen for events and integrate it deeply into our layouts.
All uses of canvas you've come so far are probably limited to games and other proof of concept demos. Today, however, we are doing something practical - we are making a progressively enhanced slideshow with a fancy transitioning effect, which is perfectly functional in older browsers as well.
Update: Per popular demand, you can now download an auto-advancing version of this slideshow. Read more in this short tutorial.
The Idea
With JavaScript, we are going to apply a special filter to every image in the slideshow. We will create a new version of the images, with higher contrast and more vivid colors, and store it in a canvas elements.
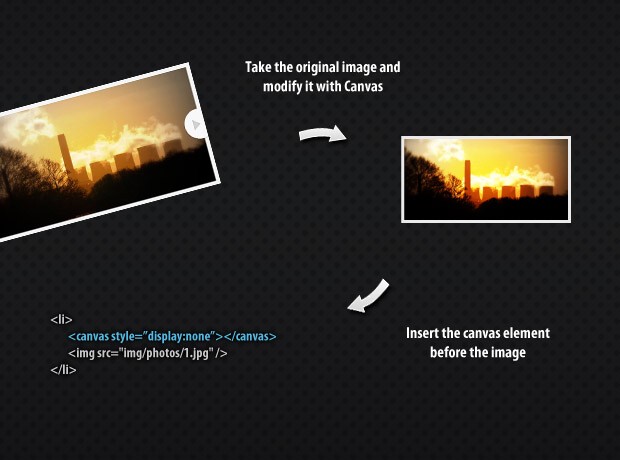
When the user chooses to proceed to another slide, the canvas is shown with a fadeIn animation, creating a smooth lighting effect.
The HTML
The first step in creating the slideshow, is laying down the HTML markup of the page.
html5-slideshow.html
<!DOCTYPE html>
<html>
<head>
<meta http-equiv="Content-Type" content="text/html; charset=utf-8" />
<title>An HTML5 Slideshow w/ Canvas & jQuery | Tutorialzine Demo</title>

<link rel="stylesheet" type="text/css" href="styles.css" />

</head>

<body>

<div id="slideshow">

    <ul class="slides">
        <li><img src="img/photos/1.jpg" width="620" height="320" alt="Marsa Alam" /></li>
        <li><img src="img/photos/2.jpg" width="620" height="320" alt="Turrimetta Beach" /></li>
        <li><img src="img/photos/3.jpg" width="620" height="320" alt="Power Station" /></li>
        <li><img src="img/photos/4.jpg" width="620" height="320" alt="Colors of Nature" /></li>
    </ul>

    <span class="arrow previous"></span>
    <span class="arrow next"></span>
</div>

<script src="http://ajax.googleapis.com/ajax/libs/jquery/1.4.2/jquery.min.js"></script>
<script src="script.js"></script>
</body>
</html>
First we have the HTML5 doctype, followed by the head section of the document. After the title tag and the stylesheet we move on with the body.
You can see that the markup for the slideshow is really simple. The main containing div, #slideshow, holds an unordered list and the previous and next arrows. The unordered list holds the slides, with each defined as a LI element. As shown in the illustration above, this is where the canvas elements with the modified versions of the images are inserted.
Lastly we include jQuery and our script.js, to which we are going to get back to in the last step of this tutorial.
The CSS
All the styles for the slideshow reside in styles.css. I've used the #slideshow id of the main containment element as a namespace, so you can easily append these styles to your stylesheet without worrying about conflicts.
styles.css
#slideshow{
    background-color:#F5F5F5;
    border:1px solid #FFFFFF;
    height:340px;
    margin:150px auto 0;
    position:relative;
    width:640px;

    -moz-box-shadow:0 0 22px #111;
    -webkit-box-shadow:0 0 22px #111;
    box-shadow:0 0 22px #111;
}

#slideshow ul{
    height:320px;
    left:10px;
    list-style:none outside none;
    overflow:hidden;
    position:absolute;
    top:10px;
    width:620px;
}

#slideshow li{
    position:absolute;
    display:none;
    z-index:10;
}

#slideshow li:first-child{
    display:block;
    z-index:1000;
}

#slideshow .slideActive{
    z-index:1000;
}

#slideshow canvas{
    display:none;
    position:absolute;
    z-index:100;
}

#slideshow .arrow{
    height:86px;
    width:60px;
    position:absolute;
    background:url('img/arrows.png') no-repeat;
    top:50%;
    margin-top:-43px;
    cursor:pointer;
    z-index:5000;
}

#slideshow .previous{ background-position:left top;left:0;}
#slideshow .previous:hover{ background-position:left bottom;}

#slideshow .next{ background-position:right top;right:0;}
#slideshow .next:hover{ background-position:right bottom;}
We can split our visitors, which will interact with the slideshow, in three main groups:
- People with JavaScript switched off. These users will only see the first slide, and will be unable to switch to a different one;
- People with JavaScript switched on, but with no support for canvas. For visitors from this group, the slides will change instantaneously, without transitioning effects;
- People with JavaScript enabled and canvas support. These are people who use the latest versions of Firefox, Safari, Chrome, Opera and the soon to be released IE9. They will enjoy the slideshow in its full glory;
To account for the first two groups, a number of rules are applied to the stylesheet. With the help of the first-child selector, only the first slide is shown by default. Also a number of overflow:hidden rules are applied in a number of places just in case.
The JavaScript
Moving on to the last part of the tutorial - the JavaScript and jQuery code. As we already explained the basic principles behind the effect, lets move straight to the execution.
script.js - Part 1
$(window).load(function(){

    // We are listening to the window.load event, so we can be sure
    // that the images in the slideshow are loaded properly.

    // Testing wether the current browser supports the canvas element:
    var supportCanvas = 'getContext' in document.createElement('canvas');

    // The canvas manipulations of the images are CPU intensive,
    // this is why we are using setTimeout to make them asynchronous
    // and improve the responsiveness of the page.

    var slides = $('#slideshow li'),
        current = 0,
        slideshow = {width:0,height:0};

    setTimeout(function(){

        if(supportCanvas){
            $('#slideshow img').each(function(){

                if(!slideshow.width){
                    // Saving the dimensions of the first image:
                    slideshow.width = this.width;
                    slideshow.height = this.height;
                }

                // Rendering the modified versions of the images:
                createCanvasOverlay(this);
            });
        }

        $('#slideshow .arrow').click(function(){
            var li            = slides.eq(current),
                canvas        = li.find('canvas'),
                nextIndex    = 0;

            // Depending on whether this is the next or previous
            // arrow, calculate the index of the next slide accordingly.

            if($(this).hasClass('next')){
                nextIndex = current >= slides.length-1 ? 0 : current+1;
            }
            else {
                nextIndex = current <= 0 ? slides.length-1 : current-1;
            }

            var next = slides.eq(nextIndex);

            if(supportCanvas){

                // This browser supports canvas, fade it into view:

                canvas.fadeIn(function(){

                    // Show the next slide below the current one:
                    next.show();
                    current = nextIndex;

                    // Fade the current slide out of view:
                    li.fadeOut(function(){
                        li.removeClass('slideActive');
                        canvas.hide();
                        next.addClass('slideActive');
                    });
                });
            }
            else {

                // This browser does not support canvas.
                // Use the plain version of the slideshow.

                current=nextIndex;
                next.addClass('slideActive').show();
                li.removeClass('slideActive').hide();
            }
        });

    },100);
With document.createElement(), you can create any DOM element that you like. So to test whether the browser really supports canvas (and doesn't just create a generic element), we use the in operator to check for the getContext() method, which is an integral part of the standard. The result of this check is used throughout the code to account for users with browsers that do not yet support canvas.
Notice that the calls to the createCanvasOverlay function (which we will discuss in the second part of the code) are enclosed in a setTimeout statement. This is done because the function is processor intensive and might cause the browser window to stall. setTimeout breaks out of the main execution path and runs the code asynchronously, maximizing the responsiveness of the page.
script.js - Part 2
    // This function takes an image and renders
    // a version of it similar to the Overlay blending
    // mode in Photoshop.

    function createCanvasOverlay(image){

        var canvas            = document.createElement('canvas'),
            canvasContext    = canvas.getContext("2d");

        // Make it the same size as the image
        canvas.width = slideshow.width;
        canvas.height = slideshow.height;

        // Drawing the default version of the image on the canvas:
        canvasContext.drawImage(image,0,0);

        // Taking the image data and storing it in the imageData array:
        var imageData    = canvasContext.getImageData(0,0,canvas.width,canvas.height),
            data        = imageData.data;

        // Loop through all the pixels in the imageData array, and modify
        // the red, green, and blue color values.

        for(var i = 0,z=data.length;i<z;i++){

            // The values for red, green and blue are consecutive elements
            // in the imageData array. We modify the three of them at once:

            data[i] = ((data[i] < 128) ? (2*data[i]*data[i] / 255) :
                        (255 - 2 * (255 - data[i]) * (255 - data[i]) / 255));
            data[++i] = ((data[i] < 128) ? (2*data[i]*data[i] / 255) :
                        (255 - 2 * (255 - data[i]) * (255 - data[i]) / 255));
            data[++i] = ((data[i] < 128) ? (2*data[i]*data[i] / 255) :
                        (255 - 2 * (255 - data[i]) * (255 - data[i]) / 255));

            // After the RGB channels comes the alpha value, which we leave the same.
            ++i;
        }

        // Putting the modified imageData back on the canvas.
        canvasContext.putImageData(imageData,0,0,0,0,imageData.width,imageData.height);

        // Inserting the canvas in the DOM, before the image:
        image.parentNode.insertBefore(canvas,image);
    }

});
This is where the magic happens. The canvas element is basically one big piece of paper on which you can draw with JavaScript. The code above creates a blank canvas element and imports the image, which was passed as a parameter, with the drawImage() method. After this, we use the getImageData() method to export the contents of all the pixels of the canvas into the imageData array.
What is more, for each pixel of the image we have four entries in the array - one for the red, green and blue colors, and the alpha channel (the transparency). These are all numbers from 0 to 255. The main for loop has to go through all the pixels and apply a special filter equation that lightens the lighter colors and darkens the dark ones. It is the same effect that you get by using the overlay blending mode in photoshop.
The main for loop has to do an incredible amount of work - for a 600x400 pixel image it does 240 000 iterations! This means that your code must be as optimal as possible. This is why, in the loop, I copied the formula three times instead of calling a function. By removing the function calls the loop became nearly three times faster.
Be aware that the rendering time will grow proportionally, if you decide to include more slides, or use larger images.
With this our HTML5 Canvas Slideshow is complete!
Final words
The canvas element opens a whole new way of building rich internet applications. For those of you who are curious, on a relatively new PC, it takes Firefox 1.2 seconds to generate all four canvas images, while Chrome is faster at 0.67s. Considering the amount of work that is done, this is a really impressive achievement.
Bootstrap Studio
The revolutionary web design tool for creating responsive websites and apps.
Learn more
Thank you for this extraordinary tutorial!!!
An excellent tutorial, well done and thanks
Awesome sauce! I was literally thinking how to make a simple slideshow/gallery with HTML5 and CSS3, and this is great! Thanks for being on the ball, Martin!
O.o! cool! ^^
Thanks for the tutorial. I just tried this myself but I couldn't get it to run on IE9 beta. I also tried downloading your files and running in the extracted folder. Still no luck. Any known issues with IE9 beta?
I fixed the bug with IE9 beta and implemented one more optimization in the main loop. The demo zip is updated with the new code.
Hi Martin, thanks for this!
I made some changes for a friend (f.ex. dynamically sizing the images) and added basic PHP code to read out a directory.
Demo: http://www.nivonova.com/dev/Gallery/
Source: http://www.nivonova.com/dev/Gallery/source.zip
Cheers!
wow! html5~ nice ~~Share it~
Thanks~
Looks nice. Thanks for sharing it :)
Is any of the content in the slider list indexable? I like the concept, but canvas might not be the best option.
The canvas elements are created on top of the regular slideshow content, so it is visible to search engines.
great tutorial once again. nice work!
I'm using firefox 3.6.10. The online demo run fine but the source code gives me a security error: Security error" code: "1000 var imageData = canvasContext.getImageData(0,0,canvas.width,canvas.height),
When I typed everything and saved in localhost, I get this:
uncaught exception: [Exception... "Component returned failure code: 0x80040111 (NS_ERROR_NOT_AVAILABLE) [nsIDOMCanvasRenderingContext2D.drawImage]" nsresult: "0x80040111 (NS_ERROR_NOT_AVAILABLE)" location: "JS frame :: http://localhost/slide/script.js :: createCanvasOverlay :: line 100" data: no]
There are some security limitations when using canvas on localhost. You will have to upload it somewhere to test it.
@Ibrahim
Replace (line100):
canvasContext.drawImage(image,0,0);
With:
try {
try {
canvasContext.drawImage(image,0,0);
}
catch (e) {
netscape.security.PrivilegeManager.enablePrivilege("UniversalBrowserRead");
canvasContext.drawImage(image,0,0);
}
}
catch (e) {
throw new Error("unable to access image data: " + e)
}
Replace (line 117):
var imageData = canvasContext.getImageData(0,0,canvas.width,canvas.height),
data = imageData.data;
With:
try {
try {
var imageData = canvasContext.getImageData(0,0,canvas.width,canvas.height),
data = imageData.data;
}
catch (e) {
netscape.security.PrivilegeManager.enablePrivilege("UniversalBrowserRead");
var imageData = canvasContext.getImageData(0,0,canvas.width,canvas.height),
data = imageData.data;
}
}
catch (e) {
throw new Error("unable to access image data: " + e)
}
This is only a localhost issue though :)
Hi, This is a fantastic slider and tutorial. I have a bit of an issue though.. the slider seems to be working fine in Firefox but not in Chrome or IE8.
Any ideas on how to fix that? :)
Very Good, :)
Thanks!!!
That´s really great tip!
Wow, yet another great article. I'm not sure wherer you guys find the time to create all these brilliant scripts. Keep up the good work Tutorialzine!
Thank you for the awesome comments guys! Glad you find it useful.
Hi, love the tutorial. Great work, One question i have, is there aline of code that i can add so that the slides go automatically rather than having to click on the arrows? and the images loop? this would be great if it can be done.
Keep up the great articles.
Yes, you can try this short tutorial.
From there you can download an auto-advancing version of this slideshow.
A fantastic tutorial/script. I think this will come handy.
aw aw aw...this is real know...
xoxoxoxo ^_^'
thank you for tutor :)
Great Work! Very useful. I like HTML5 Tutorials :)
Awesome, keep up the good work.
Very cool! I'll have to make use of this in an upcoming projects. Thanks!
An old flash trick to speed up the loop even more, is replacing data.length by a variable you've filled with the length before the loop (checking how long an array is 240.000 times seems like a waste ;))
Thumbs up for the great post!
I agree, Eric. It does make a difference in such an intensive loop.
The length is, however, cached in the z variable, so the data.length is not looked up on every iteration.
Great script! I will read the tut and want to use the gallery.
wanting to implement on my site
but getting a java script error in FF 3.6.10 as Security error" code: "1000 var imageData = canvasContext.getImageData(0,0,canvas.width,canvas.height),
but don't know how to remove this
any suggestion
You are probably trying to run it on your local PC. There are some security restrictions imposed from the browsers in this situation.
You'd have to upload it to your host to make it work.
This looks like an excellent HTML5/jQuery slideshow! I have run into a problem, however. I cannot get the images to actually change when clicking on the next/prev buttons. I downloaded the zipped files and uploaded them to my server, but even without modifications, it does not function. I'm using the latest version of Chrome. Same problem w/ FF.
Any Ideas?
Thanks!
It sounds to me that the jQuery library was not being loaded. You could have been temporarily unable to connect to Google's CDN (where jQuery is hosted).
If the problem persists, try downloading the library directly from jquery.com and uploading it along with the rest of the scripts (remember to change the include address in html5-slideshow.html).
Martin,
Thanks for your response. There were two issues. The first being exactly like you said -- a problem with connecting to the Google CDN.
A second problem I found was that using the script as-is, you cannot place any ul elements above the slideshow . (I am already using a ul in my nav section in the page header.
Is there a way to modify the JS so that it targets the slideshow ul and ignores all others?
Thanks again for your great help and tutorial!
Nevermind, here is the modification (if anyone else needs it):
var slides = $(‘#slideshow ul li’),
Thanks again for this great slideshow!
Thank you for the fix, Eric, I ported it to the tutorial & demo. Hopefully nobody would run into this problem again.
Excellent tutorial and file .. one quick question .. is there any way this should change images automatically and with arrows as well? anyone please advice.
This is great!! Exactly what I've been looking for for a while now! I'm still pretty new at all of this and I'm also interested in making the slide show auto advance. Any advice on how to do this or at least somebody who can point me in the right direction where I could find this info? Thanks.
I'm totally in for that as well. I really like the to have a slideshow like this but which advances to the next slide automatically..
So without the arrows and just an automatic slideshow looping through the pictures.
Is there a line of code which I can add so that this happens?
Cheers for any comments..
Yes, you can try this short tutorial.
From there you can download an auto-advancing version of this slideshow.
Great tutorial and good to see the possibilities HTML5 will bring once it has been adopted by all major browsers. Thanks for the share!
great it's quite usefull!
Hi guys, awesome job. I've downloaded the zip but don't work @all. I've tested on Firefox 4 and Chrome 10 on Ubuntu and Windows 7 and the HTML example looks good but simply doesn't slide the images. Any ideas? Thx in advance!
There are security restrictions in place that prevent it from working directly with the file system. You will need to upload it to a external web host, or run it through xampp.
Hey Great work, I love it. But i need a script which can fade automatically ? Can anyone help ?
very nice tutorial, i used it in my site and i wanted the changes over 7 sec , the problem now is in IE that i do not see the first image now for 7 sec. Help please (ellen from holland)so now i have it now on 3sec, but it is not what i want
Hey, nice work with the tutorial.
I created a small banner for a website. The problem is that I can't find a way to make it work in two different slideshows in the same page at the same time.
Any suggestions?
I guess I should modify the JavaScript, but I don't know what exactly.
Did you have any luck with this? Im trying to do a similar function...?
Thanks for sharing. Easy to follow and very useful.
This is a GREAT option for my flash slide shows.... since they can't be viewed on smart phones.. I ran into one problem though. It works great on a regular computer no matter how many slides... but on smart phone if I have more than 14 slides it will not work... any ideas????
Hi Martin,
I have implemented this on a site I am building which is not live atm. I have an overlay using a negative margin over the images... which is fine, but when switching between pics the next pic will stay on top for just a sec until in place and then fall in place. I would like to show you what it is doing to see if you can help, but I can not post the link publicly. Would you mind helping? Thank you!
Hello,
I was wondering if there was a way to have more than 1 slider on the page and not have it slide through both sliders at once when the arrow is clicked? It would be an amazing addition to my site if there was a way to implement this.
Great Slideshow but i have one problem.
I'd like to use a different size of images. But when i change it, the Canvas image still has your original size. You wrote, that it will all be done in the css. And it looks like the script.js is getting the right size. The canvas is size is like mine, but the image not. What am I doing wront. Thx for help.
Thanks.. I've given it a shot but ran into the security error in createCanvasOverlay which I am pretty sure I can work around.
Thanks!
I am trying to use this with JqueryMobile using content-primary and content-secondary classes to automatically change from single column on handheld device to 2 column on tablets and desktops, and I cannot get the icon arrows to appear. The link area where the arrows should be is there and works, as does the slideshow (sweet), but no arrows. Any ideas
Ran across this tutorial when I was checking out the auto advancing tutorial. (Really glad I found that, thank you!)
I implemented this tutorial on a site, but now I want to remove the canvas manipulation, but keep the fade transition. I've tried a few combinations of code, but end up breaking the code. Any guidance on what to remove to stop the canvas, but keep the fade?
Thanks!
@Yazmin,
I had the same problem, and I found out that by taking out the three color calculation (the data[i]) will remove the canvas function but still have the fade in/out function. Hope this helps.
I try this demo on my host but I'm getting security error on this line -> var imageData = canvasContext.getImageData(0,0,canvas.width,canvas.height);
How can I fix this?
Great work Martin...
Hi!
Thank you for a nice slideshow that I can use in my website!
One question though; I have two slideshows in the same page, as the images are grouped under different headlines. It seems that the slideshow gets confused if you have two instances of the slideshow in the same screen and starts to occasionally show only white images.
Any idea how to fix that? Should I use class attribute for the slideshow instead of id, as there are two instances...?
Ok, I solved the issue by making two instances of slideshow; with their own style and javascripts files. Maybe not the most elegant way but it works :-).
(Actually I guess the two instances could work well with same id, if the amount of slides is same in both).
But thanks again of a nice slideshow code!
Great slider, very useful and easy to follow along. Is there anyway to incorporate any captions in the slideshow? That would really be a useful feature.
Thanks again, great work and thanks very much for sharing.
Awesome tutorial.
Can it be used to slide texts too without converting the text into image format?
If it can then it will solve my problem :)
Great slider, really like it. Is anyone else having an issue with the size of the new image? I have resized the slider but when it generate the new image with the colour change it seems to make it smaller in width than the original?
What am I doing wrong?
Thanks in advance!!!
Very nice work Martin. But i'm getting a wired bug/issue with your material. I'm trying to create a slide slow using your code and every thing is working fine except this one. whenever i try to move to next slide then code tries to zoom at that top left part of image and then moves to next slide and same happens with every click either on next or previous. How to get rid of this bug? Imp: original pic dims are: 708x1005 and in html code i have set them to width="450" height="480".
Make sure your pictures are set to 72 dpi.
great.thanks for sharing
How I solve this, that do not have to click on the arrows, but when I moved over the mouse detect and move in that direction?
First Thank you for such a great tutorial... Second I could make the slideshow works on all the browsers except Firefox 10.0.2, it does not give me any error, but I am not sure why it is not working..
Hi guys. Does anyone know why my arrows don't appear on the slideshow? the slideshow actually works when I click on it but the arrows arn't showing. Any ideas?
I'm having the same problem as Paul. Not sure why they won't appear.
Phil,
Same thing with me - no arrows :( I would very much like to know why..
Wow, such an indepth tutorial. I am going to try it out myself. If it works, I will get back yo you.
Hey,
The Slideshow is working RIDICULOUSLY AWESOME. I am having 1 problem - it is not working in Chrome. After reading through the comments, i added this to the .js:
var slides = $('#slideshow ul li'),
but it is still not working - any ideas??
Hi,
I also have the problem with Chrome.
Do you have a solution for this yet?
Really great tutorial otherwise.
The slideshow works perfectly in the Demo, but when I downloaded it and ran it, the slideshow did not work. I am running the latest version of Google Chrome and it gives me the error "Unable to get image data from canvas because the canvas has been tainted by cross-origin data." in the script.js file. Does anyone know how to fix this error?
And still one awesome tutorial! Thanks!
not working i smartphone....
how to make it touchable...and auto play
Hai,
Very Great Tutorial. i need to fade automatically . Can i have any Solution ?
I wrote a few minutes ago about this awesome script not working on my iPhone after it did previously work before installing auto advance. I went to look for answers after finding a "javascript execution exceeded timeout" error while in debug mode in safari (iphone). It appears there may be a bug in safari that is related to line 115 of your javascript where the math may exceed the time safari will allow for the computation.
You may need to break that computation down into multiple steps so that this does not continue to happen. If it does occur, the browser has to be "killed" in order to get javascript working again. :(
Hi, I like this tutorial. But I have a problem substitute img src="img/photos/1.jpg"
into a http url, such as
http://en.olympiahall.com/vmedia/390/musicstory/2974-alizee-400-400.jpg
Any solution?
Hi. This was a great tutorial. But now the latest Google Chrome update (18.0.1025.168) has a bug in the canvas rendering. The fade transition will not work between the slides. There is flickering. It also effects video embedded elsewhere on the same page - causing the videos to reload every time a slide transitions. Has anyone come across any kind of fix for this?
I saw something about alpha not resetting properly to 1 and expressing alpha as rgba (0,0,0,1) or some such - but I'm not sure where or how it applies.
Any help would be appreciated - I have canvas slide shows in a number of my sites and they are all malfunctioning in Chrome.
Paul, Phil & Cathrine:
I had the same issue, you need to amend your CSS file to point towards the arrows. Be aware that if you're using Dreamweaver to add this in to your webpage this gave me some issues, you may be better off doing it manually ala notepad.
I have an issue though; I want to include multiple slideshows per page but am having trouble getting the scripts to work in any fashion. I've copied the script.js and autoadvance.js but aside from renaming all instances of slideshow to slideshow2 I can't get the subsequent slideshows to work. Any tips?
I have loaded the latest versions of the script.js and autoadvance.js file and the slideshow still does not work in IE9 (9.08112.16421). Update v 9.0.6
Works perfectly in Firefox, Chrome and Safari (for PC)
Thanks in advance for your assistance!
Thanks for the great tutorial. I put the slideshow up on a website and it works great but I can't see the next and previous arrows. They are working fine and I can click on them to move forward and backward throught the slideshow. I just can't see them. Any ideas? Thanks
how can i do to meke this slideshow change pics automatically?
There is a tutorial on that at this link.
http://tutorialzine.com/2011/01/how-to-make-auto-advancing-slideshows/
that's cool I just have a problem my arrows don't appear on the slideshow
You would need to upload the arrow.png
Then go into the css and fine the part with arrow.png and make sure it's pointing to the correct directory.
Hi,
I'm trying to use this slideshow on my site but i can't get it to appear on ie9.
It works perfectly on Firefox and Chrome but on ie9 it's not showing the first image and the images are showing only half.
Please help!
Hey. Just tried implementing this one for a project of mine.
I think there might be something up with my canvas element, because as it's supposed to do a photoshop kind of "overlay" function, mine just fades to black.
I've tried it out locally and on my server, the markup,css and scripts have all been written according to the tutorial and copied over a second time straight from the page to make sure there was no mistakes made - still no overlay effect.
I'm using Firefox 14.0.1
Hi,
Nice slideshow and awesome tutorial. But I have a question. How do I adapt this to support images of different dimensions. I have some images in landscape and a few in portrait. I have changed the canvas size, but there is a big white space to the left for portrait and underneath for landscape. I want to know if there is a cleaner way to implement it.
Thanks.
For the sake of time and not spending hours on this, I have just created 2 separate slideshows with 2 separate scripts on the same page to allow for both portrait and landscape type photos if that helps anyone looking for a similar solution.
Images are not sliding in Chrome. According to google I have the latest version (21.0.1180.79)
I like this tutorial but not working i smartphone....
how to make it touchable
This is a wonderful tutorial, this is the best transition I have ever seen. Still, as Garry said "I want to include multiple slideshows per page but am having trouble getting the scripts to work in any fashion. I've copied the script.js and autoadvance.js but aside from renaming all instances of slideshow to slideshow2 I can't get the subsequent slideshows to work.". I am working with the bootstrap CSS framework on a wordpress platform. I am desperately trying to adapt the code to bootstrap's slideshow, a more dynamic version of this slideshow would be amazing
I am able to switch from an image to a vimeo video, and then play the video. Once the slider has moved to the video, it will not move to the next (hopefully video) or to the previous slide.
Any Suggestions?
Thanks!
It doesn't seem to work in Chrome (I am only able to see 1 image). How do I fix this?
Thanks.
Can someone help with removing the zoom/overlay function, and just insert a fade when you click onto the next slide?
Brilliant tutorial, very helpful. I am trying to replace the demo images with just simple text instead of an image. doesn't work for me though. I presume this works with text and not just images?
Brilliant article. I really like the functionality of the code. The time it takes to load also is pretty good.
Thats awesome, thanks :)
Works amazing!
I am having difficulty with various sized images auto centring inside a div.
Any suggestions?
Thanks in advance!
Hi, Martin.
Nice piece of code.
I've used in a couple of sites and works like a charm.
But now I'm implementing it in a new one and even if canvas id is display none, I can see the small copies of every image whenever I hit next.
Any clue?
Hi Marty, thanks for sharing, love the simple way this can be implemented. Do you have a version with a pause function on it, like the one on the bbc home page?
I'm wanting to use this for a government website, but accessibility standards means there has to be a pause button on there.
Cheers
Hi,
First of all thanks for the great tutorial!
Second, I want to make the slider responsive but I can't get it to work. What part in the CSS should I edit for making it responsive?
If I try making the positions relative it messes up the layout of the slider.
Please help..
Thanks in advance!
Orhan
I got it! I simply added this
#slideshow img{
    width:100%;
}
Thanks anyway! :)
Great contribution, truly appreciated.
Hello, Martin!
I'm new to jQuery, HTML5 and CSS3, and I'm sure many of inserting slideshow independent in the same HTML file.
I noticed that it used a div # slideshow, but I think I needed it to be a class. I tried but could not ... I believe we need to change the JS too, but do not know how.
Could you give me a hand?
Thank you!
I couldn't resist commenting. Perfectly written!