Making A Slick Content Slider
Introduction
Web masters constantly search for ways to optimize the way content is presented on their sites. With the advent of terms like "above the fold" it is ever so important to provide eye-catching and functional user interfaces.
In this tutorial we are going to make a slick content slider for a computer shop, with the help of jQuery and the MopSlider plugin. The slider is going to be generated with PHP and we are using a plain txt file as a data source for the notebook configurations. We are also using laptop icons from tonev.deviantart.com.
Step 1 - Data Source
When designing a new feature you have many choices on how to store the needed data. For the purposes of this tutorial, we are putting all the laptop configurations into a single plain txt file. This strategy is perfect for simple read-only web apps, which operate with less than 100 items.
The advantages over a regular MySQL data storage is that you need only a text editor to modify the data and add new models, not to mention the greater level of simplicity in the implementation.
Below is a sample structure of the text file.
db/slider.db.txt
Product Model | Product Description | Price | Path To Image | URL
Second Product | Description | Price | Path To Image | URL
Third Product | Description | Price | Path To Image | URL
Every item occupies its own row. The number of rows is the number of items in the content slider.
There are several data columns, divided by “|”. These are the model, description, price, product image and a URL for more information. You can modify this structure by adding or removing columns, but remember to apply the changes to the demo.php loop, which we will take a look at in a moment.
This file is located in the db folder. To prevent our textual database from being typed in and opened in a web browser, we will have to add a special .htaccess file. This is executed by the Apache web server and the rules it contains are applied to the current directory.
db/.htaccess
# This will prevent opening the db dir in a browser

deny from all

# Will return a 403 error
This line prevents the directory and all its files from being opened in a web browser.
Now lets take a look at the XHTML.

Step 2 - XHTML
The markup of the page is pretty straightforward.
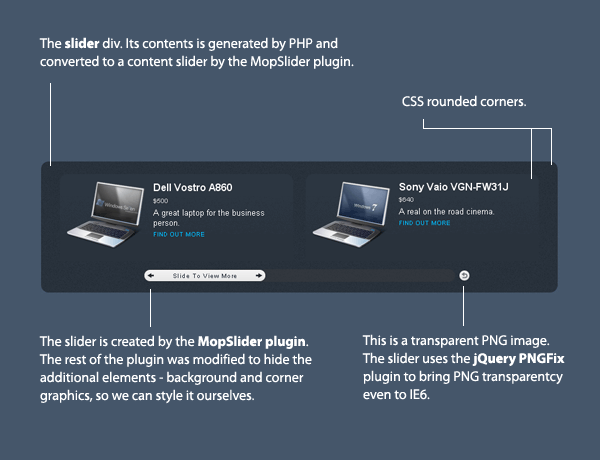
<div id="main">   <!-- The main container -->
    <div class="titles">  <!-- Placeholder for the headings -->
    <h1>Notebooks</h1>
    <h2>Fresh on the market</h2>
    </div>

    <div class="container">   <!-- Styled and rounded -->
        <div id="slider"> <!-- Contains the generated products -->
        <?=$products?>    <!-- PHP var that holds the products -->
        </div>
        <div class="clear"></div>
        <!-- Clearing the floats, the old-fashioned way -->
    </div>
</div>
It is pretty much self explanatory. Now lets move to our CSS.
Step 3 - CSS
It is CSS that made it possible to write such clean and simple XHTML as above.
demo.css
body,h1,h2,h3,p,quote,small,form,input,ul,li,ol,label{
    /* resetting some of the page elements */
    margin:0px;
    padding:0px;
}

body{
    /* styling the body */
    color:white;
    font-size:13px;
    background: url(img/bg.png);
    font-family:Arial, Helvetica, sans-serif;
}

h1{
    color:white;
    font-size:28px;
    font-weight:bold;
    font-family:"Trebuchet MS",Arial, Helvetica, sans-serif;
}

h2{
    font-family:"Arial Narrow",Arial,Helvetica,sans-serif;
    font-size:10px;
    font-weight:normal;
    letter-spacing:1px;
    padding-left:2px;
    text-transform:uppercase;
    white-space:nowrap;
}

.clear{
    /* Clear the floats */
    clear:both;
}

#main{
    /* The main container */
    width:800px;
    margin:0 auto;
}

.container,.titles{
    /* These classes share some common rules */
    color:white;
    margin-top:30px;
    width:100%;

    /* Hiding everything that overflows off the sides */
    overflow:hidden;

    background:url(img/bg_dark.png) #28313b;
    padding:20px 10px 10px;

    /* CSS rounded corners */
    -moz-border-radius:12px;
    -khtml-border-radius: 12px;
    -webkit-border-radius: 12px;
    border-radius:12px;
}

.titles{
    width:140px;
    padding:10px 15px;
    height:55px;
}

.product{
    /* The products class */
    width:370px;
    height:150px;
    background:url(img/product_bg.png) repeat-x;
    padding-top:10px;

    -moz-border-radius:12px;
    -khtml-border-radius: 12px;
    -webkit-border-radius: 12px;
    border-radius:12px;
}

.product .pic{
    /* The product image */
    float:left;
    width:128px;
    height:128px;
    padding:0 10px 5px;
    margin-top:-15px;
}

.product .link,.product .price{
    /* Common rules */
    font-size:10px;
    text-transform:uppercase;
    padding:4px 0;
}

.product .price{
    /* Custom rule */
    color:#CCCCCC;
}

.product .title{
    font-size:16px;
    font-weight:bold;
}

a, a:visited {
    /* Styling the hyperlink */
    color:#00BBFF;
    text-decoration:none;
    outline:none;
}

a:hover{
    /* The hover state */
    text-decoration:underline;
}
Lets proceed with the next step.
Step 4 - jQuery
Lets see what lays in the script.js file.
script.js
$(document).ready(function(){

    /* After the page has finished loading */
    $("#slider").mopSlider({
        'w':800,
        'h':150,
        'sldW':500,
        'btnW':200,
        'itemMgn':20,
        'indi':"Slide To View More",
        'type':'tutorialzine',  /* A custom theme */
        'shuffle':0
    });

});
You can see that on line 11 we provide “tutorialzine” as a theme. What gives? The plugin comes loaded with two themes - paper, and black. Unfortunately neither of those seem suitable for the current page design. This is why I tweaked the plugin a little bit to enable this custom theme.
Unlike the ones built-in, this one hides all the graphics, rounded corners and backgrounds to leave only the sliding bar and the content. This enables us to skin it the way we like and integrate it into any page design, but you'll have to remember to style it properly.
In this case we've styled the container div that holds the slider and it works just fine.
Lets move on to the PHP code.
Step 5 - PHP
PHP handles the important task of reading the slider.db.txt and populating the slider div with products. This happens in the beginning of demo.php.
demo.php
$slides = file('db/slider.db.txt');
/* Read the file with file() - returns an array where */
/* every file row becomes a new array element */

$products='';
foreach($slides as $v)
{
    $data = preg_split('/\s*\|\s*/',$v);
    /* Split the file row by the vertical lines */
    /* Using preg_split to remove unnecessary spaces and tabulations */

    $products.='
    <div class="product">
    <div class="pic"><img src="'.$data[3].'" width="128" height="128" alt="'.htmlspecialchars($data[0]).'" /></div>
    <div class="title">'.$data[0].'</div>
    <div class="price">$'.$data[2].'</div>
    <div class="description">'.$data[1].'</div>
    <div class="link"><a href="'.$data[4].'" target="blank">Find out more</a></div>
    <div class="clear"></div>
    </div>';

    /* $data becomes an array with the product's properties */
}
If you were to modify slider.db.txt, you would have to change the above loop so you can show the data where needed.
With this our content slider is complete!
Conclusion
Today we created a content slider, which will help you optimize your website’s real estate and serve as eye-candy for your visitors.
You are free to modify the code any way you see fit and integrate it into your site.
Bootstrap Studio
The revolutionary web design tool for creating responsive websites and apps.
Learn more
Should be on Dzone... :)
I love this, its very beautiful and very nicely done. The one thing, I think, is that instead of showing arrows pointing to all directions, just the left and right arrows. (Since it doesn't scroll up or down =p)
'deny from all' in db/.htaccess will return a 403 error.
That looks really excellent. Very sleek. I'd be interested to see how it works in other browsers. Nice work.
Thanks for the comments!
@ Kashub [~]o
Fixed it. Thanks for noticing.
Love it. How difficult would it be to retrofit this to a database? I know it might cause more server load but I would need the content to be dynamic. Seeing how I don't plan on getting a million hits a year on my personal portfolio site it won't be to big of a server drain.
Nice tutorial!
You could also use AJAX in order to get the data from the .txt file. Then your main page would be just HTML and wouldn't have to contain any PHP code in it. You would put the PHP code within another file that will be called with ajax.
@ Branden
You shouldn't worry about the server load, unless you plan to put a thousand rows in the DB.
To bind it to a MySQL database you'll have to set up a table with columns that correspond to the ones in the text file. Later you'll need to mysql_connect to it, execute a SELECT query and replace the foreach loop in demo.php with a while loop that fetches the data from the query result.
That would be about it.
@ Andrei
AJAX is a valid option in this case but it has a negative side - the content in the slider will not be visible for search engines.
However there are uses where AJAX would be great.
Nice tutorijal, bookmarked
Nice job man! Link´s didnt work in IE 6.0, and thx for share!
Like It!
Speaking of search engine compatibility. When linking to a specific product, is there a way to make it jump to that portion of the slider?
One of the things I've seen that's really frustrating is an item that shows up in a search result, but when you go to the page, it's either hidden or nonexistent.
Great tutorials here. I can see several uses for most of them in my own work already. Thanks for putting these together!
@ Nathan
I am afraid that the plugin does not provide a method to scroll to a specific portion of the slider.
A workaround would be to keep the objects in the slider to a minimum or have it as a complimentary addition to your content.
Hi
thanks for the great tutorial but i need this one with mysql database could you please make a mysql version too?
I would really appreciate that!
Gunpower
(greetz from the netherlands!)
yea, this is def a SLICK SLIDER - best Ive seen out there . You ROCK the code M. !
Awesome tuts :)
M.
wow... I like it and place In my bookmarks. Thanks
Wow this is really cool, I have to say I can probably get this goin on my new site right away. Thanks!
This is nice, But I was wondering if it's possible to have the slider run automatically in a time interval. e,g 30sec
can i use just HTML without any php code?
thanks advanced
I tried and I tried, but I had to give up. I did everything correctly, I eve copied your code. I still was unable to get it to work. I think my computer just does not like me.
Never the less it was still a nice tutorial. I learned how to use a text file as a datastore for when a database would be overrated!
@Martin
Why does everything in your site have to be so awesome?
Hi!
do you know how to move the slider with automatically just like slide show ?
great tips&website :)
thanks,
eric
Dude you rock!!!!!! Im on your site day n nite!!! Although Im a noob to web design I can proudly say a big thanks to you tuts.
I may need to learn more about db's cos I need to place a login bar on my unfinished website.
Cheers, Mate!
Thank you for taking the time to write up a pretty good and easy to understand tutorial. Can't wait to try this and propose the solution to a current client!
Thank you for this slider.
But i cant get it to work with wordpress.
I want wordpress Posts to be displayed as Products in this slider.
Yes, very slick indeed!
Hi martin can you please add my site because you used some of my icons :) it is not necessary but it will help me show my work to the world :)
http://tonev.deviantart.com/art/Laptop-icons-3-129709600?q=by%3Atonev+laptop&qo=20
@ tonev
Sorry for not including a link to your page in the first place. Added one in the introduction and the demo. Thanks for the awesome job.
thank you for adding the link :) it means a lot to me :)
mopSlider is not working on IE9
Hi Martin, this is a very nice tutorial, but could you tell me how to add the products into different category (laptop, desktop, accessories...)
thank you in advanced and hope to hear from you soon!
Best regards,
Charlot.
Slider doesn't work in iPad.
slider not working
You really make it appear really easy with your presentation but I to find this topic to be really something which I feel I'd by no means understand. It kind of feels too complex and very vast for me. I am taking a look ahead for your next post, I will try to get the hang of it!
It's very good
Thank you brother. I don't know jquery but you explained it intelligently.It helped me a lot.