A Stylish Navigation Menu With jQuery
Introduction
As you may know, the first 20 seconds of a new visitor's interaction with a website determine whether they are going to stay or leave. This means you have to follow common design practices and put everything where the user would expect it to be. A crucial part of this process is developing an easy to use navigation menu.
In this tutorial we are going to make a stylish CSS + XHTML navigation menu with the help of the jQuery library.
So download the tutorial files above and keep on reading..
Step 1 - the XHTML
The XHTML code is simple and search engine friendly.
index.html
<div id="menu-container">
<ul id="navigationMenu">
<li><a href="#" class="normalMenu">Home</a></li>
<li><a href="#" class="normalMenu">Services</a></li>
<li><a href="#" class="selectedMenu">Our clients</a></li>
<li><a href="#" class="normalMenu">The team</a></li>
<li><a href="#" class="normalMenu">About us</a></li>
<li><a href="#" class="normalMenu">Contact us</a></li>
</ul>
</div>
The entire navigation menu is basically one unordered list. You can introduce new menu items by just adding more LI elements and setting their respective text and target URLs.
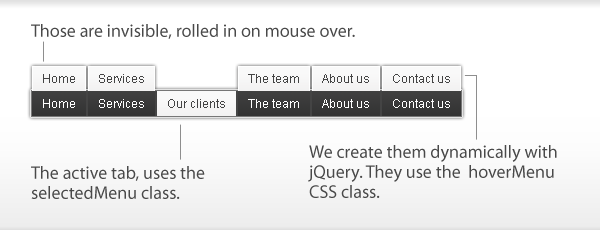
An important thing to note here is how you can mark a menu item as selected by default (or active) - just assign it the selectedMenu class (line 5). For example, here we are highlighting the "Our clients" page. You can set it up manually for a static site, or use PHP to do ti dynamically.
Step 2 - jQuery
As you can see from the illustration above, we are going to clone the set of links defined in our XHTML (the dark ones) and assign them the hoverMenu CSS class, which floats them above the default ones.
This strategy has many advantages - firstly it keeps the XHTML cleaner, because you do not have to add those links manually to the page, and secondly it guarantees that you will have clean and working navigation regardless of the visitor's javascript support - great for both usability and SEO.
Now lets see what happens in our script.js.
script.js
$(document).ready(function(){
// executed after the page has finished loading

    $('#navigationMenu li .normalMenu').each(function(){    // for each menu item

        // create a duplicate hyperlink and position it above the current one
        $(this).before($(this).clone().removeClass().addClass('hoverMenu'));

    });

    $('#navigationMenu li').hover(function(){   // using the hover method..

        // we assign an action on mouse over
        $(this).find('.hoverMenu').stop().animate({marginTop:'0px'},200);
        // the animate method provides countless possibilities

    },

    function(){
        // and an action on mouse out
        $(this).find('.hoverMenu').stop().animate({marginTop:'-25px'},200);

    });

});
Great, but what have we just done? First we used the $('document').ready method to insure that the code is executed after the page has finished loading.
Then we looped through all the links and cloned them, assigning a new CSS class - hoverMenu.
After this we used the hover() method to easily add event handlers for both the mouseover and the mouseout event.
Later we used the animate method - a really powerful tool in the jQuery arsenal. In this case we provided it with a new marginTop value and the duration of the effect. jQuery will handle all the animation.
Note the use of the stop() method - it stops all currently active animations and thus prevents the stacking of different animation effects on top of each other guaranteeing a smooth user experience.
Step 3 - the CSS
Lets take a look at our CSS style sheet.
demo.css
/* Page styles */

body,h1,h2,h3,p,td,quote,small,form,input,ul,li,ol,label{   /* resetting some elements for better browser compatibility */
    margin:0px;
    padding:0px;
}

body{   /* styling the body */
    margin-top:20px;
    font-family:Arial, Helvetica, sans-serif;
    color:#51555C;
    height:100%;
    font-size:12px;
}

/* Navigation menu styles */

ul{ /* the unordered list */
    height:25px;
    font-family:Arial, Helvetica, sans-serif;
    font-size:12px;
}

ul li{
    border:1px solid #444444;
    display:inline-block;   /* changing the display property */
    float:left; /* floating the list items to the left */
    height:25px;
    list-style-type:none;   /* disabling the list icon */
    overflow:hidden;    /* hiding the overflowing content */
}

ul li a, ul li a:hover,
ul li a:visited{
    text-decoration:none;   /* removing the underline text-decoration */
}

/* styling the links */
.normalMenu, .normalMenu:visited,
.hoverMenu, .hoverMenu:visited,
.selectedMenu,.selectedMenu:visited {/* these properties are shared between the classes */
    outline:none;
    padding:5px 10px;
    display:block;
}

/* styles that are assigned individually */

.hoverMenu,.hoverMenu:visited,
.selectedMenu,.selectedMenu:visited {
    margin-top:-25px;
    background:url(img/grey_bg.gif) repeat-x #eeeeee;
    color:#444444;
}

.selectedMenu,.selectedMenu:visited {
    margin:0;
}

.normalMenu, .normalMenu:visited{
    color:white;
    background:url(img/dark_bg.gif) repeat-x #444444;
}
As you can see, we have three main classes that define the looks of our navigation menu. normalMenu - for the normal state of the navigation links, hoverMenu - lighter link that slides down on hover, selectedMenu the active (selected) state.
With this our stylish navigation menu is complete!
Conclusion
In this tutorial I showed you how to create a stylish and user friendly navigation menu. You are free to use it in your sites and modify it in whatever fashion you find appropriate.
Bootstrap Studio
The revolutionary web design tool for creating responsive websites and apps.
Learn more
This is beautiful! Simple and smooth and very well explained. Thanx!
Looks very very similar as this tutorial
http://www.sohtanaka.com/web-design/animate-navigation-with-css-jquery/
@ Jaekwong
Agree. It does look similar. His technique is different but the implementation strikingly resembles mine. Guess there aren't that many smart ways to make such a menu.
He has also put more work into his demo. Taking a note here for future tutorials.
thx for sharing
Cool menu! Just one question, I want to increase the height of the menu, where in the CSS do I do this? Thanks
Nice navigation created using the jquery with cool effects
@Neil
To increase the menu's hight you'll have to change these values:
They are currently set to 25px (or -25px for the margins), and you'll have to replace them with your own.
You might also need to tweak the padding values on line 43 in demo.css depending on how much bigger you want the menu to be.
Fantastic! I have a question - is this menu indexable by Google?
Yes, it is SEO friendly - the search engines see a list of hyperlinks and there won't be any trouble in indexing the pages.
Thanks for this great menu, hoping to incorporate in one of my Wordpress projects.
Thanks
very good :)
thanks..
Great Work thanks much but there is a js file in the demo you didn't mention it . the file name is
jquery.min.js and it is required to play the animation in the menu ...
can you make this more clear please
Thanks again
And How can i create sub level in this menu ???
Thank you so much -
Hey Martin, i LOVE this menu! I have edited the gif's to make a really stylish blue and black menu. I am wondering if you could help me get this menu centered on a page?? I have searched plenty of ways and had it kind of working in some browsers using left 50% on the ul and right 50% on the ui but it was more of a hit or miss. I'm wondering if you know how to center this bad boy?
So.... i got it centered by wrapping it in a static div.
.container {
width: 835px;
height: 30px;
position: absolute;
top: 50%; left: 50%;
margin: -680px 0 0 -433px;
overflow: hidden;
}
If you know of any issues using this let me know, otherwise it has worked flawlessly on every browser i've tried :-) thanks again for an awesome menu.
Still need help centering.... wrapping in an absolute div was an amateur mistake. different resolutions ruin everything.
I enjoyed this blog :o). It was very helpful. Thanks for writing it clearly, we must return this site soon for more articles.
Thank you so much. You menu works great. I am desinging my own menu based on this tutorial..I have a question
How do u insert submenu for these menu..?..I will deeply appreciate if you can help me in creating submenu for your menu
Verry Good
Really a cool one. My doubt is, how can we make it scroll horizontally instead of vertically.
hi, thank for the tutorial
i would like do active (click) with selectedMenu
how i can do it?
thank you!
Great menu. I found a small error. If you are on the first item (first item is hover). Then you move the cursor to the left (to browser window) ... the first item is still hover. Can anybody fix it?
Thanks
hey, nice tutorial, but ive found a bug in your script. I wrote a c# switch case which sets the menu items class form "normalMenu" to "selectedMenu", depending on which side is loaded atm (homepage, costumers, etc.). And when I change the class in my code behind, the menubar just shows a grey background image and the link text as it would be without the comstume pics.
Fantastic tutorial, thank you for this.
I am gonna modify it and use it on my own site.
Awesome tutorials. Just great and congratulations for all this work.