Making a Photoshoot Effect With jQuery & CSS
Often, in your design or development tasks, you are presented with challenges that require a different approach than just plunging head over heels in coding. Research and experiments are a vital part of this process.
This is why this week's tutorial is structured in a slightly different manner than usual. First we are presented with the main problems faced and their solutions, and after this we get round to building upon it.
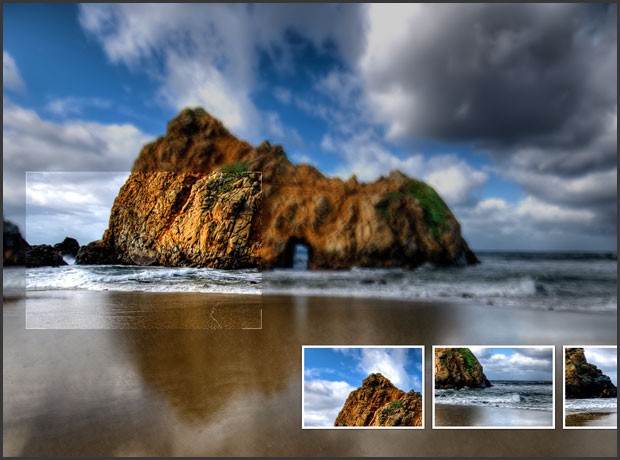
We are creating a photo shoot effect with our just-released PhotoShoot jQuery plug-in. With it you can convert a regular div on the page into a photo shooting stage simulating a camera-like feel. Using this plug-in, we give visitors the ability to take shots of the background image.
Before starting with the tutorial, I would suggest you download the zip archive from the buttons above.
Problem 1 - Blurring the image
JavaScript does not support blurring an image directly. For example, there is no such thing as document.getElemetById('image').style.blur=2, no matter how useful it would've been.
The technique I've used and incorporated into the plug-in is actually quite simple - it just stacks up a bunch of divs, each holding the image as a background and whose opacity is lowered, one on top of the other. Those divs' positions are off by a few pixels at random, so you end up with a blurred effect.
There is however a newer alternative to this technique, which I hope to implement in a future version of the plugin. It is achieved via the canvas HTML5 element, which allows low-level modifications of an image inside of the canvas. Unfortunately, canvas is not yet supported by a large portion of the currently used browsers, so a combination of the techniques would have to be used.
Problem 2 - Hiding the cursor
CSS does not provide a way for hiding the cursor from view. E.g. you cannot specify a CSS rule like cursor : none. There is a neat workaround though. CSS gives you the ability to specify a custom cursor in a .cur file with the css:url() rule. These files support transparency, so you just need to make a completely transparent cursor and assign it to the area in which you wish the cursor to be hidden.
Unfortunately Google Chrome has issues with completely blank cursors, so a special version has to be tailored which contains one white pixel (still better than nothing).
Another trouble maker is Opera, which does not support custom cursors altogether. There are no workarounds. It is not that much of a big deal though, everything else runs fine in Opera.
Problem 3 - No support for masks
A solution to this problem is to use the background property of the viewfinder div to display the original image. By specifying a negative top and left margin and updating it on every mouse move, we can give users the impression that the viewfinder clears up the blurring of the scenery below.
Masking is the process in which only a part of an image or shape is shown, with the rest clipped away. In the case of this tutorial, a mask would've given us the ability to have a regular version of the image above the blurred one, and mask it, so that only the part that intersects with the viewfinder is shown and thus giving us the impression that it un-blurs the image below.
The solutions to these problems are implemented in the plug-in for us, which lifts a lot of the development burden and we can start building upon it.
Step 1 - XHTML
As most of the work is handled by the PhotoShoot jQuery plug-in, our work is reduced to only provide a div that is going to be transformed into a photo shooting stage (we still have to pass a configuration object holding the image we want displayed, along with a few other options though).
demo.html
<div id="main">

<!-- The plugin automatically inserts the needed markup here -->

</div>
You can have this div anywhere on your page. You'll need to specify a fixed width and height in the stylesheet in order for this to work properly. After the page loads and the plug-in is initialized, additional code is inserted into this div.
demo.html
<div id="main">

<div class="blur" style="......"></div>
<div class="blur" style="......"></div>
<!--  8 more blur divs -->

<div class="overlay" style="opacity: 0.2;"></div>

<div style="......" class="viewFinder">
<img src="photoShoot/viewfinder.png" width="300" height="200">
</div>

<!-- Additional html for the shots is inserted here. Not part of the plug-in.  -->

</div>
A whole lot has changed here. As mentioned earlier, the blur effect is achieved by stacking transparent divs on top of each other - the blur divs. After this is the overlay div, which darkens the layers below it, according to the opacity option passed to the plug-in.
Finally we have the viewfinder, which follows the mouse movements on the area and has the non-blurred version of the image as its background.
To ensure maximum flexibility, the plug-in provides a way to execute a user-defined function when a click occurs. This is exactly what we use to simulate a camera flash and to insert a new shot in the album div, which is not part of the plug-in.
Step 2 - CSS
The plug-in comes with its own stylesheet (photoShoot/jquery.photoShoot-1.0.css in the demo files) which defines the look of the photo shoot components, so we are only left with styling the rest of the page.
styles.css
#main{
/* This div is converted to a photoShoot stage by the Photo Shoot plug-in */
margin:0 auto;
width:960px;
height:600px;
}
.shot{
/* These contain a scaled down version of the background image: */
border:3px solid #FCFCFC;
float:right;
position:relative;
margin-left:10px;
overflow:hidden;
/* Adding a CSS3 shadow below the shots: */
-moz-box-shadow:0 0 2px black;
-webkit-box-shadow:0 0 2px black;
box-shadow:0 0 2px black;
}
.shot img{
display:block;
}
.album{
/* This div holds the shots */
bottom:50px;
height:110px;
overflow:hidden;
position:absolute;
right:20px;
width:490px;
}
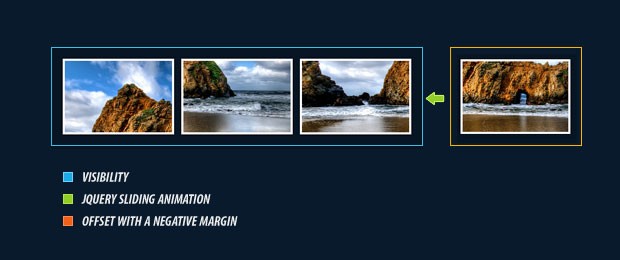
.album .slide{
/* The slide div is contained in album */
width:700px;
height:110px;
position:relative;
left:-210px;
}
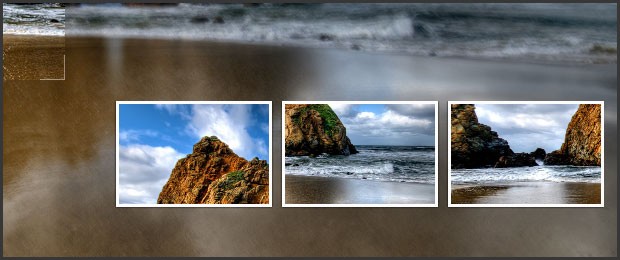
Each shot is dynamically inserted by our own custom shoot function when a click event occurs (as you will see in the next step of the tutorial). The shots are basically a scaled down version of the background image (this means that the image is downloaded once and used multiple times), which are offset to the top and bottom, according to the position of the viewfinder in the moment the event occurred.
The album and slide divs are added by our own jQuery script (not by the plug-in). The principle here is that the slide div is larger than its parent, the album div, and the shot is slid to the left when inserted, but more on that in a moment.
Step 3 - jQuery
The photoShoot plug-in itself will not be discussed here as you can read more about it on its official page. We do need, however, some additional jQuery code which:
- Inserts the .album to the #main div;
- Chooses a random flickr image from an array to be fed to the plug-in;
- Creates the options object;
- Defines a custom shot function which is called on mouse click by the plug-in;
- Calls the plug-in with the .photoshoot() method.
script.js
$(document).ready(function(){

    // This code is executed after the DOM has been completely loaded

    // Assigning the jQuery object to a variable for speed:
    var main = $('#main');

    // Setting the width of the photoshoot area to
    // 1024 px or the width of the document - whichever is smallest:

    main.width(Math.min(1024,$(document).width()));

    // Creating an array with four possible backgrounds and their sizes:
    var pics = new Array(
                { url:'http://farm4.static.flickr.com/3595/3405361333_77f2a5e731_b.jpg', size:{x:1024,y:677}},
                { url:'http://farm4.static.flickr.com/3028/2753126743_4249a4e948_b.jpg', size:{x:1024,y:768}},
                { url:'http://farm4.static.flickr.com/3641/3595250019_5a1237899a_b.jpg', size:{x:1024,y:768}},
                { url:'http://farm3.static.flickr.com/2592/4018062274_1f7f23597d_o.jpg', size:{x:1158,y:756}}
    );

    // Choosing a random picture to be passed to the PhotoShoot jQuery plug-in:
    var bg = pics[parseInt(Math.random()*4)];

    // Creating an options object (try tweeking the variables):
    var opts = {
        image       :   bg.url,
        onClick     :   shoot,
        opacity     :   0.8,
        blurLevel   :   4
    }

    // Calling the photoShoot plug-in and converting the #main div to a photo shoot stage:
    main.photoShoot(opts);

    // Adding the album holder to the stage:
    $('<div class="album">').html('<div class="slide" />').appendTo(main);

    // Our own shoot function (it is passed as onClick to the options array above):
    function shoot(position){
        // This function is called by the plug-in when the button is pressed

        // Setting the overlay's div to white will create the illusion of a camera flash:
        main.find('.overlay').css('background-color','white');

        // The flash will last for 100 milliseconds (a tenth of the second):
        setTimeout(function(){main.find('.overlay').css('background-color','')},100);

        // Creating a new shot image:
        var newShot = $('<div class="shot">').width(150).height(100);
        newShot.append( $('<img src="'+bg.url+'" width="'+(bg.size.x/2)+'" height="'+(bg.size.y/2)+'" />').css('margin',-position.top*0.5+'px 0 0 -'+position.left*0.5+'px') );

        // Removing the fourth shot (the count starts from 0):
        $('.shot').eq(3).remove();

        // Adding the newly created shot to the album div, but moved 160px to the right.
        // We start an animation to slide it in view:

        newShot.css('margin-right',-160).prependTo('.album .slide').animate({marginRight:0},'slow');
    }
});
Each time you click the area, a new shot is added to the slide div with a negative margin to the right. After this an animation starts, which slides it in view and pushes the other shots to the left, hiding the leftmost one.
It is important to remove the shots that are not visible with the remove() method. This way we prevent cluttering of the DOM with unneeded elements.
With this our Photoshoot effect is complete!
Conclusion
Today we used a problem solving approach to create photo shoot effect with pure CSS and JavaScript. You can freely use the techniques demonstrated here and build upon the code. There are many possible uses especially in navigation systems and promotional sites.
If you liked this tutorial, be sure to follow us on twitter for the latest web development news and links.
A big thanks goes to haglundc for the landscape photo used throughout this tutorial.
What do you think? How would you use it?
Bootstrap Studio
The revolutionary web design tool for creating responsive websites and apps.
Learn more
This one is great man. I don't know i guess i would use it for cropping avatars or photos for profiles.
Wow that is cool!!
This is simply amazing!
I would have never guessed that you can achieve such amazing results with jquery only :)
Great work!
You are to good for this world, this are tuts, wich are +tuts at nettuts.
Tnx, from the Groningen the Netherlands
That's freakin' amazing man - I love it! Very well done :D!
This is really amazing effect, nice usage of jQuery.
Lovely tuts! :D
Simply amazing what is being done with jQuery.
Hopefully at some point in the future I can find a use for this code.
WOW! I am completely amazed. I have seen some great effects and inspirations, but the uses with this are endless
Really COOL... but can anything be done with the captured images like saving them or e-mailing them? Otherwise it's just some eye candy...
Absolutely beautiful, I love the break-down of everything. The effect is absolutely stunning. I could see this being really cool for stuff like cropping pictures, or maybe even games like a JS-driven FPS almost, or even better, a puzzle game like ISpy or Where's Waldo!!!
Looks like I found a new summer project. ;)
Same question as steve, can you save the snapped images?
Very clever and cool!! :-)
amazing... stunning !
my congratulation for this !!!!
WOW - there are some brilliant ideas combined in this Tutorial. I haven't ever thought about blurring an image with multiple semitransparent copy's of it.
The way you crop the shots is simple and elegant.
This was inspiring to read. Best of the week if not the month.
Thanks a lot!
Congrats man! What a nice work =)
@Steve Yakoban
If you send the coordinates of the position to a server-side script, such as PHP, using AJAX, then you can crop the picture accordingly and then email it or save it; not too hard to implement really.
Thanks for the great comments fellas!
Glad you like it.
This is a fantastic effect! I love it :)
If there would be chance to add zoom this effect would be perfect ;)
This is really clever stuff. Good job. :)
Hi
This is a great plugin,
Is there an option for the user to resize the size of the snapshot?
Great solution. Thanks
my contrib to get pos of the thumb created
alert('Top: '+position.top+'px, Left:'+position.left+'px');
I sure like this plugin, the authors did a good job. When i tested it i hade the same quesion as others, is it possible to save the snapped images? yes it is.
What i did was a fast test, i wrote a simple WCF service , some ajax calls and the thing worked. i shared the stuff at http://bit.ly/dulsPF , in swedish but you can always Goggle Translate it to get a clue.
Really!!! Thanks
Thats awesome!
Its runs realy smoothly. I wonder if someone could use this in a website, would be pretty cool.
Amazing ! PHP code to get those snapshots for another tutorial ? ;)
so cool!very nice!
I'LL use it of my website!
thanks!
wow Amazing !
so amazing...clever clever
This is an amazing idea. It works smoothly even in IE!
Actually, you can use cursor: none in CSS3. See here: http://www.w3.org/TR/css3-ui/#cursor
Anyway, this demo is very awesome. :D
Fab, I would love to try this with a few of my photos.
Do the images have to come from Flckr? Or can they be from anywhere?
thanks,
Thank you so much, beautiful design.
Very Nice Effect Martin
<3 Love it!!!
Can we have Zoom in / Zoom Out effect upon mouse scrolling up/down while capturing a shot?
BTW Nice plugin with amazing idea :D
Is this plugin only designed to snapshot images? I would like to use it to take a snapshot of ANY area of a full webpage. Example: The user clicks somewhere in the footer or header of a website and a snapshot is created.
Is this possible with your plugin?
Did anyone have extension of this plugin with possibility of saving thumbs?
simply awesome..