Making a Super Simple Registration System With PHP and MySQL
Writing a registration system is a lot of work. You have to write code that validates email addresses, sends confirmation emails, provides forgotten password functionality, stores passwords securely, validates input forms and a lot more. Even when you do all of this, users will still be reluctant to register as it involves a lot of effort on their part as well.
In this tutorial, we will make a very simple registration system that doesn't require or store passwords at all! The result will be easy to modify and embed into an existing PHP website. Read on to find out how it works.
The Idea
Here is how our super simple registration system will work:
- There will be a combined login/registration form, where users will fill in their emails and hit submit;
- Upon submission, if an email address is not found in the database, a new user record is created. A random token is generated and sent to the user via email as a clickable link that is only valid for 10 minutes;
- Clicking the link in their inbox will take them to our site. The system will detect the presence of the token and will log the person in.
Here are the advantages of this approach:
- No need to store and validate passwords;
- No need for a password restoration feature, secret questions etc;
- You can be certain that a person can be reached on the given email address from the first time they login;
- The registration process is very simple and inviting.
Here are the disadvantages:
- It is as secure as the user's email account. If somebody has access to the person's email, they can login. This is the case with any forgotten password feature, but is a thing to consider;
- Email is not secure and can be intercepted. Keep in mind that this is also the case with any forgotten password feature or any regular login system that doesn't use HTTPS to transfer username/password info;
- Unless you take the time to configure your outgoing email properly, there is a chance that the messages with the login links will hit the spam box;
Given the advantages/disadvantages above, our login system is high on usability but not very high on security, so you should only use it for things like forum registrations, site memberships and services that don't deal with sensitive information.
Using The Registration System
In case you only wish to use the login system in your site and not to follow the tutorial, here is what you need to do:
- First you need to download the zip file above;
- In the zip file, find tables.sql. Import it in your database by using phpMyAdmin's import option. Alternatively you can open the file in a text editor, copy the SQL and execute it;
- Open includes/main.php and fill in your database connection details and username/password combo. In the same file, you also have to add an email which will be used as the originating address for the messages sent out by the system. Some web hosts block outgoing email unless it originates from a real email address that is created from their control panel, so put a real address there;
- Upload all the files via FTP or other means;
- Add this code to every PHP page that you want to make available only after a login;
- Have fun!
For the rest of you, who wish to learn how the login system works, read on!
The HTML
The first step is to write the HTML of the login form. The following HTML code resides in index.php. That file also holds the PHP code that handles the form submission and other useful functions of the login system. You will learn more about this in the PHP section.
index.php
<!DOCTYPE html>
<html>
<head>
<meta charset="utf-8"/>
<title>Tutorial: Super Simple Registration System With PHP & MySQL</title>
<!-- The main CSS file -->
<link href="assets/css/style.css" rel="stylesheet" />
<!--[if lt IE 9]>
<script src="http://html5shiv.googlecode.com/svn/trunk/html5.js"></script>
<![endif]-->
</head>
<body>
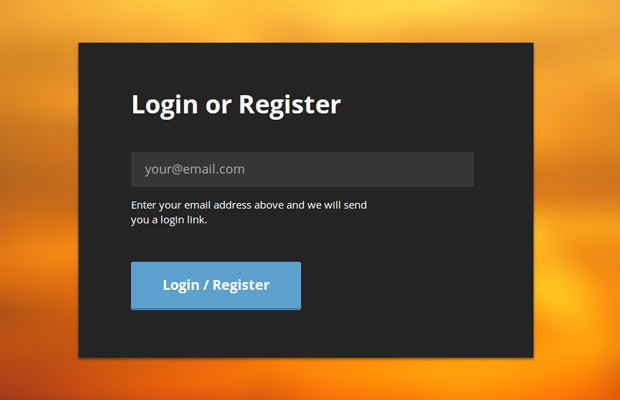
<form id="login-register" method="post" action="index.php">
<h1>Login or Register</h1>
<input type="text" placeholder="[email protected]" name="email" autofocus />
<p>Enter your email address above and we will send <br />you a login link.</p>
<button type="submit">Login / Register</button>
<span></span>
</form>
<!-- JavaScript Includes -->
<script src="http://cdnjs.cloudflare.com/ajax/libs/jquery/1.10.2/jquery.min.js"></script>
<script src="assets/js/script.js"></script>
</body>
</html>
In the head section, I've included the main stylesheet (it is not presented in the tutorial, so you will have to open it in a code editor to see it). Before the closing body tag, I am including the jQuery library and the script.js file, which we will be writing in the next section.
Now let's write some jQuery!
The JavaScript
jQuery listens for the submit event on the form, calls e.preventDefault() on it, and sends an AJAX request instead. Depending on the response from the server, it shows a message and prevents further submissions.
assets/js/script.js
$(function(){

    var form = $('#login-register');

    form.on('submit', function(e){

        if(form.is('.loading, .loggedIn')){
            return false;
        }

        var email = form.find('input').val(),
            messageHolder = form.find('span');

        e.preventDefault();

        $.post(this.action, {email: email}, function(m){

            if(m.error){
                form.addClass('error');
                messageHolder.text(m.message);
            }
            else{
                form.removeClass('error').addClass('loggedIn');
                messageHolder.text(m.message);
            }
        });

    });

    $(document).ajaxStart(function(){
        form.addClass('loading');
    });

    $(document).ajaxComplete(function(){
        form.removeClass('loading');
    });
});
The .loading CSS class is added to the form while the AJAX request is commencing (this is made possible by the ajaxStart() and ajaxComplete() methods that you can see near the end of the file). This CSS class makes the rotating gif indicator show, and in addition acts as a flag which prevents double submissions (submitting the form while a request is pending). The .loggedIn class is another flag that is set once the email has been sent. It blocks all further form submissions permanently.
Database Schema
Our simple registration system uses two MySQL tables (you can find the SQL code in tables.sql in the downloadable zip). The first table holds the user accounts, and the second holds the login attempts.
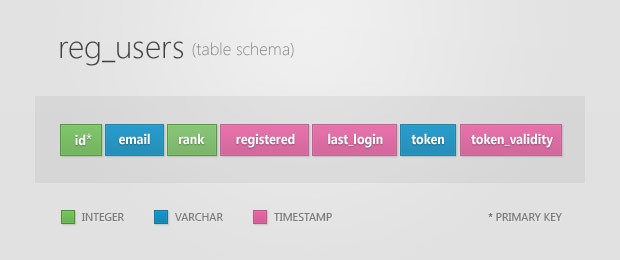
The system doesn't use passwords, which is reflected in the absence of a password field in the schema. There is a token column, accompanied by a token_validity column. The token is set when a user logs into the system and is sent to the user via email (more on that in the next section). The token_validity is then set to 10 minutes into the future, after which the token becomes invalid.
Every time somebody tries to log in, a new record is written to the second table. As you will see in our PHP code, thanks to this we are able to implement rate limiting by IP address. The limits are 10 login attempts per 10 minutes, and 20 attempts per hour. Anything more than that will result in the IP address being blocked until these limits are met.
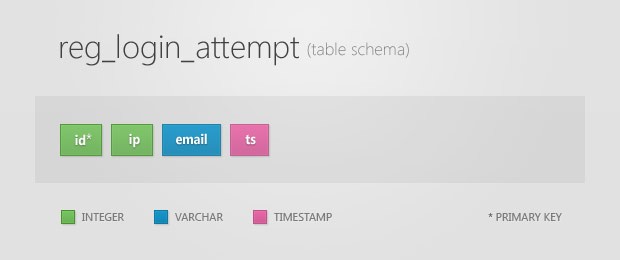
In both tables, the IP address is stored as a an integer using the ip2long PHP function.
PHP
Now we are ready to write some PHP code. The main functionality of the registration system is provided by the User class, which you can see below. This class makes heavy use of Idorm (docs), which is a minimal library for working with databases that we've used in tutorials before. The User class handles database access, the generation of login tokens and their validation. It exposes a simple interface that makes it easy to include the registration system into your PHP-powered websites.
User.class.php
class User{

    // Private ORM instance
    private $orm;

    /**
     * Find a user by a token string. Only valid tokens are taken into
     * consideration. A token is valid for 10 minutes after it has been generated.
     * @param string $token The token to search for
     * @return User
     */

    public static function findByToken($token){

        // find it in the database and make sure the timestamp is correct

        $result = ORM::for_table('reg_users')
                        ->where('token', $token)
                        ->where_raw('token_validity > NOW()')
                        ->find_one();

        if(!$result){
            return false;
        }

        return new User($result);
    }

    /**
     * Either login or register a user.
     * @param string $email The user's email address
     * @return User
     */

    public static function loginOrRegister($email){

        // If such a user already exists, return it

        if(User::exists($email)){
            return new User($email);
        }

        // Otherwise, create it and return it

        return User::create($email);
    }

    /**
     * Create a new user and save it to the database
     * @param string $email The user's email address
     * @return User
     */

    private static function create($email){

        // Write a new user to the database and return it

        $result = ORM::for_table('reg_users')->create();
        $result->email = $email;
        $result->save();

        return new User($result);
    }

    /**
     * Check whether such a user exists in the database and return a boolean.
     * @param string $email The user's email address
     * @return boolean
     */

    public static function exists($email){

        // Does the user exist in the database?
        $result = ORM::for_table('reg_users')
                    ->where('email', $email)
                    ->count();

        return $result == 1;
    }

    /**
     * Create a new user object
     * @param $param ORM instance, id, email or null
     * @return User
     */

    public function __construct($param = null){

        if($param instanceof ORM){

            // An ORM instance was passed
            $this->orm = $param;
        }
        else if(is_string($param)){

            // An email was passed
            $this->orm = ORM::for_table('reg_users')
                            ->where('email', $param)
                            ->find_one();
        }
        else{

            $id = 0;

            if(is_numeric($param)){
                // A user id was passed as a parameter
                $id = $param;
            }
            else if(isset($_SESSION['loginid'])){

                // No user ID was passed, look into the sesion
                $id = $_SESSION['loginid'];
            }

            $this->orm = ORM::for_table('reg_users')
                            ->where('id', $id)
                            ->find_one();
        }

    }

    /**
     * Generates a new SHA1 login token, writes it to the database and returns it.
     * @return string
     */

    public function generateToken(){
        // generate a token for the logged in user. Save it to the database.

        $token = sha1($this->email.time().rand(0, 1000000));

        // Save the token to the database,
        // and mark it as valid for the next 10 minutes only

        $this->orm->set('token', $token);
        $this->orm->set_expr('token_validity', "ADDTIME(NOW(),'0:10')");
        $this->orm->save();

        return $token;
    }

    /**
     * Login this user
     * @return void
     */

    public function login(){

        // Mark the user as logged in
        $_SESSION['loginid'] = $this->orm->id;

        // Update the last_login db field
        $this->orm->set_expr('last_login', 'NOW()');
        $this->orm->save();
    }

    /**
     * Destroy the session and logout the user.
     * @return void
     */

    public function logout(){
        $_SESSION = array();
        unset($_SESSION);
    }

    /**
     * Check whether the user is logged in.
     * @return boolean
     */

    public function loggedIn(){
        return isset($this->orm->id) && $_SESSION['loginid'] == $this->orm->id;
    }

    /**
     * Check whether the user is an administrator
     * @return boolean
     */

    public function isAdmin(){
        return $this->rank() == 'administrator';
    }

    /**
     * Find the type of user. It can be either admin or regular.
     * @return string
     */

    public function rank(){
        if($this->orm->rank == 1){
            return 'administrator';
        }

        return 'regular';
    }

    /**
     * Magic method for accessing the elements of the private
     * $orm instance as properties of the user object
     * @param string $key The accessed property's name
     * @return mixed
     */

    public function __get($key){
        if(isset($this->orm->$key)){
            return $this->orm->$key;
        }

        return null;
    }
}
Tokens are generated with the SHA1 algorithm and saved to the database. I am using MySQL's date and time functions to set the value of the token_validity column to 10 minutes into the future. When validating the token, we explicitly tell the engine that we are looking for a token whose token_validity field has not yet expired. This way we limit how long the login tokens are considered valid.
Notice that I use the __get magic method (docs) near the end of the file to capture property access on the user object. This makes it possible to access the data held in the database as properties: $user->email, $user->token etc. For an example on how to use this class in the next code fragments.

Another file that holds useful functionality is functions.php. There we have a number of helper functions that make the rest of the code cleaner.
functions.php
function send_email($from, $to, $subject, $message){

    // Helper function for sending email

    $headers  = 'MIME-Version: 1.0' . "\r\n";
    $headers .= 'Content-type: text/plain; charset=utf-8' . "\r\n";
    $headers .= 'From: '.$from . "\r\n";

    return mail($to, $subject, $message, $headers);
}

function get_page_url(){

    // Find out the URL of a PHP file

    $url = 'http'.(empty($_SERVER['HTTPS'])?'':'s').'://'.$_SERVER['SERVER_NAME'];

    if(isset($_SERVER['REQUEST_URI']) && $_SERVER['REQUEST_URI'] != ''){
        $url.= $_SERVER['REQUEST_URI'];
    }
    else{
        $url.= $_SERVER['PATH_INFO'];
    }

    return $url;
}

function rate_limit($ip, $limit_hour = 20, $limit_10_min = 10){

    // The number of login attempts for the last hour by this IP address

    $count_hour = ORM::for_table('reg_login_attempt')
                    ->where('ip', sprintf("%u", ip2long($ip)))
                    ->where_raw("ts > SUBTIME(NOW(),'1:00')")
                    ->count();

    // The number of login attempts for the last 10 minutes by this IP address

    $count_10_min =  ORM::for_table('reg_login_attempt')
                    ->where('ip', sprintf("%u", ip2long($ip)))
                    ->where_raw("ts > SUBTIME(NOW(),'0:10')")
                    ->count();

    if($count_hour > $limit_hour || $count_10_min > $limit_10_min){
        throw new Exception('Too many login attempts!');
    }
}

function rate_limit_tick($ip, $email){

    // Create a new record in the login attempt table

    $login_attempt = ORM::for_table('reg_login_attempt')->create();

    $login_attempt->email = $email;
    $login_attempt->ip = sprintf("%u", ip2long($ip));

    $login_attempt->save();
}

function redirect($url){
    header("Location: $url");
    exit;
}
The rate_limit and rate_limit_tick functions enforce rate limiting (maximum number of login attempts for a period of time). The login attempts are written to the reg_login_attempt database. These functions are called when handling the submissions of the login form, as you can see from the next fragment.
The code below is taken from index.php and it handles the login form submission. It returns an JSON response, which is handled by the jQuery code we saw in assets/js/script.js.
index.php
try{

    if(!empty($_POST) && isset($_SERVER['HTTP_X_REQUESTED_WITH'])){

        // Output a JSON header

        header('Content-type: application/json');

        // Is the email address valid?

        if(!isset($_POST['email']) || !filter_var($_POST['email'], FILTER_VALIDATE_EMAIL)){
            throw new Exception('Please enter a valid email.');
        }

        // This will throw an exception if the person is above
        // the allowed login attempt limits (see functions.php for more):
        rate_limit($_SERVER['REMOTE_ADDR']);

        // Record this login attempt
        rate_limit_tick($_SERVER['REMOTE_ADDR'], $_POST['email']);

        // Send the message to the user

        $message = '';
        $email = $_POST['email'];
        $subject = 'Your Login Link';

        if(!User::exists($email)){
            $subject = "Thank You For Registering!";
            $message = "Thank you for registering at our site!\n\n";
        }

        // Attempt to login or register the person
        $user = User::loginOrRegister($_POST['email']);

        $message.= "You can login from this URL:\n";
        $message.= get_page_url()."?tkn=".$user->generateToken()."\n\n";

        $message.= "The link is going expire automatically after 10 minutes.";

        $result = send_email($fromEmail, $_POST['email'], $subject, $message);

        if(!$result){
            throw new Exception("There was an error sending your email. Please try again.");
        }

        die(json_encode(array(
            'message' => 'Thank you! We\'ve sent a link to your inbox. Check your spam folder as well.'
        )));
    }
}
catch(Exception $e){

    die(json_encode(array(
        'error'=>1,
        'message' => $e->getMessage()
    )));
}
On a successful login or registration, the code above will send out an email to the person with a login link. The token is made available as the tkn $_GET variable in the generated URL.
Visiting the login link will trigger this code:
index.php
if(isset($_GET['tkn'])){

    // Is this a valid login token?
    $user = User::findByToken($_GET['tkn']);

    if($user){

        // Yes! Login the user and redirect to the protected page.

        $user->login();
        redirect('protected.php');
    }

    // Invalid token. Redirect back to the login form.
    redirect('index.php');
}
Calling $user->login() will create the needed session variables, so that subsequent views of any page of the site will keep the person logged in.
Logging out of the system is handled similarly:
index.php
if(isset($_GET['logout'])){

    $user = new User();

    if($user->loggedIn()){
        $user->logout();
    }

    redirect('index.php');
}
At the end of the code, I am redirecting to index.php again, so that the ?logout=1 parameter in the URL is removed.
Our index.php file needs another protection - we don't want already logged in people to see the form. For this purpose, we are going to use the $user->loggedIn() method:
index.php
$user = new User();

if($user->loggedIn()){
    redirect('protected.php');
}
Lastly, here is how to protect a page of your site and make it available only after a login:
protected.php
// To protect any php page on your site, include main.php
// and create a new User object. It's that simple!

require_once 'includes/main.php';

$user = new User();

if(!$user->loggedIn()){
    redirect('index.php');
}
After this check, you can be sure that the user has been successfully logged in. You will also have access to the data stored in the database as properties of the $user object. To output the user's email and their rank, use this code:
echo 'Your email: '.$user->email;
echo 'Your rank: '.$user->rank();
rank() is a method here, because the rank column in the database normally contains numbers (0 for a regular user, 1 for an administrator) and we need to transform these into rank names, which is done in that method. To turn a regular user into an administrator, simply edit their record from phpMyAdmin (or a database management program of your choice). Being an administrator will not give him any additional abilities - it will simply report him as such. It is up to your code to give special powers to administrators.
We're Done!
With this our super simple registration system is complete! You can easily use it in an existing PHP website and modify it any way you like.
Bootstrap Studio
The revolutionary web design tool for creating responsive websites and apps.
Learn more
Pretty brilliant stuff.
Cheers
Nice idea Martin. I am a big fan of registration forms with nearly no needed information because it is just faster and easier for the user to get started. But this is also the best place to get very valuable information about the user... and to get the opt in for a newsletter for example.
Regards,
Manuel
Wow nice tut!
I read all of your tutorials and they are great and very inspiring! Keep doing your awesome work Martin!
Regards,
Hi Martin, great stuff. Really was looking for some resources on this kind of topic. I went to your demo to test it though and after I registered and came back to the page later to login It just sent me another e-mail to register. Shouldn't the page validate that you are already a user and redirect you to the secured area?
When you fill in your email, you should receive an email with a login link (it could have gone to the spam folder). Click the link and you will be logged in automatically.
I tried your demo version I didn't get any confirmation or login/registration email I checked spam folder thoroughly and inbox too but it was not there..:/
were you able to figure out the confirmation of login/registration? if you did, please do let help. thank you.
Hi,
Do you make the 'Users Table Schema' in Photoshop or is that some very nice tool?
Lovely article!
Thanks! I made it in Photoshop.
Hey Martin !
Really nice article !
Actually you inspired us so we just created http://drawmyba.se. A web tool to create nice SQL tables and embed or share them everywhere.
It's free to use :)
We put a link to your website on our homepage, feel free to contact us about that if you need to.
Have a nice day and keep up your good work !
Cool! Now I will have where to refer people when they ask :)
Hi Martin, thanks for the article.
I'm wondering what do you use to see your database schema like that?
Really awesome!
Awesome one... :) but only missing thing is password field..
There is no password field. Read on the tutorial: No need to store and validate passwords
I was looking for this. Thanks a lot Martin !!
Hoping to see more snippets from you..!! Keep sharing !!
Thanks again !!
Looks really nice, thanks Martin!
Simply awesome!!
Nice but there is another little "problem". Think about that, every time that I want to login I must login in my own email account so that's not really fast as you can see.
However that's a great idea for login/registration, good job.
(Sorry for my bad english)
Hi Martin, love the idea and the simplicity but I am finding the same problem as Jsu... enter the email and then click on the link in my inbox, all fine, takes me to protected.php. When you logout and then re-enter your email address it just repeats the process - sends a link to my email address... shouldn't it take me directly to protected.php once I've already registered my email?
Would love to get this issue sorted, it looks great!
Thanks,
Greg
What is handling the sending of the email link? Shouldn't there be an SMTP server receiving the "message" from PHP?
Your descriptions of the database schemas are wonderful and very easy to understand, what do you use to make? Do you have a template or something like that?
The code highlighting is awesome as well, what plugin do you use? Thanks in advance.
Great site and I love the idea of a simplified Reg / Login, but like Alberto, am concerned about the login flow for existing users.
At first I couldn't figure out how you authenticated existing users and then realised it was exactly the same way as for new ones, by sending another email with the token-embedded URL.
As a user I think the extra time and effort of having to check my email inbox and click on the new link every time I wanted to login would outweigh the simplicity of not having to remember a password. Now, if you used some other method like browser id and cookies to authenticate existing users, and then only send a new email link when these did not match, that could work maybe.
This was my thinking as well. I love the idea, especially for sites where you just need a few user settings, but it needs a way to retain the authentication without going to the email every time. Could make the authenticated URL a bookmark, but most people wouldn't do that.
In main.php change DIR to FILE Reason: DIR is new in PHP 5.3. If you need this script to run on earlier versions of PHP, use dirname(FILE) instead.
Hi, really nice tutorial. Is there any way to combine PHP and Bootstrap like this?
Hi, really nice tutorial. Is there any way to combine PHP and Bootstrap like this?
Martin your tutorial is very nice, i also recently wrote tutorial about PHP registration, hope you will find it helpful too.
http://www.allphptricks.com/simple-user-registration-login-script-in-php-and-mysqli/
Nice work there. But I wanted to know how to Autoload Idiorm.php using php Autoloader.php. Secondly how can I break down or separate the User.Class into Signup.Class and Login.Class. Please attend to my question. Thank you