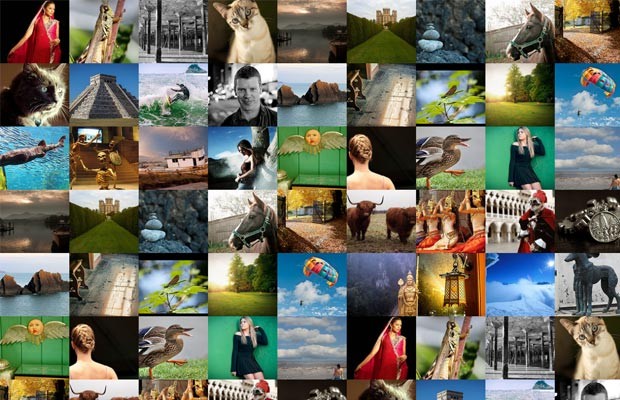
Smooth Diagonal Fade Gallery with CSS3 Transitions
In this tutorial we are going to create a gallery with a smooth diagonal fade effect, powered by css3 transitions. It will scan a folder with photos on the server and display them in a grid that spans the entire browser window. Adding new photos is as easy as copying two files (a regular image and a thumbnail, preferably 150x150 px) to the gallery folder.
CSS3 capable browsers will show a smoothly animated diagonal fade effect, while older browsers will fall back to a simpler but still perfectly usable non-animated version of the gallery.
The HTML
As usual, the first thing we do when starting work on a new project is to write the HTML.
index.html
<!DOCTYPE html>
<html>

    <head>
        <meta charset="utf-8"/>
        <title>Smooth Diagonal Fade Gallery with CSS3 Transitions</title>

        <!-- The Swipebox plugin -->
        <link href="assets/swipebox/swipebox.css" rel="stylesheet" />

        <!-- The main CSS file -->
        <link href="assets/css/style.css" rel="stylesheet" />

        <!--[if lt IE 9]>
            <script src="http://html5shiv.googlecode.com/svn/trunk/html5.js"></script>
        <![endif]-->
    </head>

    <body>

        <div id="loading"></div>

        <div id="gallery"></div>

        <!-- JavaScript Includes -->
        <script src="https://ajax.googleapis.com/ajax/libs/jquery/1.10.0/jquery.min.js"></script>
        <script src="assets/swipebox/jquery.swipebox.min.js"></script>
        <script src="assets/js/jquery.loadImage.js"></script>
        <script src="assets/js/script.js"></script>

    </body>
</html>
The gallery depends on the jQuery library, which I've included before the closing body tag. I have also added a great little lightbox plugin called Swipebox, but you can easily replace it with the lightbox of your choice. The two main divs are #loading and #gallery. The first holds a loading gif, and the second the gallery photos. The #gallery div is set to position:fixed so it takes the entire width and height of the page. The markup for the photos themselves is just as simplistic:
<a href="assets/photos/large/34.jpg" class="swipebox static"
    style="width:148px;height:129px;background-image:url(assets/photos/thumbs/34.jpg)">
</a>
The photos in the gallery are all 150x150 pixels, which means we will almost never achieve an exact fit for the entire page, unless we resize them a bit. This is exactly what has happened to the photo above, which is why it has a width and height value in its style attribute. You will see how we calculate this in the JS section.
Scanning for Photos with PHP
The photos are contained in two folders on the server - assets/photos/thumbs/ for the thumbnails, and assets/photos/large/ one for the full sizes. With PHP, we will scan the folders and output a JSON with the file names. You could alternatively return the images from a database, but you will have to keep the same structure. Here is the script:
load.php
// Scan all the photos in the folder
$files = glob('assets/photos/large/*.jpg');

$data = array();
foreach($files as $f){
    $data[] = array(
        'thumb' => str_replace('large', 'thumbs', $f),
        'large' => $f
    );
}

// Duplicate the photos a few times, so that we have what to paginate in the demo.
// You most certainly wouldn't want to do this with your real photos.
// $data = array_merge($data, $data);
// $data = array_merge($data, $data);
// $data = array_merge($data, $data);

header('Content-type: application/json');

echo json_encode(array(
    'data' => $data,
));
Adding new photos to the gallery is as easy as copying the image and its thumbnail to the correct folder (both files should have the same name!). I have duplicated the photos a few times so we have a larger pool to show in the gallery, but you probably won't want to do this with your real photos.
Now that we have the JSON in place, let's write some JavaScript!
The JavaScript
Here is what we need to do:
- First we will issue an AJAX GET request to fetch all the photos on disk from the PHP script.
- Then we will calculate how many photos to show on the page and their sizes, depending on the dimensions of the window, so that they fit perfectly.
- We will preload all the images that will be shown on the current page with a preloader script that uses jQuery deferreds. In the meantime, we will show the #loading div.
- After everything is loaded, we will generate the markup for the photos and add them to the #gallery element. Then we will trigger the diagonal fade animation and initialize the Swipebox gallery.
- When the user clicks on an arrow, we will repeat steps 3 and 4 (with either a top-left or a bottom-right animation).
The code is too long for me to present in one go, so I will show it to you in parts. First, here is the overall structure that we will follow:
assets/js/script.js
$(function(){

    // Global variables that hold state

    var page = 0,
        per_page = 100,
        photo_default_size = 150,
        picture_width = photo_default_size,
        picture_height = photo_default_size,
        max_w_photos, max_h_photos
        data = [];

    // Global variables that cache selectors

    var win = $(window),
        loading = $('#loading'),
        gallery = $('#gallery');

    gallery.on('data-ready window-resized page-turned', function(event, direction){

        // Here we will have the JavaScript that preloads the images
        // and adds them to the gallery

    });

    // Fetch all the available images with
    // a GET AJAX request on load

    $.get('load.php', function(response){

        // response.data holds the photos

        data = response.data;

        // Trigger our custom data-ready event
        gallery.trigger('data-ready');

    });

    gallery.on('loading',function(){
        // show the preloader
        loading.show();
    });

    gallery.on('loading-finished',function(){
        // hide the preloader
        loading.hide();
    });

    gallery.on('click', '.next', function(){
        page++;
        gallery.trigger('page-turned',['br']);
    });

    gallery.on('click', '.prev', function(){
        page--;
        gallery.trigger('page-turned',['tl']);
    });

    win.on('resize', function(e){

        // Here we will monitor the resizing of the window
        // and will recalculate how many pictures we can show
        // at once and what their sizes should be so they fit perfectly

    }).resize();

    /* Animation functions */

    function show_photos_static(){

        // This function will show the images without any animations
    }

    function show_photos_with_animation_tl(){

        // This one will animate the images from the top-left

    }

    function show_photos_with_animation_br(){

        // This one will animate the images from the bottom-right

    }

    /* Helper functions */

    function get_per_page(){

        // Here we will calculate how many pictures
        // should be shown on current page

    }

    function get_page_start(p){

        // This function will tell us which is the first
        // photo that we will have to show on the given page

    }

    function is_next_page(){

        // Should we show the next arrow?

    }

    function is_prev_page(){

        // Should we show the previous arrow?

    }

});
Some of the function definitions are left blank, but you can see them further down the page. The first group of variable definitions will hold the state of the gallery - dimensions, array of pictures, current page etc, which allows for a cleaner separation between the logic and the data. We will use custom events for better code organization (by listening for and triggering arbitrary named events). You can think for these event listeners as the methods of an object and the variables near the beginning as its properties.
After you've read through all the comments in the fragment above, proceed with the first event listener, which outputs the relevant slice of the images array depending on the current page:
gallery.on('data-ready window-resized page-turned', function(event, direction){

    var cache = [],
        deferreds = [];

    gallery.trigger('loading');

    // The photos that we should be showing on the new screen
    var set = data.slice(get_page_start(), get_page_start() + get_per_page());

    $.each(set, function(){

        // Create a deferred for each image, so
        // we know when they are all loaded
        deferreds.push($.loadImage(this.thumb));

        // build the cache
        cache.push('<a href="' + this.large + '" class="swipebox"' +
                    'style="width:' + picture_width + 'px;height:' + picture_height + 'px;background-image:url(' + this.thumb + ')">'+
                    '</a>');
    });

    if(is_prev_page()){
        cache.unshift('<a class="prev" style="width:' + picture_width + 'px;height:' + picture_height + 'px;"></a>');
    }

    if(is_next_page()){
        cache.push('<a class="next" style="width:' + picture_width + 'px;height:' + picture_height + 'px;"></a>');
    }

    if(!cache.length){
        // There aren't any images
        return false;
    }

    // Call the $.when() function using apply, so that
    // the deferreds array is passed as individual arguments.
    // $.when(arg1, arg2) is the same as $.when.apply($, [arg1, arg2])

    $.when.apply($, deferreds).always(function(){

        // All images have been loaded!

        if(event.type == 'window-resized'){

            // No need to animate the photos
            // if this is a resize event

            gallery.html(cache.join(''));
            show_photos_static();

            // Re-initialize the swipebox
            $('#gallery .swipebox').swipebox();

        }
        else{

            // Create a fade out effect
            gallery.fadeOut(function(){

                // Add the photos to the gallery
                gallery.html(cache.join(''));

                if(event.type == 'page-turned' && direction == 'br'){
                    show_photos_with_animation_br();
                }
                else{
                    show_photos_with_animation_tl();
                }

                // Re-initialize the swipebox
                $('#gallery .swipebox').swipebox();

                gallery.show();

            });
        }

        gallery.trigger('loading-finished');
    });

});
Although the images are added to the #gallery div in a single operation, they are set to opacity:0 with css. This sets the stage for the animation functions. The first of them shows the photos without an animation, and the latter two animate them in a wave from the top-left or the bottom-right. The animation is entirely CSS based, and is triggered when we assign a class name to the images with jQuery.
function show_photos_static(){

    // Show the images without any animations
    gallery.find('a').addClass('static');

}

function show_photos_with_animation_tl(){

    // Animate the images from the top-left

    var photos = gallery.find('a');

    for(var i=0; i<max_w_photos + max_h_photos; i++){

        var j = i;

        // Loop through all the lines
        for(var l = 0; l < max_h_photos; l++){

            // If the photo is not of the current line, stop.
            if(j < l*max_w_photos) break;

            // Schedule a timeout. It is wrapped in an anonymous
            // function to preserve the value of the j variable

            (function(j){
                setTimeout(function(){
                    photos.eq(j).addClass('show');
                }, i*50);
            })(j);

            // Increment the counter so it points to the photo
            // to the left on the line below

            j += max_w_photos - 1;
        }
    }
}

function show_photos_with_animation_br(){

    // Animate the images from the bottom-right

    var photos = gallery.find('a');

    for(var i=0; i<max_w_photos + max_h_photos; i++){

        var j = per_page - i;

        // Loop through all the lines
        for(var l = max_h_photos-1; l >= 0; l--){

            // If the photo is not of the current line, stop.
            if(j > (l+1)*max_w_photos-1) break;

            // Schedule a timeout. It is wrapped in an anonymous
            // function to preserve the value of the j variable

            (function(j){
                setTimeout(function(){
                    photos.eq(j).addClass('show');
                }, i*50);
            })(j);

            // Decrement the counter so it points to the photo
            // to the right on the line above

            j -= max_w_photos - 1;
        }
    }
}
Next is the function that listens for the window resize event. This can arise whenever the browser window is resized or when the device orientation is changed. In this function we will calculate how many photos we can fit on the screen, and what their exact sizes should be so they fit perfectly.
win.on('resize', function(e){

    var width = win.width(),
        height = win.height(),
        gallery_width, gallery_height,
        difference;

    // How many photos can we fit on one line?
    max_w_photos = Math.ceil(width/photo_default_size);

    // Difference holds how much we should shrink each of the photos
    difference = (max_w_photos * photo_default_size - width) / max_w_photos;

    // Set the global width variable of the pictures.
    picture_width = Math.ceil(photo_default_size - difference);

    // Set the gallery width
    gallery_width = max_w_photos * picture_width;

    // Let's do the same with the height:

    max_h_photos = Math.ceil(height/photo_default_size);
    difference = (max_h_photos * photo_default_size - height) / max_h_photos;
    picture_height = Math.ceil(photo_default_size - difference);
    gallery_height = max_h_photos * picture_height;

    // How many photos to show per page?
    per_page = max_w_photos*max_h_photos;

    // Resize the gallery holder
    gallery.width(gallery_width).height(gallery_height);

    gallery.trigger('window-resized');

}).resize();
The last line causes the function to be triggered right after it is defined, which means that we have correct values from the start.
The following helper functions abstract away some of the most often used calculations:
function get_per_page(){

    // How many pictures should be shown on current page

    // The first page has only one arrow,
    // so we decrease the per_page argument with 1
    if(page == 0){
        return per_page - 1;
    }

    // Is this the last page?
    if(get_page_start() + per_page - 1 > data.length - 1){
        // It also has 1 arrow.
        return per_page - 1;
    }

    // The other pages have two arrows.
    return per_page - 2;
}

function get_page_start(p){

    // Which position holds the first photo
    // that is to be shown on the give page

    if(p === undefined){
        p = page;
    }

    if(p == 0){
        return 0;
    }

    // (per_page - 2) because the arrows take up two places for photos
    // + 1 at the end because the first page has only a next arrow.

    return (per_page - 2)*p + 1;
}

function is_next_page(){

    // Should we show the next arrow?

    return data.length > get_page_start(page + 1);
}

function is_prev_page(){

    // Should we show the previous arrow?

    return page > 0;
}
They may be only a couple of lines long and used only once or twice, but they do a great deal towards making our code more readable.

The CSS
And finally, here is the CSS code. The photos have zero opacity by default, and have a scale transformation of 0.8 applied to them. They also have the transition property set, which will cause every change of an attribute to be animated. The .show class, which is added by the animation functions, raises the opacity and the scale of the element, which is automatically animated by the browser.
assets/css/styles.css
#gallery{
    position:fixed;
    top:0;
    left:0;
    width:100%;
    height:100%;
}

#gallery a{
    opacity:0;
    float:left;
    background-size:cover;
    background-position: center center;

    -webkit-transform:scale(0.8);
    -moz-transform:scale(0.8);
    transform:scale(0.8);

    -webkit-transition:0.4s;
    -moz-transition:0.4s;
    transition:0.4s;
}

#gallery a.static:hover,
#gallery a.show:hover{
    opacity:0.9 !important;
}

#gallery a.static{
    opacity:1;

    -webkit-transform:none;
    -moz-transform:none;
    transform:none;

    -webkit-transition:opacity 0.4s;
    -moz-transition:opacity 0.4s;
    transition:opacity 0.4s;
}

#gallery a.next,
#gallery a.prev{
    background-color:#333;
    cursor:pointer;
}

#gallery a.next{
    background-image:url('../img/arrow_next.jpg');
}

#gallery a.prev{
    background-image:url('../img/arrow_prev.jpg');
}

#gallery a.show{
    opacity:1;

    -webkit-transform:scale(1);
    -moz-transform:scale(1);
    transform:scale(1);
}
The .static class is set by the show_photos_static() function and it disables all animations (with the exception of opacity, as we want the hover effect to still be smooth) and shows the photos immediately (otherwise on every resize you would see the diagonal fade). You can see the rest of this file in the tutorial files, which you can download from the button near the top of the page.
We're done!
I hope that you like this little experiment and find many uses for this smoothly animated gallery.
Bootstrap Studio
The revolutionary web design tool for creating responsive websites and apps.
Learn more
WOW ! Very nice. Thanks for sharing
Amazing one guys, But I am waiting for something better when someone clicks on image.
I have error on my console XMLHttpRequest cannot load ~/Downloads/dfg/load.php. Origin null is not allowed by Access-Control-Allow-Origin.
You probably tried to load the gallery by clicking the index.html. This won't work, because browsers don't allow AJAX requests to local files for security reasons (even if they did, load.php will be returned as a text file and not executed).
To make it work, you will have to open it through a locally running web server (like apache as part of XAMPP/MAMP/WAMP etc) or to upload it to a web host.
This is realy great guys, thanks for sharing!
Amazing! Thanks!
Now that is something I will use over and over again! Great job man, really great!
Amazing stuff. Loved it
Hi, wow..nice gallery!! Thanks for the source and tutorial.
Hi Sir,
This is a great gallary, but I am a bit confused with the "next page arrow"
From your example, there are only 35 pic but you set per_page = 100 in the script. It should not show the next arrow right? But it just shows three pages from your example.
Can you elaborate how this works please?
Thanks!
The per_page is set to 100 by default, but this is re-calculated on load and on every window/resize. I could have written it as
per_page = nullwith the same effect.Hi,
Great gallery!
Is it possible to change this gallery so that it shows perhaps 7-9 images per page in a constrained space (e.g. 450 x 450px instead of full background)?
Thanks!
Hi, can u please give me a code snippet to load images from database to the same structure that you have made?
Unfortunately I don't have one ready. You will have to read the database records and output the same json that I use. Maybe someone from the community will post an example eventually.
nice post~is it possible to use timthumb to generate thumbnails automatically? That would be more convenient for site management
Fantastic! However, how to automate the transition?
Here is one way to do it.
Great tutorial. Design is lovely, code is very clean, everything feels right. :)
On a side note, you probably should have used an unordered list instead of a bunch of lonely anchor tags. I think it would be semantically better.
Thank you! Yes, it would be semantically correct, but the markup is generated with JavaScript so there will be no benefits that I can think of, it will only make things a tiny bit more complicated on the CSS side.
Love the Swipebox.
This is the best gallery i've seen so far, is it possible to somehow incorporate the description from pictures contained in metadata? or done manually? thanks, and congrats for your work
Beautiful work!
Don't know why it won't work properly(e.g. photos won't show up or the fade effect only start from top left) if I change the name of the folder.
Simply Cool! great work. The only thing to be conscious of is that this technique isn't always that great, and seems to not work for some people, but it works with me in Chrome, Firefox and Safari.
This is beautiful!
I love your tutorials, brilliant stuff
Amazing. I'm going to build something like this. Thanks for the tutorial.