How to Make a Mac OSX-like Animated Folder with CSS3
In this short tutorial, we are going to make a OSX-like folder with CSS3, by utilizing 3D transforms, gradients and box shadows. In addition, we are going to use jQuery UI and its drag and drop interactions to build a pretty interactive demo.
HTML
The HTML of the folder is as simple as it gets - we only need a div for the front cover and one of the back:
<div class="folder">
    <div class="front"></div>
    <div class="back"></div>
</div>
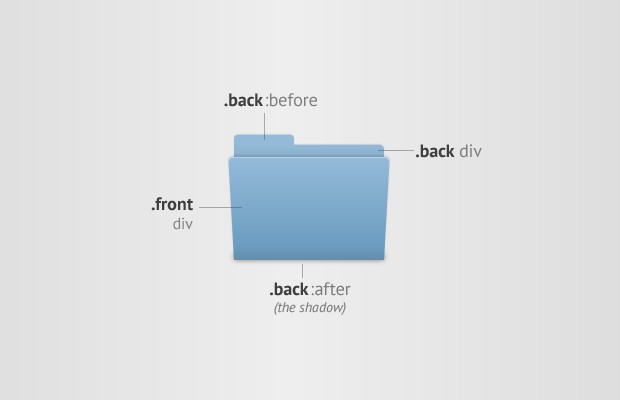
In the great spirit of CSS3 traditions, we are keeping the needed markup to a minimum, and we are depending on the pseudo :before and :after elements to add the finer details. See the illustration below for an example.
And here is the page we will be working on. Inside #main div is the folder and the icons that we will be setting as draggables using jQuery UI:
index.html
<!DOCTYPE html>
<html>
<head>
<meta charset="utf-8" />
<title>How to Make a OSX-like Animated Folder with CSS3 | Tutorialzine </title>
<!-- The jQuery UI Styles -->
<link rel="stylesheet" href="http://code.jquery.com/ui/1.9.2/themes/base/jquery-ui.css" />
<!-- Our stylesheet -->
<link rel="stylesheet" href="assets/css/styles.css" />
</head>
<body>
<div id="main">
<div class="folder">
<div class="front"></div>
<div class="back"></div>
</div>
<img src="assets/48px/box.png" style="top:340px;left:100px;" alt="box" />
<!-- More icons here .. -->
</div>
<!-- JavaScript Includes -->
<script src="http://code.jquery.com/jquery-1.8.3.min.js"></script>
<script src="http://code.jquery.com/ui/1.9.2/jquery-ui.js"></script>
<script src="assets/js/script.js"></script>
</body>
</html>
Also, before the closing body tag I am including the jQuery library and jQuery UI, along with the script.js file that you will see later. First, let's discuss the most important part - the CSS.
CSS
To start, we will style the div with the folder class you saw above. This is also the place where we define the perspective setting, which is important for the 3D CSS effect. You can think of this property as your distance from the element (the closer you are, the more pronounced the perspective is).
assets/css/styles.css
.folder {
    /* This will enable the 3D effect. Decrease this value
     * to make the perspective more pronounced: */

    -webkit-perspective: 800px;
    -moz-perspective: 800px;
    perspective: 800px;

    position: absolute;
    top: 50%;
    left: 50%;
    z-index: 0;

    width: 160px;
    height: 120px;
    margin: -100px 0 0 -60px;
}
After this, we will style the .front and .back divs that comprise the folder. I have grouped the rules that these elements have in common in the .folder div block:
.folder div{
    width:150px;
    height:115px;

    background-color:#93bad8;

    /* Enabling 3d space for the transforms */
    -webkit-transform-style: preserve-3d;
    -moz-transform-style: preserve-3d;
    transform-style: preserve-3d;

    /* Enabling a smooth animated transition */
    -webkit-transition:0.5s;
    -moz-transition:0.5s;
    transition:0.5s;

    /* Disable text seleltion on the folder */
    -webkit-user-select: none;
    -moz-user-select: none;
    user-select: none;

    position:absolute;
    top:0;
    left:50%;
    margin-left:-75px;
}
I am using the transition property to tell the browser that it should animate between changes in the values of the other CSS properties. This will cause the folder to open smoothly when we start dragging one of the icons. Next is the front div:
.folder .front{
    border-radius:5px 5px 0 0;

    -moz-transform:rotateX(-30deg);
    -webkit-transform:rotateX(-30deg);
    transform:rotateX(-30deg);

    -moz-transform-origin:50% 100%;
    -webkit-transform-origin:50% 100%;
    transform-origin:50% 100%;

    background-image: -moz-linear-gradient(top, #93bad8 0%, #6c9dc0 85%, #628faf 100%);
    background-image: -webkit-linear-gradient(top, #93bad8 0%, #6c9dc0 85%, #628faf 100%);
    background-image: linear-gradient(top, #93bad8 0%, #6c9dc0 85%, #628faf 100%);

    box-shadow:0 -2px 2px rgba(0,0,0,0.1), 0 1px rgba(255,255,255,0.35) inset;

    z-index:10;

    font: bold 26px sans-serif;
    color: #5A88A9;
    text-align: center;
    text-shadow: 1px 1px 1px rgba(255, 255, 255, 0.1);
    line-height: 115px;
}
This is where we set the background of the front cover, and apply the initial rotation. This leaves the back cover:
.folder .back{
    background-image: -webkit-linear-gradient(top, #93bad8 0%, #89afcc 10%, #5985a5 60%);
    background-image: -moz-linear-gradient(top, #93bad8 0%, #89afcc 10%, #5985a5 60%);
    background-image: linear-gradient(top, #93bad8 0%, #89afcc 10%, #5985a5 60%);

    border-radius:0 5px 0 0;
    box-shadow:0 -1px 1px rgba(0,0,0,0.15);
}

/* The top part */
.folder .back:before{
    content:'';
    width:60px;
    height:10px;
    border-radius:4px 4px 0 0;
    background-color:#93bad8;
    position:absolute;
    top:-10px;
    left:0px;
    box-shadow:0 -1px 1px rgba(0,0,0,0.15);
}

/* The shadow */
.folder .back:after{
    content:'';
    width:100%;
    height:4px;
    border-radius:5px;
    position:absolute;
    bottom:5px;
    left:0px;
    box-shadow:0 4px 8px #333;
}
All that is left, is to define the open class on the folder. When this class is added, the front will tilt forward as a result by the larger rotateX value.
.folder.open .front{
    -moz-transform:rotateX(-50deg);
    -webkit-transform:rotateX(-50deg);
    transform:rotateX(-50deg);
}
Great! Now let's sprinkle some jQuery goodness to make the example work:
jQuery
As I mentioned previously, we are using jQuery UI and the drag&drop interaction to allow users to move icons around. When a drag starts, we will apply the open class to the folder which triggers the CSS3 transition.
assets/js/script.js
$(function() {

    var folder = $("#main .folder"),
        front = folder.find('.front'),
        img = $("#main img"),
        droppedCount = 0;

    img.draggable();

    folder.droppable({
        drop : function(event, ui) {

            // Remove the dragged icon
            ui.draggable.remove();

            // update the counters
            front.text(++droppedCount);

        },

        activate : function(){
            // When the user starts draggin an icon
            folder.addClass('open');
        },

        deactivate : function(){
            // Close the folder
            folder.removeClass('open');
        }
    });
});
And with this we're done!
Wrap up
It is cool that so much can be done with CSS3 without much effort. But it could be even cooler - you could use the HTML5 File APIs and allow users to upload files by dragging them from their desktops (hint: remember this tut?). I am sure that you folks will think of wonderful ways to enhance this code.
Bootstrap Studio
The revolutionary web design tool for creating responsive websites and apps.
Learn more
Owa! boss. Its awesome. Let me try :)
Thank you!
Simply state of the art UI :)
Great work! ...needs evolving so we can open the folder and retrieve whatever's in there though...if it could incorporate that it would be a killer pieve of work. Well done.
Great tutorial. Very creative
very nice , tnx
Awesome :)
Simply awesome, i will try this one.
I have been poking around a bit. In case anyone is interested; https://github.com/EliasZ/animated-folder
Cool~just like in Mac OS
This is so cool! Interesting what can be done with CSS3...
I need to try this one, I am thinking countless ideas that I can do with this technique. Thanks for the tut!
Very nice!
Thx.
Great !!
wow, this is amazing.
What i really love about this tutorial is that it shows technique used like 70% of the time - toggling classes for creating such awesome effects. This tutorial alone is enough for completing most of the day-to-day challenges when building web apps
Brilliant output