Tutorial: Create a Beautiful Password Strength Meter
In this tutorial we will be creating a beautiful password strength indicator. It will determine the complexity of a password and move a meter accordingly with the help of the new Complexify jQuery plugin. Only when a sufficiently complex password is entered, will the user be able to continue with their registration.
A PSD file is also available, so you can customize the form to your liking.
The HTML
We start off with a standard HTML5 document that will include our registration form. The form will only serve as an example of the password meter - if you need support for actual registrations, you will need to write the required server-side code.
index.html
<!DOCTYPE html>
<html>
<head>
<meta charset="utf-8" />
<title>How to Make a Beautiful Password Strength Indicator</title>
<!-- The stylesheet -->
<link rel="stylesheet" href="assets/css/styles.css" />
<!--[if lt IE 9]>
<script src="http://html5shiv.googlecode.com/svn/trunk/html5.js"></script>
<![endif]-->
</head>
<body>
<div id="main">
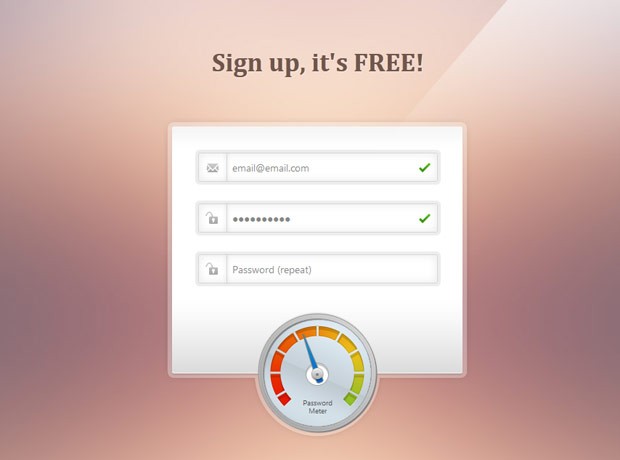
<h1>Sign up, it's FREE!</h1>
<form class="" method="post" action="">
<div class="row email">
<input type="text" id="email" name="email" placeholder="Email" />
</div>
<div class="row pass">
<input type="password" id="password1" name="password1" placeholder="Password" />
</div>
<div class="row pass">
<input type="password" id="password2" name="password2" placeholder="Password (repeat)" disabled="true" />
</div>
<!-- The rotating arrow -->
<div class="arrowCap"></div>
<div class="arrow"></div>
<p class="meterText">Password Meter</p>
<input type="submit" value="Register" />
</form>
</div>
<!-- JavaScript includes - jQuery, the complexify plugin and our own script.js -->
<script src="http://code.jquery.com/jquery-1.7.2.min.js"></script>
<script src="assets/js/jquery.complexify.js"></script>
<script src="assets/js/script.js"></script>
</body>
</html>
We are including the latest version of jQuery, the Complexify plugin and our script.js right before the closing body tag for better performance.
jQuery
The jQuery code below is quite straightforward. We are binding a number of events to the form elements and validating them. If an error was encountered, we add an "error" class to the .row div that contains the input. This will display the red cross. The "success" class on the other hand will display a green check mark. When the form is submitted, we check whether all of the rows are marked as successful for allowing the submission.
assets/js/script.js
$(function(){

    // Form items
    var pass1 = $('#password1'),
        pass2 = $('#password2'),
        email = $('#email'),
        form = $('#main form'),
        arrow = $('#main .arrow');

    // Empty the fields on load
    $('#main .row input').val('');

    // Handle form submissions
    form.on('submit',function(e){

        // Is everything entered correctly?
        if($('#main .row.success').length == $('#main .row').length){

            // Yes!
            alert("Thank you for trying out this demo!");
            e.preventDefault(); // Remove this to allow actual submission

        }
        else{

            // No. Prevent form submission
            e.preventDefault();

        }
    });

    // Validate the email field
    email.on('blur',function(){

        // Very simple email validation
        if (!/^\S+@\S+\.\S+$/.test(email.val())){
            email.parent().addClass('error').removeClass('success');
        }
        else{
            email.parent().removeClass('error').addClass('success');
        }

    });

    /* The Complexify code will go here */

    // Validate the second password field
    pass2.on('keydown input',function(){

        // Make sure it equals the first
        if(pass2.val() == pass1.val()){

            pass2.parent()
                    .removeClass('error')
                    .addClass('success');
        }
        else{
            pass2.parent()
                    .removeClass('success')
                    .addClass('error');
        }
    });

});
With this out of the way, we can move on with the Complexify plugin that will validate the password. The plugin takes a callback function with two arguments - a percentage value from 0 to 100 depending on the complexity of the password, and a valid flag that takes into account the minimum length requirement, defined by the minimumChars property.
By tweaking the strengthScaleFactor property you can allow simpler passwords to be used. The default scale is 1 which requires a mix of upper and lower case letters, numbers and special characters, but I found it too strict so I lowered it to 0.7. You can lower it further if you need even simpler passwords.
pass1.complexify({minimumChars:6, strengthScaleFactor:0.7}, function(valid, complexity){

    if(valid){
        pass2.removeAttr('disabled');

        pass1.parent()
                .removeClass('error')
                .addClass('success');
    }
    else{
        pass2.attr('disabled','true');

        pass1.parent()
                .removeClass('success')
                .addClass('error');
    }

    var calculated = (complexity/100)*268 - 134;
    var prop = 'rotate('+(calculated)+'deg)';

    // Rotate the arrow. Additional rules for different browser engines.
    arrow.css({
        '-moz-transform':prop,
        '-webkit-transform':prop,
        '-o-transform':prop,
        '-ms-transform':prop,
        'transform':prop
    });
});
If a valid value has been passed, we will enable the second password field (it is disabled by default). We will also use CSS3 transformations to rotate the arrow. The transformation will be animated thanks to a transition property which you can see in the CSS section. The arrow moves from -134 to 134 degrees (the default 0 degrees correspond to the arrow pointing vertically up), so the code compensates for that.
CSS
I will include only the more interesting parts of the stylesheet here. The code that follows styles the arrow and defines a transition.
assets/css/styles.css
#main form .arrow{
    background: url("../img/arrow.png") no-repeat -10px 0;
    height: 120px;
    left: 214px;
    position: absolute;
    top: 392px;
    width: 11px;

    /* Defining a smooth CSS3 animation for turning the arrow */

    -moz-transition:0.3s;
    -webkit-transition:0.3s;
    -o-transition:0.3s;
    -ms-transition:0.3s;
    transition:0.3s;

    /* Putting the arrow in its initial position */

    -moz-transform: rotate(-134deg);
    -webkit-transform: rotate(-134deg);
    -o-transform: rotate(-134deg);
    -ms-transform: rotate(-134deg);
    transform: rotate(-134deg);
}

/* The small piece that goes over the arrow */
#main form .arrowCap{
    background: url("../img/arrow.png") no-repeat -43px 0;
    height: 20px;
    left: 208px;
    position: absolute;
    top: 443px;
    width: 20px;
    z-index: 10;
}
You can find the rest of the code in assets/css/styles.css. The best way to learn how it all works is by inspecting the working demo with Firebug or Chrome's Developer tools and playing with the styles.
We're done!
You can build upon this example and use it to present an eye catching validation option for your customers. And it is even easier to customize with the included PSD.
Bootstrap Studio
The revolutionary web design tool for creating responsive websites and apps.
Learn more
Very nice pwd-meter ;) Enjoyed it.
The render is very nice but the complexity checker looks really simply.
I never used complexify but it seems in the demo that only the lenght of the password is a way to securize it... What about mix of numeric, letters and special characters ???
With the percentage on the Dan Palmer's page it seems like it's count but just one percent more for non-letter character...
But one more time it's a really cool design ! :)
The plugin adds different weights to different groups of characters. For example it gives more weight to cyrillic and arabic alphabets than to latin, but it does not force you to put different kinds of characters - you can construct your password only using lower case letters but you will have to provide a longer password.
Of course you can easily replace it with a different plugin if you need to.
Yeah you're right, i was just thinking too much about off-topic. ^_^
Hi xTG,
Just thought I'd try and explain briefly:
Complexify works out the mathematical complexity of breaking the password. It actually does the real sums to work out how difficult that process would be based on the different range of characters you've used, and the length.
It turns out, when you work it out, that the length of the password contributes far more to making it secure than adding special characters. For example, if you use a 10 character password with lowercase letters and numbers, the complexity is (26+10)^10 which is 3.610^15. However, if you use just lower case letters but have 12 characters, the complexity is 9.510^16, which is an order of magnitude higher!
While it might seem a little counter-intuitive because of how people are educated about password security, I can assure you that it is mathematically sound.
I love your tutorials thanks
As always, this is beautiful.
Thank you for these tutorials. I am grateful.
Regards :)
awesome like always ;)
Very nice design,it is quite engaging.
Very nice tutorial!
This my give me ideas for my next Android app
I loved everything in this form!
thanks man!
Thank you for the awesome comments folks!
Thanks, is very cool!!
Man it seem as "how much symbols in textfield"-meter.
But cool design, and cool realisation.
that was awwwesome...
loved it
Martin it's nice, and i love that animated meter but i believe it's not quite practical because it keeps on increasing the meter value depending upon total number of characters and doesn't look whether i have mix letters or not.
I have seen one on this site http://www.thetutlage.com/post=TUT152 , his regex seems to be better but your meter is too cool...
I will use his regex and your designs to setup mine. :-)
Of course, you can modify it as you wish :)
WOW!
Now this is some tasteful stuff :)
Glad you like it!
Very nice. Really looks good and works brilliantly.
Great..very nicely done and self explanatory .. and of course design is very neat and clean.keep it up.
Nice, but getting a full strength password is hard work - i'd not wanna have to remember that every time..!
lol I LOVED the meter-gauge for it. Awesome tutorial. Might use it in the near future!!
Why is simply increasing the amount of characters used increasing the password its strength? The algorithm used might need some improvement but overall it looks really awesome!
Thank you! Yes it could use some improvements. Maybe going with a different plugin might have been a better decision.
Very cool. My site doesn't require a password but maybe for a client in the future I can give this a shot.
Nice, I love it. Thank you ...
Martin Angelov, you are an awesome dude. Love your work and tutorial very much :)
Fantastic and handsome! I'm using it to create a questionnaire that pepole can edit using their password.
I like the style too so i whould like to use the same style to the questionnaire page. May I have the form_bg psd?
Its really nice and you look really cute..
Hi Martin,
Yup, it does look really, beautiful! To make it even more gorgeous, I hit upon an idea. Why not make the orange bars (within the meter) even more glossy, with white fading gradient? That will add the "shiny" look and enhance its appeal even more.
Great tutorial by the way!
It's very very nice form. Thanks very much.
Cool ,very nice design....
Oh wow, that`s beautiful. great work indeed.
Very nice, thank you!
Make sure you guys add the autocomplete="off" parameter to the form, or the yellow Chrome box will mess the style up!
Great job Martin i really love this plugin but 1 thing which i think would make this plugin really interesting would be to move the needle all the way to end when password field gets the focus like we see in cars & bikes when we key in the ignition the speedometer pointer goes all the way to end please tell me how can i get this effect
thanks.
oh that's great tutorial
I am trying to incorporate this sign up form into a password script. However, instead of using an email address, I am using all letters only, excluding special characters. Thus, I need to change the email validation to check for any special characters. Can someone show me how to write this up in the .js file?
I managed to get it working on my site. I noticed when loading on a smartphone(iphone), the arrow & button is not in the center of the meter, It views fine on a pc. Anyone knows how I can fix this?
Really great tutorial. Can't seem to locate the PSD. Thanks!!!