Having Fun With CSS3: Spinning Newspapers
Imagine a cop drama taking place in the 1930s. After a streak of bank heists, a young detective is given the case of his life. He accepts the challenge, and after grueling months of hard work and life-threatening situations, he manages to bring the bad guys to justice.
What follows is a classical device used by film makers of the period - newspapers flashing and spinning towards the camera, praising the heroic feats of our protagonist.
So lets have some fun and build this classical scene using the CSS3 animations capabilities of the new versions of Firefox, Chrome and Safari, picking useful techniques along the way.
The Idea
Using JavaScript, we will load a sliced up version of the newspaper (slices are independently encoded as PNG or JPG for smaller filesize), and combine them in a single canvas element. We will also load a custom font from Google WebFonts, which we use to write the article title to the canvas.
We also define a simple CSS3 keyframe animation, which uses transformations such as scale() and rotate() to animate the canvas elements. Appending the canvas to the page triggers the animation, which means we don't need to write a single line of JavaScript for the effect itself.
Currently, CSS3 keyframe animations are supported by Firefox, Safari and Chrome, so if you are using a recent version of one of these browsers, you will be able to enjoy the demo.
Here are some minor considerations that drove the decisions above:
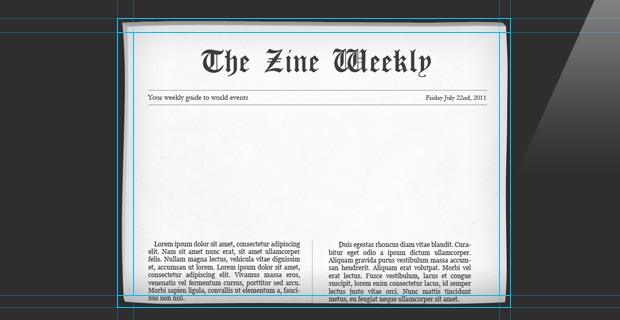
- The image of the newspaper, encoded as PNG, weighs at over 250kb. Slicing it into independently encoded slices saves 200kb, as the center part does need transparency and is encoded as JPEG;
- Rotating a bunch of DOM elements is slower than a single canvas element. Also, rotated text in the browser generally does not look very good, as letters may lose their anti-aliasing (see a simple experiment here; it is most pronounced in Firefox). Painting the text and the newspaper background to a
canvaselement solves both of these problems;
The HTML
The markup of the page is minimal - everything is done using jQuery, so we only need to include our JS source files and stylesheets.
index.html
<!DOCTYPE html>
<html>
    <head>
        <meta charset="utf-8" />
        <title>Spinning Newspaper Effect | Tutorialzine Demo</title>

        <!-- Our CSS stylesheet file -->
        <link rel="stylesheet" href="assets/css/styles.css" />

        <!-- Embedding the Anton font from Google Webfonts -->
        <link rel="stylesheet" href="http://fonts.googleapis.com/css?family=Anton&v2" />

        <!--[if lt IE 9]>
          <script src="http://html5shiv.googlecode.com/svn/trunk/html5.js"></script>
        <![endif]-->
    </head>

    <body>

        <h3 id="fin">That is all</h3>

        <!--
            This div uses the "Anton" font,
            preloading it for the canvas element
        -->
        <div id="fontPreload">.</div>

        <script src="http://ajax.googleapis.com/ajax/libs/jquery/1.6.2/jquery.min.js"></script>
        <script src="assets/js/script.js"></script>

    </body>
</html>
In the head section, we include our styles.css file (discussed below) and a stylsheet, which embeds the Anton font from Google WebFonts. Near the end of the file, we include version 1.6.2 of the jQuery library and our script.js (discussed in detail later on).
The most important piece of markup in the code is also the most unassuming. The #fontPreload div is crucial for this example. What it does is use the embedded Anton web font. This is required so that browsers properly initializes the font before it is used in the canvas. Without it we would be staring at a blank newspaper cover.
The jQuery
As we are using a custom web font, we need to be sure that the font is loaded before we use it to generate the newspaper titles. This is why we are binding a callback to the $(window).load() event, which is called once everything is loaded:
assets/js/script.js
$(window).load(function(){
var imgPath = "assets/img/";
// Define 6 paper covers:
var papers = [
{
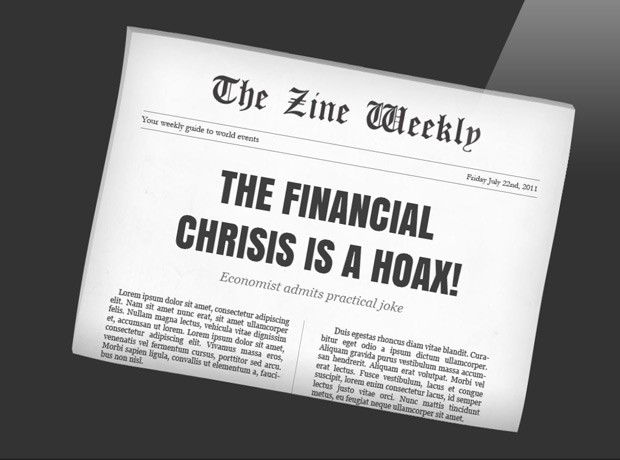
line1:"The financial",
line2:"chrisis is a hoax!",
subtitle:"Economist admits practical joke"
}, {
line1:"Deeply fried now",
line2:"considered healthy",
subtitle:"Scientists change the definition of \"Healthy\""
}, {
line1:"Apple announces",
line2:"the new iphone 9",
subtitle:"5, 6, 7 and 8 deemed \"not hip enough\""
}, {
line1:"The world did end",
line2:"on may 21st!",
subtitle:"Priest argues we are actually dead"
}, {
line1:"France imposes an",
line2:"internet kitten tax",
subtitle:"Every cat picture on the internet will cost 3 €"
}, {
line1:"Thank you &",
line2:"goodbye",
subtitle:"The Zine Weekly takes its farewell"
}
];
// Check whether canvas and CSS3 animations are supported:
if(!$.support.canvas){
$('#fin').html('Sorry, your browser does not<br />support <canvas>').show();
return;
}
if(!$.support.css3Animation){
$('#fin').html('Sorry, your browser does not<br />support CSS3 Animations').show();
return;
}
// Use jQuery.Deferred to bind a callback when all
// the images that comprise the paper are loaded:
$.when(
loadImage(imgPath+"paper_top.png"),
loadImage(imgPath+"paper_left.png"),
loadImage(imgPath+"paper_center.jpg"),
loadImage(imgPath+"paper_right.png"),
loadImage(imgPath+"paper_bottom.png")
).then(function( imgTop, imgLeft, imgCenter, imgRight, imgBottom ){
// Loop through the paper covers and
// create a new canvas for each one:
$.each(papers,function(i){
var canvas = document.createElement("canvas"),
c = canvas.getContext("2d");
canvas.width = 717;
canvas.height = 526;
// Drawing the paper background slices:
c.drawImage( imgTop, 0, 0 );
c.drawImage( imgLeft, 0, 12 );
c.drawImage( imgCenter, 14, 12 );
c.drawImage( imgRight, 711, 12 );
c.drawImage( imgBottom, 0, 516 );
// Drawing the text using our helper
// function (see at the bottom):
drawText( this.line1, this.line2, this.subtitle, c, 358, 250 );
// Appending the element to the page.
// This triggers the CSS3 animation.
setTimeout(function(){
$("body").append(canvas);
},i*5800);
});
// "This is all"
$('#fin').delay(papers.length*5800).fadeIn();
});
/*------------------------
Helper functions
------------------------*/
// Load an image by URL and resolve a jQuery.Deferred:
function loadImage(src){
var def = new $.Deferred(),
img = new Image();
img.onload = function(){
// Resolve the deferred. The img parameter
// will be available in the then function:
def.resolve(img);
}
// Always set the src attribute
// after the onload callback:
img.src = src;
return def.promise();
}
// Draw two lines of text and a subtitle
// on the canvas (passed as the c param):
function drawText( line1, line2, subtitle, c, x, y ){
c.font = "65px Anton,Calibri";
c.textAlign = "center";
c.fillStyle = "#3e3e3e";
c.fillText(line1.toUpperCase(),x,y);
c.fillText(line2.toUpperCase(),x,y+80);
c.font = "italic 20px Georgia,serif";
c.fillStyle = "#737373";
c.fillText(subtitle,x,y+120);
}
});
(function(){
// Adding custom checks for canvas and css3
// animations support, to the jQuery.support object:
$.support.canvas = 'getContext' in document.createElement('canvas');
$.support.css3Animation = (function(){
var sp = $('<span>');
return (
sp.css("-webkit-animation") !== undefined ||
sp.css("-moz-animation") !== undefined ||
sp.css("animation") !== undefined
);
})();
})();
To generate the newspapers, we need to first load the five slices that comprise the image. This sounds like the perfect place to use jQuery's Deferred object, introduced in version 1.5. What it does is to notify us when a number of asynchronous events are completed. As you can see in the code above, we are using it in the loadImage() function. The then() method on line 58 is called only when all five images are loaded.
Using jQuery.Deferred is a convenient way to organize our code better. It is also used by jQuery's internal AJAX and animation methods. To get a better idea of what you can do with it, read through the deferred object documentation.
Inside the $.each loop, we create a canvas element for each of the paper covers, and add them to the page after a delay introduced by the setTimeout() call.
Once we have the canvas on the page, we can continue with animating it.
The CSS
Canvas elements are treated as any other element. This means that you can safely style and transform them the same way as you would a regular image.
Once the canvas is added to the page, it will assume the styling you see below:
canvas{
    position:fixed;
    width:717px;
    height:526px;

    top:50%;
    left:50%;

    margin:-263px 0 0 -358px;
    opacity:0;

    /* Configure the animation for Firefox */
    -moz-animation-duration:6s;
    -moz-animation-name:spin;
    -moz-animation-timing-function:linear;

    /* Configure it for Chrome and Safari */
    -webkit-animation-duration:6s;
    -webkit-animation-name:spin;
    -webkit-animation-timing-function:linear;
}
Nothing out of the ordinary here. We are centering the canvas in the page, and defining the different aspects of the animation like duration, name, and a timing function. "Linear" would make our animation run at a constant speed, instead of getting accelerated as is the case with "ease", which is used by default.
After this, we have to use the @keyframes declaration to specify how our element would look at different key points during the animation:
@-moz-keyframes spin{
    0%{
        opacity:0.2;
        -moz-transform:scale(0.2) rotate(0deg);
    }

    15%{
        opacity:1;
        margin:-263px 0 0 -358px;
        -moz-transform:scale(1) rotate(1090deg);
    }

    90%{
        opacity:1;
        top:50%;
        -moz-transform:scale(1) rotate(1090deg);
    }

    100%{
        top:500%;
        opacity:1;
        -moz-transform:scale(1) rotate(1090deg);
    }
}
When the canvas element is added to the page, we start off from the 0% position above. The element's opacity is set to 0.2, and it is made 5 times smaller using a scale() transformation. It is quickly animated to its full size ( scale(1) ) in and from 15% to 90% of the animation (or about four and a half seconds) it stays fixed on the screen, after which it quickly falls outside the bottom border of the window (top is increased to 500%).
It is important to specify the properties that you want to persist in every percentage point of the animation. One example is the -moz-transform:scale(1) rotate(1090deg) declaration, which is duplicated three times. Without it, Chrome and Safari (but not Firefox) will revert to the default rotation of 0 degrees mid animation.
And, as this is still considered an experimental feature by browser vendors, we need to write the same code for webkit:
@-webkit-keyframes spin{
    0%{
        opacity:0.2;
        -webkit-transform:scale(0.2) rotate(0deg);
    }
    15%{
        opacity:1;
        margin:-263px 0 0 -358px;
        -webkit-transform:scale(1) rotate(1090deg);
    }
    90%{
        opacity:1;
        top:50%;
        -webkit-transform:scale(1) rotate(1090deg);
    }

    100%{
        top:500%;
        opacity:1;
        -webkit-transform:scale(1) rotate(1090deg);
    }
}
With this our spinning newspaper effect is complete!
Conclusion
As with any cop drama from the 1930s, and the 1930s themselves for that matter, this tutorial has to come to an end. Hope you folks had as much fun following the tutorial as I had writing it. If you have any thoughts or suggestion be sure to share in the comment section. You can also download a PSD with the newspaper template, so you can make your own, below.
Bootstrap Studio
The revolutionary web design tool for creating responsive websites and apps.
Learn more
hi
it seem's cool but it doesn't wok on fire fox 3.6.18
The article said if you have a newer browser it will work. if you are running 3.6 you are WAAY behind lol.
@aniss, install FF 5.0 :)
Amazing (:
I love It
It's like olds movies....
Or the day of the tentacle
really cool. I like it.
whaaat, dude!
This rocks! :)
That's a great tip. Well done for the well presented tutorial and also for demonstrating this example with canvas and not just a simple div.
Definitely helped me have a slightly better understanding of canvas.
Great effect, I'm going to have to try and find some use for this in a future project =)
Nice one!
What about making it take the headlines from a RSS?
I would love to have it as a "Feed reader" for my newspaper!
Let me know!
Mariano
Superbe, great work as ever. Can't wait for the next tut. Excellent
Amazing effect and great tutorial!
LOL
I love the headlines in the demo! hilarious :)
And as usual,, elegant job!
Hello,
This is nice idea to promote special offers on website, can you even release jquery version as well for non css3 supported browsers. thanks.
Really nice, as always. I have a question. Is this the same technique which Vimeo uses on it's login page for moving a cloud image across the screen. the cloud is not any animation as it is just a simple image and is moving across the screen.
"www.vimeo.com/log_in"
I am struggling my brain out to find out the technique as I want to move a balloon on my website's front page and tried doing that with marquee with scrolling up and at the scroll speed of 1.. but unsuccessful as the balloon image disappeared...
I'll definitely would like to see that as a tutorial if possible...
Do you have some link about different in rotated object? Why in FF its so bad?
I test it on Opera, Chrome and FF.
Firefox looses, Chrome was wery blurry (but ok), and Opera is betwet. Maybe Opera win this comepition :)
In firefox rotated text looks terrible! In Chrome they are "no" difference between canvas and normal html text. In Opera you can see different, but it is acceptable.
Why Firefox (v 5!) is so terrible in this area? Maybe they have default off some options?
Im sory. I test it on FF 4. In FF 5 text was blurred and it was ok.
Great tutorial as always!
The French headline made me laugh my ass off!!
Keep up the good work!
Rally neat idea! Love it! Not sure how practical it would be, but I still love it!
That is awesome..will put to use somehow. Thank you!
Amazing effect and great tutorial!
Incredible! I love animation now I can try my self.
thanks
I love this! Sorry if I'm missing something, but where can I download the PSD with the newspaper template (mentioned in the Conclusion of the tutorial) so I can customize this even more? Thanks again!
Awesome tutorial. Loved it and the steps were easy to follow
This is so cool I will be trying this out on some of my next few projects. thanks