Bubble Slideshow Effect with jQuery
Today we will be building a jQuery-powered bubble animation effect. It will be a great way to present a set of images on your website as a interesting slideshow. And as the code will be completely modular, you will be able to easily use it and modify it.
The HTML
The slideshow effect we will be creating today, will take the form of an easy to use jQuery plugin. As most of the work is done by the plugin, there isn't much to do in this section. However, to use the plugin you need to add an unordered list on your page. The individual slides of the slideshow will be added as LI elements.
index.html
<!DOCTYPE html>
<html>
    <head>
        <meta charset="utf-8" />
        <title>Bubble Slideshow Effect with jQuery | Tutorialzine Demo</title>

        <!-- Our CSS stylesheet file -->
        <link rel="stylesheet" href="assets/css/styles.css" />

        <!-- The plugin stylehseet -->
        <link rel="stylesheet" href="assets/jquery.bubbleSlideshow/jquery.bubbleSlideshow.css" />

        <!--[if lt IE 9]>
          <script src="http://html5shiv.googlecode.com/svn/trunk/html5.js"></script>
        <![endif]-->
    </head>

    <body>

        <!-- The bubble slideshow holder -->
        <ul id="slideShow"></ul>

        <!-- JavaScript includes -->
        <script src="http://ajax.googleapis.com/ajax/libs/jquery/1.6.2/jquery.min.js"></script>
        <script src="assets/jquery.bubbleSlideshow/bgpos.js"></script>
        <script src="assets/jquery.bubbleSlideshow/jquery.bubbleSlideshow.js"></script>
        <script src="assets/js/script.js"></script>

    </body>
</html>
To be able to use the plugin, you will need to include jquery.bubbleSlideshow.css in the head of the page, bgpos.js and jquery.bubbleSlideshow.js before the closing body tag. bgpos.js is a jQuery CSS hooks plugin that will allow us to animate the background-position property (needed in the bubble animation), and jquery.bubbleSlideshow.js holds the code we will be writing today. Also remember to include the jQuery library as well.
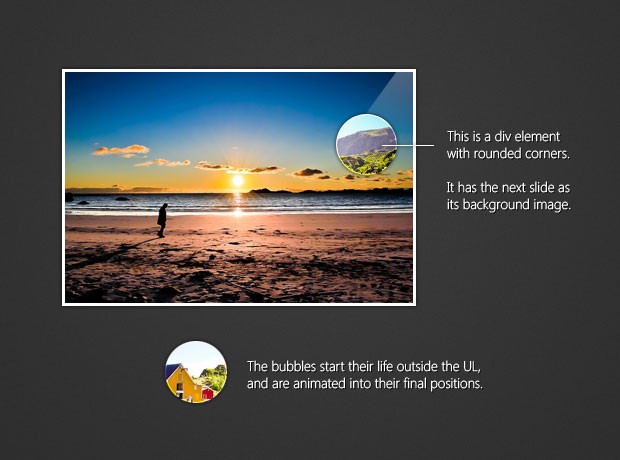
You can see a simple explanation of the bubble effect below.
JavaScript and jQuery
First we will write a JavaScript class named Bubble. Every bubble in the slideshow is going to be an object of this class. It will have properties such as top and left (position offsets), size (diameter of the circle) and an elem property, which is a jQuery object containing the actual div. We will use this property later when we animate the bubble in the flyFrom() method.
jquery.bubbleSlideshow.js
  // This is the Bubble class. It takes left and top
    // coordinates, size (diameter) and a image URL

    function Bubble( left, top, size, imgURL ){

        this.top    = top;
        this.left   = left;
        this.size   = size;

        // This places the center of the
        // circles on the specified position:

        top -= size/2;
        left-= size/2;

        this.elem = $('<div>',{
            'class':'bubble',
            'css'   : {
                'width'     : size,
                'height'    : size,
                'top'       : top,
                'left'      : left,
                'background-position': (-left)+'px '+(-top)+'px',
                'background-image': 'url('+imgURL+')'
            }
        });

    }

    // The fly from method takes a starting position, time,
    // and a callback function, executed when the animation finishes.

    Bubble.prototype.flyFrom = function( startX, startY, time, callBack ){

        time = time || 250;
        callBack = callBack || function(){};

        startX -= this.size/2;
        startY -= this.size/2;

        // Offsetting the element

        this.elem.css({
            'display'               : 'block',
            'backgroundPositionX'   : -startX,
            'backgroundPositionY'   : -startY,
            'left'                  : startX,
            'top'                   : startY
        });

        // Animating it to where it should be

        this.elem.animate({
            'backgroundPositionX'   : -this.left,
            'backgroundPositionY'   : -this.top,
            'left'                  : this.left,
            'top'                   : this.top
        }, time, 'easeOutCirc', callBack );

    };

    // Helper function for generating random
    // values in the [min,max] range

    function rand( min, max ){
        return Math.floor( Math.random()*((max+1)-min) + min);
    }
The flyFrom() method takes a set of coordinates, that determine the position the bubble flies in from. It still ends up in the position that you specify when creating it. This method is defined on the Bubble function's prototype, which automatically makes it available to all its instances. This is a more effective approach, as only one copy of this method exists at a time, instead of a copy of this method for each object. Also, notice the rand() function defined at the bottom of the fragment. It mimics the PHP function of the same name and is used throughout the plugin code.
Now that we have the class in place, lets write a function that creates an array with bubble objects, appends them to a new LI element, and animates them. The function takes three parameters:
- stage, which is a jQuery object that holds a UL element. This will hold the slideshow, with each slide being an individual LI;
- imgURL is the URL of the image that will be shown in the bubbles;
- func is a callback function that will be called once all bubble animations are complete. This is used to switch the slides and destroy the bubbles, as they will not be needed after the transition to the new slide is complete;
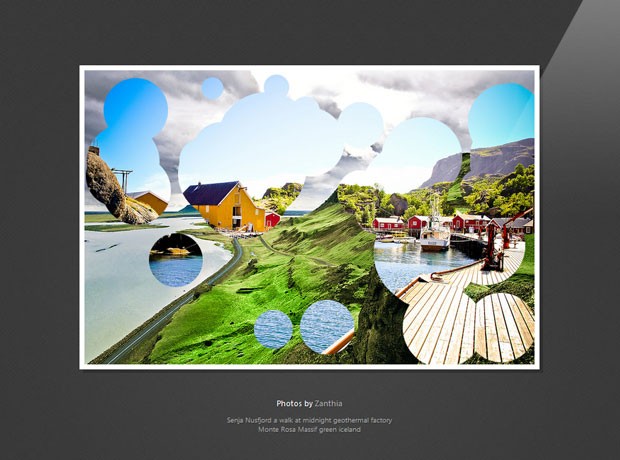
As you guessed, for every slide transition, a new random set of bubbles is created, and destroyed after the next slide is made visible.
jquery.bubbleSlideshow.js
  function showBubbles( stage, imgURL, func ){

        // This function appends a new LI element to the UL
        // and uses it to hold and animate the bubbles.

        var i = 0,
            bubbles = [],
            totalBubbles = 75,
            stageWidth = stage.outerWidth(),
            stageHeight = stage.outerHeight(),
            emptyFunc = function(){};

        // This li holds the bubbles
        var li = $('<li class="bubbleStage">').appendTo(stage);

        // This function is passed to the flyFrom method call:

        var callBack = function(){

            // Waiting for the func function to
            // finish and removing the li.

            $.when(func()).then(function(){
                li.remove();
            });
        };

        for( i=0; i<totalBubbles; i++ ){

            var x    = rand(0, stageWidth),
                y    = rand(0,stageHeight),
                size = rand(30,150);

            var bubble = new Bubble( x, y, size, imgURL );
            li.append(bubble.elem);

            bubbles.push(bubble);
        }

        // Sorting the bubbles so that the
        // bubbles closest to the top border of
        // the image come first:

        bubbles = bubbles.sort(function( b1, b2 ){
            return b1.top+b1.size/2 > b2.top+b2.size/2;
        });

        // Looping through all the bubbles,
        // and triggering their flyFrom methods

        for( i=0; i<bubbles.length; i++){

            (function( bubble, i ){
                setTimeout(function(){

                    bubble.flyFrom(
                        stageWidth/2,
                        stageHeight+200,
                        250,
                        (i == bubbles.length-1) ? callBack : emptyFunc
                    );

                // This Math.floor schedules five bubbles
                // to be animated simultaneously

                }, Math.floor(i/5)*100);

            })( bubbles[i], i );
        }
    }
Great! So now we have a function that creates a set of bubbles in a new LI element and animates them. But these are only functions, they are not a plugin yet, so we will have to work on that. Also we are still missing the slides themselves. Lets write the missing pieces:
jquery.bubbleSlideshow.js
$.fn.bubbleSlideshow = function(photos){

        if(!$.isArray(photos)){
            throw new Error("You need to pass an array of photo URLs as a parameter!");
        }

        photos = photos.reverse();

        var ul = this.addClass('bubbleSlideshow');

        $.each(photos,function(){
            ul.append('<li><img src="'+this+'" /></li>');
        });

        // These methods are available externally and
        // can be used to control the bubble slideshow

        ul.showNext = function(){
            showNext(ul);
        };

        ul.showPrev = function(){
            showPrev(ul);
        };

        ul.autoAdvance = function(timeout){
            timeout = timeout || 6000;
            autoAdvance(ul,timeout);
        };

        ul.stopAutoAdvance = function(){
            stopAutoAdvance(ul);
        };

        return ul;
    };
The code above defines a new plugin called bubbleSlideshow(). It should be called on a UL element and takes an array of photo URLs as its parameter. These are added to the UL.
Inside its body, the plugin creates a new LI element for each of the photos in the array, and adds showNext, showPrev, autoAdvance and stopAutoAdvance methods to the UL. These wrap around local functions with the same names, which you can see below:
jquery.bubbleSlideshow.js
  function autoAdvance(stage,timeout){
        stage.data('timeout',setTimeout(function(){
            showNext(stage);
            autoAdvance(stage,timeout);
        },timeout));
    }

    function stopAutoAdvance(stage){
        clearTimeout(stage.data('timeout'));
    }

    function showNext(stage){
        showFrame(stage, stage.find('li.bubbleImageFrame').first());
    }

    function showPrev(stage){
        showFrame(stage, stage.find('li.bubbleImageFrame').last().prev());
    }

    function showFrame(stage, frame ){

        // This function shows a frame,
        // passed as a jQuery object

        if(stage.data('working')){
            // Prevents starting more than
            // one animation at a time:
            return false;
        }
        stage.data('working',true);

        var frame = frame.hide().detach();

        // Using the showBubbles function, defined below.
        // The frame is showed after the bubble animation is over.

        showBubbles( stage, frame.find('img').attr('src'), function(){
            stage.append(frame);
            stage.data('working',false);

            // This returns a jQuery Promise object.
            return frame.fadeIn('slow');
        });

    }
I used "local" to describe these functions, because they are not available from outside the plugin. The showNext and showPrev functions above both call showFrame, passing it the UL and the LI slide that is to be shown. showFrame makes sure that there is only one animation running at a time, and calls the showBubbles function we already wrote.
The callback function that is passed along with the method call, displays the slide you want to show above all the others by appending it last in the UL (the slides are absolutely positioned, which means that the last element in the UL is shown on top). This function is called once the bubble animation completes.
Here is how you initialize the bubble slideshow:
script.js
$(function(){
    var photos = [
        'http://farm6.static.flickr.com/5230/5822520546_dd2b6d7e24_z.jpg',
        'http://farm5.static.flickr.com/4014/4341260799_b466a1dfe4_z.jpg',
        'http://farm6.static.flickr.com/5138/5542165153_86e782382e_z.jpg',
        'http://farm5.static.flickr.com/4040/4305139726_829be74e29_z.jpg',
        'http://farm4.static.flickr.com/3071/5713923079_60f53b383f_z.jpg',
        'http://farm5.static.flickr.com/4108/5047301420_621d8a7912_z.jpg'
    ];

    var slideshow = $('#slideShow').bubbleSlideshow(photos);

    $(window).load(function(){
        slideshow.autoAdvance(5000);
    });

    // Other valid method calls:

    // slideshow.showNext();
    // slideshow.showPrev();
    // slideshow.stopAutoAdvance();
});
All that is left is to define a few CSS rules that add properties such positioning, overflows and background-positions:
jquery.bubbleSlideshow.css
ul.bubbleSlideshow{
    position:relative;
    list-style:none;
    overflow:hidden;
}

.bubbleSlideshow li{
    position:absolute;
    top:0;
    left:0;
}

.bubbleSlideshow li img{
    display:block;
}

.bubbleSlideshow li div.bubble{
    -moz-border-radius:50%;
    -webkit-border-raidus:50%;
    border-radius:50%;

    background-repeat:no-repeat;
    display:none;
    position:absolute;
}
With this the bubble effect slideshow is complete!
Final words
The effect we made today may not be limited only to slideshows. It can be used to build unique website backgrounds, headers and presentations. The plugin is built to automatically resize to fit the UL, so you can easily change its size by tweaking a few CSS properties.
Bootstrap Studio
The revolutionary web design tool for creating responsive websites and apps.
Learn more
Thank you so much for this tutorial! I really learned some new great tricks.
I love your tutorials and your clean layouts.
Hi
dude you're like always, YOU ROCK !!! ;)
Can't wait for the next tuto lol
+1 Aniss: YOU ROCK!!
Great tut!!!!!! thanks!!
Nice effetcs! Grats!
Interesting effect!
Great jQuery effects. I also like the notion of Carousel
In the IE fail... =/
But the effects are veeery good!
Congratulations!
Pretty Nice Plugin. But I can not make it in IE6.
Why would you need IE6 compatibility. Didn't we all attend its funeral over a year ago?
It's Very Great...If I have folder 'Image' that contain many image...how I Slide show my image from folder 'Image' ?
Thanks
Great work!! but having an issue with resizing the container div and the images that should fill it. The images after the splash effect are stuck in the upper left hand corner
Hi bro,
first off all, thank you for sharing your greats work, cool Ideas and tut. u r doing good job and don't stop that and thnx :)
It doesn't show circles in IE7,8 as developer just didn't want to use some hacks like css3pie or excanvas for rounded images...sad but true
how to replace the image ??