Photobooth with PHP, jQuery and CSS3
In this tutorial, we will be building a jQuery and PHP powered photobooth. It will allow your website visitors to take a snapshot with their web camera and upload it from a neat CSS3 interface.
As you might know, it is not possible to access web cameras and other peripheral devices directly from JavaScript (and it won't be for some time). However there is a solution to our problem - we can use a flash movie. Flash has perfect web camera support, and is installed on nearly all internet - enabled computers.
The solution we are going to use for this app is webcam.js. It is a JavaScript wrapper around flash's API that gives us control over the user's webcam.
HTML
The first step to building our Photobooth is laying down the HTML structure of the main page. We will be using jQuery to fetch a list of the latest photos, so we don't need to embed any PHP logic here. This means we can leave it as a plain HTML file.
index.html
<!DOCTYPE html>
<html>
<head>
<meta charset="utf-8" />
<title>Photobooth with PHP, jQuery and CSS3</title>
<link rel="stylesheet" type="text/css" href="assets/css/styles.css" />
<link rel="stylesheet" type="text/css" href="assets/fancybox/jquery.fancybox-1.3.4.css" />
</head>
<body>
<div id="topBar">
<h1>jQuery & CSS3 Photobooth</h1>
<h2>« Go back to Tutorialzine</h2>
</div>
<div id="photos"></div>
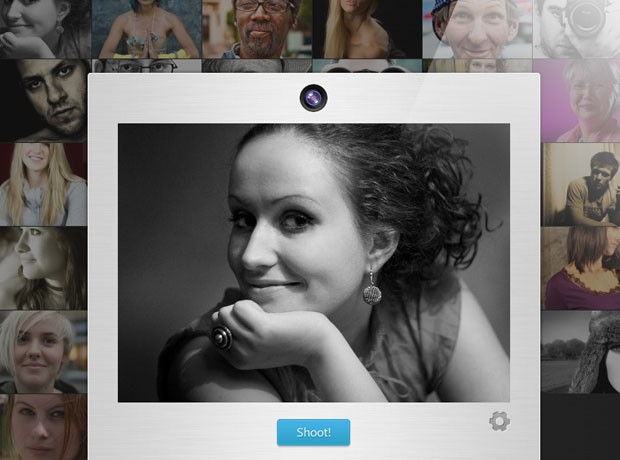
<div id="camera">
<span class="tooltip"></span>
<span class="camTop"></span>
<div id="screen"></div>
<div id="buttons">
<div class="buttonPane">
<a id="shootButton" href="" class="blueButton">Shoot!</a>
</div>
<div class="buttonPane hidden">
<a id="cancelButton" href="" class="blueButton">Cancel</a> <a id="uploadButton" href="" class="greenButton">Upload!</a>
</div>
</div>
<span class="settings"></span>
</div>
<script src="http://ajax.googleapis.com/ajax/libs/jquery/1.5.2/jquery.min.js"></script>
<script src="assets/fancybox/jquery.easing-1.3.pack.js"></script>
<script src="assets/fancybox/jquery.fancybox-1.3.4.pack.js"></script>
<script src="assets/webcam/webcam.js"></script>
<script src="assets/js/script.js"></script>
</body>
</html>
There are three main divs in the page:
- #topBar displays the headings;
- #photos is where the images are inserted after they are requested with jQuery's $.getJSON method;
- #camera holds the webcam.swf movie (which we are using to communicate with the web camera). It also holds the control buttons for taking photos and uploading.
The control buttons are divided in two .buttonPane divs. In the jQuery part of the tutorial, we will be making a simple function to toggle between the panes.
At the bottom of the body, we are including a number of JavaScript files. Starting with the jQuery library, we are also adding the fancybox plugin for displaying the photos, the easing plugin (to make fancybox even fancier), webcam.js - the plugin that enables us to communicate with web cameras through flash, and finally our own script.js to make all this work together.
Note that if you are tweaking your website for high load, you might want to combine all these JS files together. This will make the page load faster as JavaScript files block the page while loading.

PHP
Although the main page is plain old HTML, we do need PHP to make our photo booth work. To be more exact, there are two features of the app that we need PHP for - receiving the uploaded image from flash, and for listing the uploaded files.
upload.php
/*
    This file receives the JPEG snapshot from
    assets/webcam/webcam.swf as a POST request.
*/

// We only need to handle POST requests:
if(strtolower($_SERVER['REQUEST_METHOD']) != 'post'){
    exit;
}

$folder = 'uploads/';
$filename = md5($_SERVER['REMOTE_ADDR'].rand()).'.jpg';

$original = $folder.$filename;

// The JPEG snapshot is sent as raw input:
$input = file_get_contents('php://input');

if(md5($input) == '7d4df9cc423720b7f1f3d672b89362be'){
    // Blank image. We don't need this one.
    exit;
}

$result = file_put_contents($original, $input);
if (!$result) {
    echo '{
        "error"     : 1,
        "message"   : "Failed save the image. Make sure you chmod the uploads folder and its subfolders to 777."
    }';
    exit;
}

$info = getimagesize($original);
if($info['mime'] != 'image/jpeg'){
    unlink($original);
    exit;
}

// Moving the temporary file to the originals folder:
rename($original,'uploads/original/'.$filename);
$original = 'uploads/original/'.$filename;

// Using the GD library to resize
// the image into a thumbnail:

$origImage  = imagecreatefromjpeg($original);
$newImage   = imagecreatetruecolor(154,110);
imagecopyresampled($newImage,$origImage,0,0,0,0,154,110,520,370);

imagejpeg($newImage,'uploads/thumbs/'.$filename);

echo '{"status":1,"message":"Success!","filename":"'.$filename.'"}';
As I mentioned earlier, we can't communicate with web cameras directly from JavaScript. This is why we need flash, which has excellent web camera support, to act as an intermediate layer. This leaves us with two choices:
- we can have flash export the snapshot and make it available to JavaScript (slow and ineffective);
- have flash upload the photo directly to a PHP script.
Sensibly, the flash webcam plugin uses the second approach. It also has the benefit of uploading the snapshot as a valid JPEG image, which means we can save it to a file directly with PHP, without having to convert it.
In our upload.php we validate that the uploaded data is a JPEG image, save it to a file in the uploads/original/ directory, and generate a 154 -by- 110 px thumbnail. I chose this thumbnail size out of convenience, as it shares the same width to height ratio as the original image (520 -by- 370 px), which makes the resize easier.
browse.php
/*
    In this file we are scanning the image folders and
    returning a JSON object with file names. It is used
    by jQuery to display the images on the main page:
*/

// The standard header for json data:
header('Content-type: application/json');

$perPage = 24;

// Scanning the thumbnail folder for JPG images:
$g = glob('uploads/thumbs/*.jpg');

if(!$g){
    $g = array();
}

$names = array();
$modified = array();

// We loop though the file names returned by glob,
// and we populate a second file with modifed timestamps.

for($i=0,$z=count($g);$i<$z;$i++){
    $path = explode('/',$g[$i]);
    $names[$i] = array_pop($path);

    $modified[$i] = filemtime($g[$i]);
}

// Multisort will sort the array with the filenames
// according to their timestamps, given in $modified:

array_multisort($modified,SORT_DESC,$names);

$start = 0;

// browse.php can also paginate results with an optional
// GET parameter with the filename of the image to start from:

if(isset($_GET['start']) && strlen($_GET['start'])>1){
    $start = array_search($_GET['start'],$names);

    if($start === false){
        // Such a picture was not found
        $start = 0;
    }
}

// nextStart is returned alongside the filenames,
// so the script can pass it as a $_GET['start']
// parameter to this script if "Load More" is clicked

$nextStart = '';

if($names[$start+$perPage]){
    $nextStart = $names[$start+$perPage];
}

$names = array_slice($names,$start,$perPage);

// Formatting and returning the JSON object:

echo json_encode(array(
    'files' => $names,
    'nextStart' => $nextStart
));
The browse.php file lists the contents of the image folders as a JSON object. It does it with PHP's glob function, which scans the folder and returns an array with file names. We then sort this array according to the photo upload dates with the array_multisort function, after which we slice it with array_slice to return only 24 photos at a time.
jQuery
As I mentioned earlier, we are using the webcam.js plugin to control the user's web camera. This plugin exposes a simple API, available as a global object named webcam. It gives us methods for taking and uploading photos, and for generating the necessary embed code for the swf file.
In script.js below, we will be using this api and build our photo booth script around it. First we will define some variables and cache the most commonly used jQuery selectors throughout the code for better performance:
assets/js/script.js - Part 1
$(document).ready(function(){

    var camera = $('#camera'),
        photos = $('#photos'),
        screen =  $('#screen');

    var template = '<a href="uploads/original/{src}" rel="cam" '
        +'style="background-image:url(uploads/thumbs/{src})"></a>';

    /*----------------------------------
        Setting up the web camera
    ----------------------------------*/

    webcam.set_swf_url('assets/webcam/webcam.swf');
    webcam.set_api_url('upload.php');   // The upload script
    webcam.set_quality(80);             // JPEG Photo Quality
    webcam.set_shutter_sound(true, 'assets/webcam/shutter.mp3');

    // Generating the embed code and adding it to the page:
    screen.html(
        webcam.get_html(screen.width(), screen.height())
    );
The template variable above holds the markup that will be generated for each photo. It is basically a hyperlink that has the thumbnail of the photo as its background-image, and which points to the full size shot. The {src} attribute gets replaced with the actual file name of the photo (the file names were generated automatically by upload.php in the previous section).
Next we will be binding event listeners for the control buttons. Notice the use of webcam.freeze(), and the webcam.upload() methods. This gives the user the ability to take a shot and decide whether to upload it later. webcam.reset() prepares the web camera for another shot.
assets/js/script.js - Part 2
  /*----------------------------------
        Binding event listeners
    ----------------------------------*/

    var shootEnabled = false;

    $('#shootButton').click(function(){

        if(!shootEnabled){
            return false;
        }

        webcam.freeze();
        togglePane();
        return false;
    });

    $('#cancelButton').click(function(){
        webcam.reset();
        togglePane();
        return false;
    });

    $('#uploadButton').click(function(){
        webcam.upload();
        webcam.reset();
        togglePane();
        return false;
    });

    camera.find('.settings').click(function(){
        if(!shootEnabled){
            return false;
        }

        webcam.configure('camera');
    });

    // Showing and hiding the camera panel:

    var shown = false;
    $('.camTop').click(function(){

        $('.tooltip').fadeOut('fast');

        if(shown){
            camera.animate({
                bottom:-466
            });
        }
        else {
            camera.animate({
                bottom:-5
            },{easing:'easeOutExpo',duration:'slow'});
        }

        shown = !shown;
    });

    $('.tooltip').mouseenter(function(){
        $(this).fadeOut('fast');
    });
After this we will need to implement some of the callbacks exposed by the webcam plugin:
assets/js/script.js - Part 3
  /*----------------------
        Callbacks
    ----------------------*/

    webcam.set_hook('onLoad',function(){
        // When the flash loads, enable
        // the Shoot and settings buttons:
        shootEnabled = true;
    });

    webcam.set_hook('onComplete', function(msg){

        // This response is returned by upload.php
        // and it holds the name of the image in a
        // JSON object format:

        msg = $.parseJSON(msg);

        if(msg.error){
            alert(msg.message);
        }
        else {
            // Adding it to the page;
            photos.prepend(templateReplace(template,{src:msg.filename}));
            initFancyBox();
        }
    });

    webcam.set_hook('onError',function(e){
        screen.html(e);
    });
This completes the web camera integration. However we still need to display a list with the latest photos (and give users a way to browse through older images as well). We will be doing this with a custom function called loadPics() which will communicate with browse.php:
assets/js/script.js - Part 4
  /*-------------------------------------
        Populating the page with images
    -------------------------------------*/

    var start = '';

    function loadPics(){

        // This is true when loadPics is called
        // as an event handler for the LoadMore button:

        if(this != window){
            if($(this).html() == 'Loading..'){
                // Preventing more than one click
                return false;
            }
            $(this).html('Loading..');
        }

        // Issuing an AJAX request. The start parameter
        // is either empty or holds the name of the first
        // image to be displayed. Useful for pagination:

        $.getJSON('browse.php',{'start':start},function(r){

            photos.find('a').show();
            var loadMore = $('#loadMore').detach();

            if(!loadMore.length){
                loadMore = $('<span>',{
                    id          : 'loadMore',
                    html        : 'Load More',
                    click       : loadPics
                });
            }

            $.each(r.files,function(i,filename){
                photos.append(templateReplace(template,{src:filename}));
            });

            // If there is a next page with images:
            if(r.nextStart){

                // r.nextStart holds the name of the image
                // that comes after the last one shown currently.

                start = r.nextStart;
                photos.find('a:last').hide();
                photos.append(loadMore.html('Load More'));
            }

            // We have to re-initialize fancybox every
            // time we add new photos to the page:

            initFancyBox();
        });

        return false;
    }

    // Automatically calling loadPics to
    // populate the page onload:

    loadPics();
As loadPics() is bound as a handler for the click event of the Load More tile, this function can be called in two ways: the normal one and as a callback. The difference is that the this object of the function points either to window, or to the DOM element. We can check for this and take appropriate action, like preventing double clicks from issuing multiple requests to browse.php.
Lastly, we have the helper functions, used throughout the rest of the code.
assets/js/script.js - Part 5
  /*----------------------
        Helper functions
    ------------------------*/

    // This function initializes the
    // fancybox lightbox script.

    function initFancyBox(filename){
        photos.find('a:visible').fancybox({
            'transitionIn'  : 'elastic',
            'transitionOut' : 'elastic',
            'overlayColor'  : '#111'
        });
    }

    // This function toggles the two
    // .buttonPane divs into visibility:

    function togglePane(){
        var visible = $('#camera .buttonPane:visible:first');
        var hidden = $('#camera .buttonPane:hidden:first');

        visible.fadeOut('fast',function(){
            hidden.show();
        });
    }

    // Helper function for replacing "{KEYWORD}" with
    // the respectful values of an object:

    function templateReplace(template,data){
        return template.replace(/{([^}]+)}/g,function(match,group){
            return data[group.toLowerCase()];
        });
    }
});
Now that we've discussed all of the code, lets say a few words about the CSS styles.
CSS3
With the recent introduction of Firefox 4, CSS3 transitions can finally become a fully qualified member of our developer toolbox. In our photobooth, we are using CSS3 to add a bit of class to the photo booth.
assets/css/styles.css
/*-------------------
    Photo area
--------------------*/

#photos{
    margin: 60px auto 100px;
    overflow: hidden;
    width: 880px;
}

#photos:hover a{
    opacity:0.5;
}

#photos a,
#loadMore{
    background-position: center center;
    background-color: rgba(14, 14, 14, 0.3);
    float: left;
    height: 110px;
    margin: 1px 1px 0 0;
    overflow: hidden;
    width: 145px;

    -moz-transition:0.25s;
    -webkit-transition:0.25s;
    -o-transition:0.25s;
    transition:0.25s;
}

#photos a:hover{
    opacity:1;
}

#loadMore{
    cursor: pointer;
    line-height: 110px;
    text-align: center;
    text-transform: uppercase;
    font-size:10px;
}

#loadMore:hover{
    color:#fff;
    text-shadow:0 0 4px #fff;
}
In the fragment above, you can see that we've defined a 0.25s transition on the photo anchors (these hold our images). This will animate every change to the styles of these elements, including those applied by :hover definitions. This in effect makes all the photos fade out to 50% when we hover over the #photos div, except the one directly beneath the mouse pointer.
With that same transition definition, we also affect the #loadMore span. It has a text shadow rule applied on hover, which gets animated into a smooth glow effect.

With this our photo booth is complete!
Conclusion
You can use this app as a fun addition to a community forum or other social networking website. You can optionally build in a comment field to go with the photo, or integrate it more deeply with your site.
Did you like this week's tutorial? Share you thoughts in the comment section.
Bootstrap Studio
The revolutionary web design tool for creating responsive websites and apps.
Learn more
Always with high level!
Great Job!!
Thanks for your teaching!
Great tut! very informative. I love the JS wrapper for flash API, webcam.js. Thanks man
I've just skimmed through the article and the codes quickly but oh man, so many possibilities with this! As you mention in the conclusion it would be a great addition to a community site. Easy to integrate so people just can take a picture and save it directly to their profile. No need to install a program on your computer and no hassle with uploading.
I like how you put the your codes together, they're making a lot of sense and the additional comments in the codes also helps a lot.
Thumbs up for another great tutorial. Thanks Martin :D
Note: I'm the dude with all the crazy facial hair and a pirate flag in the background in the photobooth ;P
Super, super awesome tutorial. Martin, you should do video tuts!!!
Idea for the follow-up tut. - Videobooth ....
Any chance?
Huge thanks to you man.
As usual another rocking post from you. I have a little doubt, how to close the Camera window? I don't see any close button if a person doesn't have a cam.
This is the reason why I love web. The idea is brilliant! Things like this makes web more enjoyable place :]
Also a great tutorial.. as always :)
Thank you, for all that effort you put in this stuff.
Awesome and really informative tutorial. I have read nearly all of your tutorials. Each tutorial you write is with highest quality. Really superb!
Thanks for this one!
Although nice idea by @Nick, you should post Video tuts.
This is a really nice tutorial! Great idea!
Excellent tutorial! How about a video booth?
this is insane, in a good way! I have no use for it as of now but I'm sure I can figure out a function for it eventually. Awesome as always
The output is awesome!. Thanks for the tutorial! Instead using the camera to shoot, can we upload another picture that we already have?
I can not make this great demo run :(
Maybe you forgot to set your uploads folder to allow to write the images... >> CHMOD << !?
Works fine here, amazing work, Martin!
but flash is no longer supported by google chrome, so the camera wont upload as it used to. any alternative? any help would do
Wow, this is gr8!
If you're using OSX make sure that the flash player preferences for "video" are "USB Video Class Video". If you selected other option (Google camera adapter 0/1, CamTwist etc.) turn it to USB Video Class Video, or you'll see only black screen. This is Mac OSX Specific. Great tutorial as usuall
great tutorial (...as always)! thanks alot tutorialzine!
Awesome, it gives ideas..
very nice tutorial.
i'm more semi-pro with html/php.
what's the best way to implement photobooth into a wordpress site?
oh men. this is going to be a trend.!!!!
Really interesting tutorial, Very easy to follow and relating to what Goatie said, it has so may possibility's. I like the idea of being able to take a photo to upload and save it as a profile picture for a community website. Overall a really neat application to have on a site if used in the right way. I can see this being used in many websites to come.
Excellent tutorial, thanks for sharing
That Gundam is amazing!
Super Cool ""
I love you Martin! :)
This is great ! fantastic ....Tutorialzine is the best !
Wow, now that is cool. Really great idea. Well done guys =)
Hi,
I have the problem with the quality video in Linux.
On Windows the quality of the webcam is great, on the same PC on Linux is awful!
Any chance?
Thanks
Thanks, good article !
Just a note: in browse.php, line 59, I had to replace
if($names[$start+$perPage]) by if(count($names)>$perPage) to get the pictures to load correctly in the gallery if there is less than 24 pictures.
or : if(isset($names[$start+$perPage])){...}
SWEET! mate, this is truly amazing. You know I contacted you about that work, this is actually very close to the idea I was having. Maybe if you email me again i will tell you my idea... ;-p
Awesome tutorial and jpegcam rocks too!
If only I had found your article BEFORE I built my own site. I would like to create a personalized but very simple voting site. It is still in beta but if you would like to check it out it is: http://yourheadfor.com. Comments and suggestions are highly appreciated.
Nice Tutorial. What's about the functionality on the ipad2 ?
Unfortunately the photobooth depends on flash for taking pictures. This means that it will not work on iPads nor iPhones.
Until support for external devices is built into the web browser, the only solution would be native applications.
What to say... I love you :))))
This is fun!!!
Hello, can anybody tell me, how to hide a "Shoot!" button in photobooth, while flash permissions window is dispayed? This feature is very important.
Unfortunately it is not possible. Flash does not notify you when it is displaying the permissions window. The best thing you can do is instruct users how to permanently allow your site.
BAD....ASS!!!!
You know, that's why I love about you guys. People would charge for stuff like this and here it is...free.
Great tutorial. Is there a way to approve photos before posting. I have the need to censor pornography on a religious website.
Thanks for this great work
To be able to approve / disapprove images, you will need to set up an admin system and keep all the photos in a database. On the front end it will be pretty much the same, but the PHP part would need a significant rewrite.
Excelente tutorial! Parabéns...
Thisis great but when I try the demo in explorer (8 and 9). It will not snap after a page refresh.
Try the demo in explorer, refresh the page and then click shoot! and see what happends.
GREAT JOB!
I love this but it's not working well in IE
Martin, this is amazing work!
For iPhone support, do you think something like this would work:
http://code.google.com/p/iphone-photo-picker/
By far the best I came across for a long time. Chapeau!
Thank you for this useful script.
We wish to add a 3,2,1 delayed shotting pictures, and a preview & save button. Is there a script for this? Or if we can do that on the source file of the flash?
Pin
Don't mention it's using Flash (it basically couldn't be made without), @html5douche wouldn't be happy.
Great ! Thanks a lot for this tutorial.
What do I have to change to display all the pictures on the homepage ? because right now it display only pictures I take, but if I refresh the page, nothing...
Thanks !
The same question as Pin ... a delayed shutter function.
I've tried
setTimeout("webcam.freeze()",3000)
In the script.js file, which work, but my very limited javascript skills can't work around delaying the switching of the camera buttons (cancel & upload) nor making a 3-2-1 counter.
Othervise really great script ... love it! :-)
Does anyone know how to include an option to upload from your computer?
This so great. Please can you write about designing a wall or facebook like wall.
Thank you.
Great ! Thanks a lot for this tutorial.
Great tutorial! used it to build my website The World Smiling
Thanks a lot!!! :)
Hi, using your script my friend and me just create this website! check this out ;-)
http://theworldsmiling.com/
I hope you like the way we modified and used your idea :-)
Greetings
Giovanni > It's really great what you've done :)
Hi,
Do you know of a way to shut down the webcam completely, once it is started and be able to restart it later without having to redirect to a different page?
Thanks.
:D Lol. You may want to delete some of the spam images on the demo.
Neat tutorial
AWESOME! I have been craving for a long time now to actually do this, but in terms of video. Nevertheless, this would be a great start. Thank you so much for being so kind to share such lovely code with all of us.
BTW, I did check out the code. Unless I have missed it, I am unable to find an option to completely shut down the webcam, once it is started. The only way, as of now, seems to be do navigate to a completely different page. So am I missing the option to shut off the webcam when needed or is it really absent in this code? It would really help us all if you could please throw some light on this at. If it is missing altogether, then is there any way to add that feature to this marvelous code?
Thanks again for your generous contribution.
This is awesome!! Very great work..
I wanted to ask you .. how can i build in a comment field to go with the photo ?
I just asked the same question. did you ever get an answer of figure this out! I rally need to figure this out. You're help is greatly appreciated. Thanks.
Thank you! But if i refresh the demo page,the shoot will be can not use,why?
Are you using internet explorer, if yes, try using FireFox
Hi,
The demo works well (great work btw) but I can't make it work on my computer, the photos won't be taken...
I could use some help here!
Thanks
It is probably security related. Make sure that you are accessing the script through localhost (you will need to be running xampp or another apache+php package for that).
Hi Martin
This is of course a great solution to a long term problem. Works fine without hiccups. Appreciate you for sharing the code. Meanwhile, there is no option for closing the camera window if you do not want to use it and seconding redirecting another page after uploading a snap shot. Please any help will be appreciated. Thanks.
Thanx. This was such a great help!!!! :-))))
If someone would hide the shoot button when no Camera was detected. This is the easy way to hide the shoot Button:
webcam.set_hook('onError',function(e){ screen.html(e); if(e == "No camera was detected.") { $("#shootButton").hide(); } });nice api it works great on my localhost.
but when i put it on my hosting the photos appears to be damage or corrupted... what seems to be the problem, and how can i trap it?
does any1 have the same issue as mine? i cannot resolve the problem of having the image damage or corrupted.. :(
how would one add a comment field? I'd love to use this but the comment field would be very useful. Thanks
This doesn't work on Internet Explorer. Has anybody figured out how to fix this for IE?
It's not on firefox as well. I have the latest version of flash player installed. It works great on Chrome.
Hi,nice output of taking photo from webcam.but one problem i am getting for IE8,7.
problem : first time its working fine but if i refresh the page then not working in IE.
showing error "object doesnot support thesse property" for line this.get_movie()._snap().How i overcome this.
Thanks.
Hi there,
is there any way to modify where it looks for the video source? ive a webcam conected to a php, mysql apache server and want the webcam.js to look at the machine locally rather then the machine its being loaded from???
Alan
WOW Martin Great Tut!
Any one know an easy way for me to add a Facebook Share button to each picture after they enlarge them???
Thanks again Martin!
Also does anyone know a way to get this to work on cell phones? A way to detect the browser and prompt to use the phones camera?
Hello Justin, did you find a solution to make this work on your phone? I need similar use but for an android tablet.
Please let me know if you have a solution
Thank you
Hello! Thank you for your work! I wonder if it's possible to insert an image on the shooting and also add a button to download the photo? Thank you!
I have similar question as Justin.
Is there a way to make the browser and a android tablet detect the camera and take the pictures.
I really need to know because I bought the tablet just for that purpose but so far no luck.
Trying to make it work on this tablet
http://www.amazon.com/Acer-Iconia-A100-07U08U-7-Inch-Tablet/dp/B00548QAPC
Wonderfull tutorial is there possible to add timer to take picture?
thx
Great tutorial! Just one question.
Is it possible to delete taken photos after page is refreshed or revisited? I meant delete previous photos so users can only see their own once is taken?
Woah! This is the best online photobooth I came across. I'm trying to add masks to it and merge the mask and the snapshot with php imagecopymerge. Yes it involves div over flash but that's taken care of. I'm stuck where I have to get the mask ID along with the snapshot for the merge process... Maybe prefixing filenames with the div's ID? Dunno. First one who finds out posts here? Oh, here my github repo (you'll have to create /uploads/original & /uploads/thumbs folders with write access).
Im trying to do the same thing, maybe it have something to do with merging the Snap of the JPG with the PNG after the SWF took the photo.. Let us now if you progress with it..
Finally I did it with PHP Merging
Here is the result:
www.maculiculkin.com
Works perfectly! But only on when the window is bigger than 210x210 .. I need mine 180x180, and as I've tried - not possible :(
thanks for great work.
I was trying to save the file directly to mysql database in blob format but couldn't do it. what should I do ? please help me.
And please tell how to debug the code in upload.php. I was trying to write database insertion code in upload.php but could not follow the server request.
Should the flash script be changed??
I am new to action script
Hi Rameshor
The best way to debug is to use a proxy service, something like Charles is a good one. The Webcam or JQuery does not really upload it the PHP that Handel all the server side stuff so adding it to a database should be done the normal way you would Handel that.
Hope that helps good luck
Thank you very much.
nice nice!
I would like to put a frame around the camera. is this possible? the frame will be pulled from a DataBase
I have to say, it's AMAZING!.
I love it so much!
but Martin, I was wondering does this pretty support submit some text with the image together please? I read the source and seems I didn't find where to change it.
Could you please show me some tips ?
Thank you.
Hi,
awesome job mate!!!
Is it possible to get the .fla file so it will be possible to add an image overlay?
thanks for your time...
Hi, Thank you for an awesome tut.
But I'm getting a problem in the script. Code works well almost, but when I'm opening the main page, images are not getting loaded into it by default which are already taken.
Plz help me out in this.
I have this installed and it seems to be working,but when I hit the upload you do not get the browse to open. all permissions have been set and the mods I did have no effect on the script either. I've even tried it with the stock script. Can someone please assist me? Thanks,Alan
Hi, is it normal that after u took a picture , you refresh the page ,the picture all gone ? but in the folder have the picture.
How to make the stay on the page ,even after refreshing the page ,it still there.
how can I put imputs to save to a db a name, email, etc of the user that upload the photo? I can't handle to get the imputs with $_POST on upload.php...can some one helpme?
Perfect this tutorial, fascinating ... I wonder if it is to make a similar application with the instagram, mobile, remove her picture on android phone and sent automatically to this system, is?
I am Brazilian and I loved this tutorial.
Hello, good job, thanks a lot.
But i have a question, on mozilla firefox doesn't works, anybody know what happen?, Thanks.
My likkle contrib to dis excellent script. Code is ugly but it works.
(I added png masks over flash - dat waz phun)
Man8 photobooth ghpage
Just fantastic.... thank for this tutorial.
Easy fix for anyone wondering why it's not working in IE.
Open script.js and find the line: var shootEnabled = false;
This var is being set which doesn't allow clicks within the shootbutton or the settings button if it's set to false. (I'm assuming it's for when the image is at a still but doesn't work that way.
Simply set the var to true and your button clicks should work properly. Tested in IE8,IE9 and FF and works well.
Thanks to the author
@Sam I tried this. Still doesn't work. In webcam.js, this line is throwing up:
Error: Object doesn't support this property or method
The click returns True then the page is refreshed. Image is never saved.
You sure it's working? I'm using IE8.
Great script! Is it possible to watermark the image with the actual date and a png image? Can someone help me?
Hi, I use this script and I'm using cloudflare on my site. I always get a 500 internal server error everytime I upload the captured image. I hope someone can help me with this.
Excellent Tutorial. It really helps me a lot... Good job
Soooo, My only issue is that the upload script is not re-sizing the images and putting them in the thumbs folder.
All folders and subfolders are set to file permissions of 777
Any fix for this?
when re-booting does not work click shot in IE. The reason for caching webcam.swf
Bugfix for all IE browsers:
create file assets/webcam/webcam.php with code:
<?
header("Content-type: application/x-shockwave-flash");
$filename = "webcam.swf";
$handle = fopen($filename,"r");
$contents = fread ($handle, filesize ($filename));
print $contents;
fclose($handle);
?>
file: assets/js/script.js
find: webcam.set_swf_url('assets/webcam/webcam.swf');
replace to: webcam.set_swf_url('assets/webcam/webcam.php?uniq=' + new Date().getTime());
file: assets/webcam/webcam.js
find:
swf_url: 'webcam.swf', // URI to webcam.swf movie (defaults to cwd)
replace to:
swf_url: 'webcam.php', // URI to webcam.swf movie (defaults to cwd)
it worked!
Demo: http://up-image.ru/cam.html
Good luck! Happy Christmas!
Do I need to create database for this one? I try to put up all the file in the server and it work except for some function when upload after taking the picture, I couldnt find the image anywhere can you help me how to do this? thank you.
Before the webcam image, I wanted to put 2 fields for name and email. How do I?
hey the code works great but i was looking to be able to view the captured video stream live on the local network. can anyone help how to start with that?? if anyone has already written the code for the same i would highly appreciate sharing that code with me. thanks
Hi.
Great tutorial!
I've like to name the files according to a variable set in the URL using "get". How can I do that?
Thank you so much for this wondeful tutorial. I was so much in need of this.
Keep up with the good Job man!!! I appreciate it.
Hello
Is it possible to make it work without need for folders to be 777?
Most of hosting firms are highly discourage users to have any folder of file CHMOD 777 because of security risks.
Great tutorial. Thank you. The upload folder has 755.
I have a problem, I've installed it in my own domain but when I take a picture it doesn't show immediately I have to refresh page to see it... how can I solve it? please help me.
can anybody give me C# code of upload.php
How to add name to photo, before send? Or add sender name before shoot photo?
Hi Wagner, have u found the way to add the image name before send? Can u share the script if you have done that?
Thanks.
Okay so after almost 4 years, I assume there is still no solution to this yet or guys have found another great script to work around.
So what I did to solve this issue was to tweak the camera div to appear in a bootstrap modal. I binded the show.bs.modal function to the load modal button. This function uses an ajax request to check that the additional form data (username, surname, firstname...) were supplied by the user. If check was successful, the additional data is stored in a php $_SESSION and camera div is loaded, otherwise, an error is returned in a JSON message to warn the user that additional data should be supplied.
The extra data stored in the php $_SESSION are called in the main upload script and manipulated as desired. I was even able to use a custom PHP Upload Class in the php script.
I'll still look for another work around to post the extra data to the upload script instead of using $_SESSION, but for now this is working for me.