Shutter Effect Portfolio with jQuery and Canvas
In today's tutorial, we will be using the HTML5 canvas element to create a simple photography portfolio, which displays a set of featured photos with a camera shutter effect. This functionality will come in the form of an easy to use jQuery plugin that you can easily incorporate into any website.
The Idea
The canvas element is a special area on which you can draw with JavaScript and apply all sorts of manipulations to your image. However, there are limitations to what can be done with it. Generating complex real-time animations is challenging, as you have to redraw the canvas on every frame.
This requires a lot of processing power that web browsers just cannot provide currently, and as a result smooth animations are nearly impossible. But there is a way around this limitation. If you've played around with the demo, you've noticed how smooth it runs. This is because the frames are generated ahead of time and each one is built as a separate canvas element.
After the initial load of the page (when the frames are generated), the job of the plugin becomes to simply cycle through the frames.
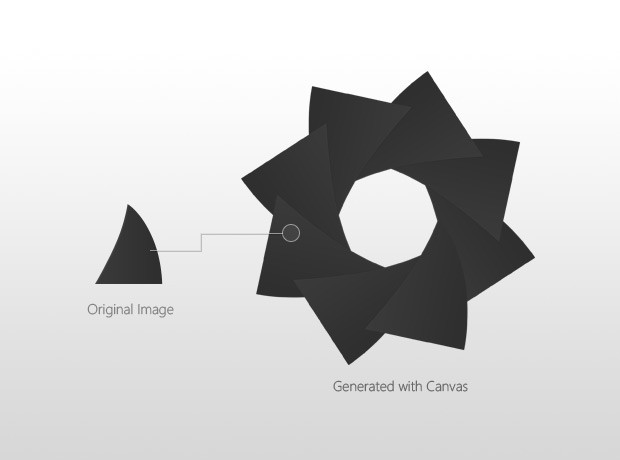
The shutter itself is generated by drawing the same slightly curved triangular image. With each frame, the opening is smaller until the peaces fit together.
HTML
First lets take a closer look at the HTML markup of the page. As we are using the canvas element, we need to define the document as HTML5 with the appropriate doctype.
index.html
<!DOCTYPE html> <!-- Defining the document as HTML5 -->
<html>
<head>
<meta http-equiv="Content-Type" content="text/html; charset=utf-8" />
<title>"Shutter Effect" with Canvas and jQuery | Tutorialzine Demo</title>
<link rel="stylesheet" type="text/css" href="assets/css/styles.css" />
<link rel="stylesheet" type="text/css" href="assets/jquery.shutter/jquery.shutter.css" />
</head>
<body>
<div id="top"></div>
<div id="page">
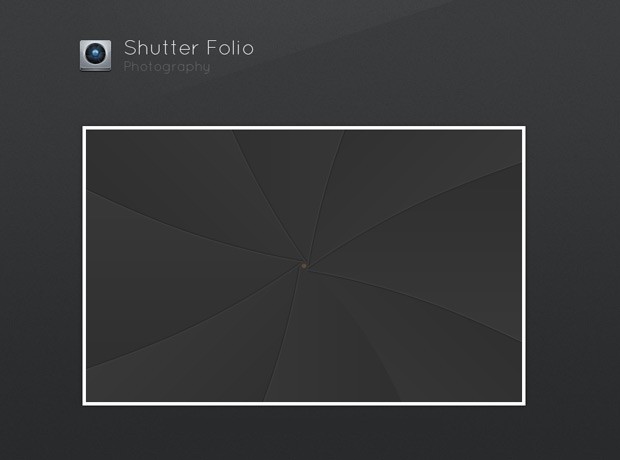
<h1>Shutter Folio Photography</h1>
<div id="container">
<ul>
<li><img src="assets/img/photos/1.jpg" width="640" height="400" /></li>
<li><img src="assets/img/photos/2.jpg" width="640" height="400" /></li>
<li><img src="assets/img/photos/3.jpg" width="640" height="400" /></li>
<li><img src="assets/img/photos/4.jpg" width="640" height="400" /></li>
</ul>
</div>
</div>
<script src="http://ajax.googleapis.com/ajax/libs/jquery/1.5.0/jquery.min.js"></script>
<script src="assets/jquery.shutter/jquery.shutter.js"></script>
<script src="assets/js/script.js"></script>
</body>
</html>
The stylesheets for the page and the plugin are included in the head section, and the script files just before the closing body tag. The #content div holds an unordered list with four photos, which are going to be displayed as a slideshow. If the user's browser does not support the canvas element, we will just cycle through these images without displaying the shutter effect.

When the shutter plugin is called, it generates the following HTML markup. In our example, we are calling it on the #content div, so the code below is appended to it.
Generated HTML
<div class="shutterAnimationHolder" style="width: 640px; height: 400px;">
  <div class="film"
  style="height: 15000px; width: 1000px; margin-left: -500px; top: -300px;">

    <canvas width="1000" height="1000"></canvas>
    <canvas width="1000" height="1000"></canvas>
    <canvas width="1000" height="1000"></canvas>
    <canvas width="1000" height="1000"></canvas>
    <canvas width="1000" height="1000"></canvas>
    <canvas width="1000" height="1000"></canvas>
    <canvas width="1000" height="1000"></canvas>
    <canvas width="1000" height="1000"></canvas>
    <canvas width="1000" height="1000"></canvas>
    <canvas width="1000" height="1000"></canvas>
    <canvas width="1000" height="1000"></canvas>
    <canvas width="1000" height="1000"></canvas>
    <canvas width="1000" height="1000"></canvas>
    <canvas width="1000" height="1000"></canvas>
    <canvas width="1000" height="1000"></canvas>
  </div>
</div>
Each canvas element holds one frame of the shutter animation. The height of the .film div is set be large enough to display the canvas elements one above the other. By animating the film's top property, we can skip through the frames and create the animation.
The .shutterAnimationHolder div is set to be the same height as the container in which it is inserted, and is displayed over the unordered list with the photos. With overflow:hidden it hides the rest of the film and only shows one frame at a time. You can think of the canvas elements as regular PNGs, so they supports complete transparency and displays the photo below them.
We will come back to this in the jQuery step of the tutorial.
CSS
The CSS that powers the demo is quite simple, as most of the work is done by generating the canvases images. However, they still have to be organized as a film and animated properly in order to achieve a smooth animation.
jquery.shutter.css
.shutterAnimationHolder .film canvas{
    display: block;
    margin: 0 auto;
}

.shutterAnimationHolder .film{
    position:absolute;
    left:50%;
    top:0;
}

.shutterAnimationHolder{
    position:absolute;
    overflow:hidden;
    top:0;
    left:0;
    z-index:1000;
}
These three sets of rules are prefixed with the .shutterAnimationHolder class, so the styles only affect the markup, generated by the plugin. If you are into optimization, you can choose to copy this code to your main stylesheet, in order to minimize the number of HTTP requests.
jQuery
This is the most interesting part of the tutorial. Here we will create a jQuery plugin - tzShutter - which is easy to use and require minimum modifications in your website in order to use it.
One important aspect of the development of this plugin, is to provide proper support for users whose browsers do not understand the canvas tag (basically all IE versions except for 9). This can be done easily by skipping the canvas generation in this case.
Also we must provide a way for users of tzShutter to trigger the opening and closing animations. We will achieve this with binding two custom events to the containing element - shutterOpen and shutterClose, both easily executed with the trigger() jQuery method.
Additionally, the plugin will provide users with a way of plugging custom functionality by the means of callback functions, passes as parameters. These are executed in key parts of the animation process - when the canvas elements are generated, and when the shutter is opened or closed.
You can see the code of the plugin below.
jquery.shutter.js
(function(){

    // Creating a regular jQuery plugin:

    $.fn.tzShutter = function(options){

        // Checking for canvas support. Works in all modern browsers:
        var supportsCanvas = 'getContext' in document.createElement('canvas');

        // Providing default values:

        options = $.extend({
            openCallback:function(){},
            closeCallback:function(){},
            loadCompleteCallback:function(){},
            hideWhenOpened:true,
            imgSrc: 'jquery.shutter/shutter.png'
        },options);

        var element = this;

        if(!supportsCanvas){

            // If there is no support for canvas, bind the
            // callack functions straight away and exit:

            element.bind('shutterOpen',options.openCallback)
                   .bind('shutterClose',options.closeCallback);

            options.loadCompleteCallback();

            return element;
        }

        window.setTimeout(function(){

            var frames = {num:15, height:1000, width:1000},
                slices = {num:8, width: 416, height:500, startDeg:30},
                animation = {
                    width : element.width(),
                    height : element.height(),
                    offsetTop: (frames.height-element.height())/2
                },

                // This will calculate the rotate difference between the
                // slices of the shutter. (2*Math.PI equals 360 degrees in radians):

                rotateStep = 2*Math.PI/slices.num,
                rotateDeg = 30;

            // Calculating the offset
            slices.angleStep = ((90 - slices.startDeg)/frames.num)*Math.PI/180;

            // The shutter slice image:
            var img = new Image();

            // Defining the callback before setting the source of the image:
            img.onload = function(){

                window.console && console.time && console.time("Generating Frames");

                // The film div holds 15 canvas elements (or frames).

                var film = $('<div>',{
                    className: 'film',
                    css:{
                        height: frames.num*frames.height,
                        width: frames.width,
                        marginLeft: -frames.width/2, // Centering horizontally
                        top: -animation.offsetTop
                    }
                });

                // The animation holder hides the film with overflow:hidden,
                // exposing only one frame at a time.

                var animationHolder = $('<div>',{
                    className: 'shutterAnimationHolder',
                    css:{
                        width:animation.width,
                        height:animation.height
                    }
                });

                for(var z=0;z<frames.num;z++){

                    // Creating 15 canvas elements.

                    var canvas  = document.createElement('canvas'),
                        c       = canvas.getContext("2d");

                    canvas.width=frames.width;
                    canvas.height=frames.height;

                    c.translate(frames.width/2,frames.height/2);

                    for(var i=0;i<slices.num;i++){

                        // For each canvas, generate the different
                        // states of the shutter by drawing the shutter
                        // slices with a different rotation difference.

                        // Rotating the canvas with the step, so we can
                        // paint the different slices of the shutter.
                        c.rotate(-rotateStep);

                        // Saving the current rotation settings, so we can easily revert
                        // back to them after applying an additional rotation to the slice.

                        c.save();

                        // Moving the origin point (around which we are rotating
                        // the canvas) to the bottom-center of the shutter slice.
                        c.translate(0,frames.height/2);

                        // This rotation determines how widely the shutter is opened.
                        c.rotate((frames.num-1-z)*slices.angleStep);

                        // An additional offset, applied to the last five frames,
                        // so we get a smoother animation:

                        var offset = 0;
                        if((frames.num-1-z) <5){
                            offset = (frames.num-1-z)*5;
                        }

                        // Drawing the shutter image
                        c.drawImage(img,-slices.width/2,-(frames.height/2 + offset));

                        // Reverting back to the saved settings above.
                        c.restore();
                    }

                    // Adding the canvas (or frame) to the film div.
                    film.append(canvas);
                }

                // Appending the film to the animation holder.
                animationHolder.append(film);

                if(options.hideWhenOpened){
                    animationHolder.hide();
                }

                element.css('position','relative').append(animationHolder);

                var animating = false;

                // Binding custom open and close events, which trigger
                // the shutter animations.

                element.bind('shutterClose',function(){

                    if(animating) return false;
                    animating = true;

                    var count = 0;

                    var close = function(){

                        (function animate(){
                            if(count>=frames.num){
                                animating=false;

                                // Calling the user provided callback.
                                options.closeCallback.call(element);

                                return false;
                            }

                            film.css('top',-frames.height*count - animation.offsetTop);
                            count++;
                            setTimeout(animate,20);
                        })();
                    }

                    if(options.hideWhenOpened){
                        animationHolder.fadeIn(60,close);
                    }
                    else close();
                });

                element.bind('shutterOpen',function(){

                    if(animating) return false;
                    animating = true;

                    var count = frames.num-1;

                    (function animate(){
                        if(count<0){

                            var hide = function(){
                                animating=false;
                                // Calling the user supplied callback:
                                options.openCallback.call(element);
                            };

                            if(options.hideWhenOpened){
                                animationHolder.fadeOut(60,hide);
                            }
                            else{
                                hide();
                            }

                            return false;
                        }

                        film.css('top',-frames.height*count - animation.offsetTop);
                        count--;

                        setTimeout(animate,20);
                    })();
                });

                // Writing the timing information if the
                // firebug/web development console is opened:

                window.console && console.timeEnd && console.timeEnd("Generating Frames");
                options.loadCompleteCallback();
            };

            img.src = options.imgSrc;

        },0);

        return element;
    };

})(jQuery);
The only shortcoming of this method, is that the processor intensive task of generating the canvas elements is done when he page is loaded. This might cause the browser interface to become unresponsive for a short period of time. You could alternatively use actual PNG images instead, but this would add more than 1mb of weight to your pages (versus the 12 kb now).
Now lets see how the plugin is used.
script.js
$(document).ready(function(){

    var container = $('#container'),
        li = container.find('li');

    // Using the tzShutter plugin. We are giving the path
    // to he shutter.png image (located in the plugin folder), and two
    // callback functions.

    container.tzShutter({
        imgSrc: 'assets/jquery.shutter/shutter.png',
        closeCallback: function(){

            // Cycling the visibility of the li items to
            // create a simple slideshow.

            li.filter(':visible:first').hide();

            if(li.filter(':visible').length == 0){
                li.show();
            }

            // Scheduling a shutter open in 0.1 seconds:
            setTimeout(function(){container.trigger('shutterOpen')},100);
        },
        loadCompleteCallback:function(){
            setInterval(function(){
                container.trigger('shutterClose');
            },4000);

            container.trigger('shutterClose');
        }
    });

});
When the plugin finishes generating the canvas elements, it triggers the loadCompleteCallback function. We use it to schedule a shutter animation every four seconds, accompanied with a change of the visible photo in the unordered list.
With this our Shutter Effect Plugin is complete!
Conclusion
The canvas tag gives developers a vast array of possibilities and allows them to create new and exciting user interfaces, animations and even games. Share your thoughts in the comment section below. If you liked this tutorial be sure to subscribe to our RSS feed and follow us on twitter.
Bootstrap Studio
The revolutionary web design tool for creating responsive websites and apps.
Learn more
Great tutorial, perfect for website owners that are photographers. =-)
You rox nice work :)
Pretty useful but I'm still not using HTML5 until it is seriously supported by all browsers and the fact this was heavy on my browser/processor is something that is a drawback. Still a great tutorial and very nice effect!! Well done!
Nice effect, could be cool to add a realistic photo-click-sound on every photo change...
Great as usual :)
awesome tutorial you are the best
WOW...its like blitch photo....greats...:D
thanks^^
Amazing O.o!
Awesome!
As usual, on internet explorer does not work.
its not working in internet explorer :(
Is there something I embedded wrong on my site? http://zachography.tumblr.com It doesnt circle through the photos.
WOW This is awesome! its very rare to see a cool transition between slides like this without using flash, but thats the beauty of HTML 5. Unfortunately still issues with cross browser compatibility. Still a great looking effect especially for photographs :)
great as always...
technology plus art are wonderful
Simply amazing effect! If it worked in IE would be a loud success.
Great Work! just fabulous specially the Idea of using it in Canvas.
is there any way i can use this effect on a single image in the header when the page loads?
Hi there,
It's working on jQuery 1.5.0.
But its not working on jQuery 1.7.1, would you please check it?
This does not operate by JQuery1.72.
It cannot use.
Why is it?
Simply wonderful. To let this work with jQuery 1.7.x, just replace "className" with "class" in rows 65 and 78.
So, in file jquery.shutter.js write:
'class': 'film' instead of classname: 'film'
and
'class': 'shutterAnimationHolder' instead of classname: 'shutterAnimationHolder'
i want to execute the shutter close and open when i click on a button....i tried that but it takes nearly 5 seconds to start the closing...If u could tell me how do i do it on click of a button, its really urgent...
Awesome and unique! Thank you very much!
Awesome! Its really useful for my website!Thx
good! but there is no pre-next button.....it is a pity
Hello,
I tried to change with the latest jquery version, but the shutter effect isn't working..
Please Help...?
Hello,
I noticed that it does not work in IE 9,
Who can help me ?
thanks
This is amazing, just amazing :-) I wish one day IE will be smart enough to understand technology and art together can create awesomeness!!!
Hello there,
Great tutorial! very useful! I have a question, however. Is there a way to make the "shutter" effect to be a "hover over" event instead of cycling over again, every so often? Thank you!