Converting jQuery Code to a Plugin
When it comes to efficiently organizing jQuery code, one of the best options is turning certain parts of it into a plugin. There are many benefits to this - your code becomes easier to modify and follow, and repetitive tasks are handled naturally. This also improves the speed with which you develop, as plugin organization promotes code reuse.
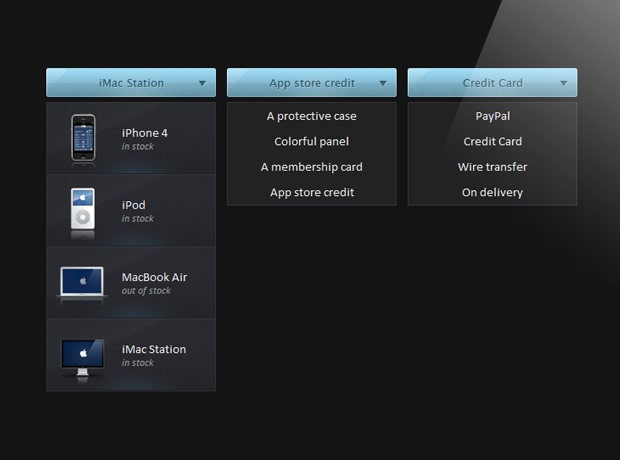
This is why today we are going to demonstrate the process of converting code to a plugin. We are going to take the code from our jQuery & CSS3 Select Replacement tutorial, and turn it into a ready for use jQuery plugin.
The Idea
Writing a jQuery plugin is not at all difficult. You need to extend the $.fn object with your own function. What is more difficult, however, is finding a way to properly structure your code so that your plugin is easy to embed and use, without dependencies.
Here are several problems that we need to solve when converting the tutorial code into a jQuery plugin:
- We need to give users the ability to control what markup is generated for the dropdown. For example the tutorial code relies heavily on the presence of data- attributes, which contain HTML markup. This is too specific to be included into a plugin, so we need to leave it out of the implementation;
- Because of the way plugins are called, we need to rewrite the code so it uses the "this" object that is passed to the plugin, instead of hard-coding a selector. This will also make it possible to convert more than one select element at once;
- We need to extract the JavaScript and CSS code of the plugin into separate files, so it is easy to embed and redistribute.
The Code
As you remember from the tutorial, our jQuery code scans the select's option elements and builds an unordered list. In the process it also looks for a number of data- attributes in the options that contain an image URL and a description to use in the list.
This is, however, too specific for a plugin. We need to give users the ability to override this functionality. To solve the problem, we can allow users to pass a function as a parameter to the plugin, which will generate the markup instead. If such a parameter is not passed, we will use fall back to a default one, which basically takes the text of the option element and turn it directly into a list item.
Lets put this into code:
(function($){

    $.fn.tzSelect = function(options){
        options = $.extend({
            render : function(option){
                return $('<li>',{
                    html : option.text()
                });
            },
            className : ''
        },options);

    // More code will be added here.

    }
})(jQuery);
The render function takes an option element (the kind that is contained in a select), and returns a li element, which is directly included in the drop down list by the plugin. This solves problem #1 outlined above.
Before we move on with solving problem #2, lets see how our plugin is going to be called:
$(document).ready(function(){
    $('select').tzSelect();
});
In the example code above, you can see that we are applying the plugin to every select element on the page. We can access these elements by traversing the "this" object that is passed to the plugin:
return this.each(function(){

            // The "this" points to the current select element:

            var select = $(this);

            var selectBoxContainer = $('<div>',{
                width       : select.outerWidth(),
                className   : 'tzSelect',
                html        : '<div class="selectBox"></div>'
            });

            var dropDown = $('<ul>',{className:'dropDown'});
            var selectBox = selectBoxContainer.find('.selectBox');

            // Looping though the options of the original select element

            if(options.className){
                dropDown.addClass(options.className);
            }

            select.find('option').each(function(i){
                var option = $(this);

                if(i==select.attr('selectedIndex')){
                    selectBox.html(option.text());
                }

                // As of jQuery 1.4.3 we can access HTML5
                // data attributes with the data() method.

                if(option.data('skip')){
                    return true;
                }

                // Creating a dropdown item according to the
                // data-icon and data-html-text HTML5 attributes:

                var li = options.render(option);

                li.click(function(){

                    selectBox.html(option.text());
                    dropDown.trigger('hide');

                    // When a click occurs, we are also reflecting
                    // the change on the original select element:
                    select.val(option.val());

                    return false;
                });

                dropDown.append(li);
            });

            selectBoxContainer.append(dropDown.hide());
            select.hide().after(selectBoxContainer);

            // Binding custom show and hide events on the dropDown:

            dropDown.bind('show',function(){

                if(dropDown.is(':animated')){
                    return false;
                }

                selectBox.addClass('expanded');
                dropDown.slideDown();

            }).bind('hide',function(){

                if(dropDown.is(':animated')){
                    return false;
                }

                selectBox.removeClass('expanded');
                dropDown.slideUp();

            }).bind('toggle',function(){
                if(selectBox.hasClass('expanded')){
                    dropDown.trigger('hide');
                }
                else dropDown.trigger('show');
            });

            selectBox.click(function(){
                dropDown.trigger('toggle');
                return false;
            });

            // If we click anywhere on the page, while the
            // dropdown is shown, it is going to be hidden:

            $(document).click(function(){
                dropDown.trigger('hide');
            });

        });
The fragment above almost identical with the tutorial code we are converting today. One notable change is that we assign $(this) to the select variable (line 5), which used to be $('select.makeMeFancy') (a hardcoded selector), which significantly limited the scope of the code.
The other change is that instead of directly generating the drop down list, we are calling the render function that was passed as a parameter (line 51).
When we combine the above, we get the complete source code of the plugin:
tzSelect/jquery.tzSelect.js
(function($){

    $.fn.tzSelect = function(options){
        options = $.extend({
            render : function(option){
                return $('<li>',{
                    html : option.text()
                });
            },
            className : ''
        },options);

        return this.each(function(){

            // The "this" points to the current select element:

            var select = $(this);

            var selectBoxContainer = $('<div>',{
                width       : select.outerWidth(),
                className   : 'tzSelect',
                html        : '<div class="selectBox"></div>'
            });

            var dropDown = $('<ul>',{className:'dropDown'});
            var selectBox = selectBoxContainer.find('.selectBox');

            // Looping though the options of the original select element

            if(options.className){
                dropDown.addClass(options.className);
            }

            select.find('option').each(function(i){
                var option = $(this);

                if(i==select.attr('selectedIndex')){
                    selectBox.html(option.text());
                }

                // As of jQuery 1.4.3 we can access HTML5
                // data attributes with the data() method.

                if(option.data('skip')){
                    return true;
                }

                // Creating a dropdown item according to the
                // data-icon and data-html-text HTML5 attributes:

                var li = options.render(option);

                li.click(function(){

                    selectBox.html(option.text());
                    dropDown.trigger('hide');

                    // When a click occurs, we are also reflecting
                    // the change on the original select element:
                    select.val(option.val());

                    return false;
                });

                dropDown.append(li);
            });

            selectBoxContainer.append(dropDown.hide());
            select.hide().after(selectBoxContainer);

            // Binding custom show and hide events on the dropDown:

            dropDown.bind('show',function(){

                if(dropDown.is(':animated')){
                    return false;
                }

                selectBox.addClass('expanded');
                dropDown.slideDown();

            }).bind('hide',function(){

                if(dropDown.is(':animated')){
                    return false;
                }

                selectBox.removeClass('expanded');
                dropDown.slideUp();

            }).bind('toggle',function(){
                if(selectBox.hasClass('expanded')){
                    dropDown.trigger('hide');
                }
                else dropDown.trigger('show');
            });

            selectBox.click(function(){
                dropDown.trigger('toggle');
                return false;
            });

            // If we click anywhere on the page, while the
            // dropdown is shown, it is going to be hidden:

            $(document).click(function(){
                dropDown.trigger('hide');
            });

        });
    }

})(jQuery);
Placing this plugin in a separate file solves problem #3. However, as I mentioned previously, we intentionally left out the code that uses the data- attributes in order to make the plugin more portable. To compensate, we need to pass a custom render function when calling the plugin, as you can see below (this is also the code that is used in the demo).
script.js
$(document).ready(function(){

    $('select.makeMeFancy').tzSelect({
        render : function(option){
            return $('<li>',{
                html:   '<img src="'+option.data('icon')+'" /><span>'+
                        option.data('html-text')+'</span>'
            });
        },
        className : 'hasDetails'
    });

    // Calling the default version of the dropdown
    $('select.regularSelect').tzSelect();

});
With this our jQuery plugin is complete!
You can use this plugin by simply dropping the tzSelect folder (available from the download button above) into your project root, and including jquery.tzSelect.css and jquery.tzSelect.js in your HTML documents.
Wrapping Up
Following these simple steps, you can easily turn a mess of jQuery code into a structured and ready for reuse plugin. Sure, it does take a bit of work, but the effort would pay out many times in the long run.
Bootstrap Studio
The revolutionary web design tool for creating responsive websites and apps.
Learn more
wooo... this is an awesome tutorial!
Amazing, good work.
Nicely done and worthy of a recommendation. You still rock with jQuery guides. Thanks.
Thanks for this. I was just looking into jQuery plugin development for a project and your tutorial really comes in handy.
Yeah! Nice Tut! Now I need to go back and see how I can convert my jquery validaton script to a jquery plugin...
Another awesome stuff! Thanks a lot!
can be like that, its good, change automatic...ck ck ck
Hats off guys. Every tutorial at tutorialzine is a million dollar stuff. Thanks for sharing.
Love this script!
I am hoping to use this to style product personalisation options on our site, I've now handed over to the developers who are currently trying to implement this on the site and we've hit a snag!
We need to find a way to get the list to post back!
Any ideas?
Thanks in advance.
Awesome! It's very useful to me. Thanks a lot!
Very nice. I do have a suggested improvement to your plugin. In place of
if(i==select.attr('selectedIndex')){
selectBox.html(option.text());
}
you could substitute
if(i == 0 || this.defaultSelected){
selectBox.html(option.text());
}
Then the first <option> for each <select> can specify disabled='disabled' instead of selected='selected'. This way, if user turns off javascript, the first option isn't selected, but if javascript is on it will still be displayed by default.
One further suggestion I might make--as it stands, the demo's hover effect doesn't work on Internet explorer 7 or 8. jquery.tzSelect.css needs a fallback background rule for the hover. For example, adding the rule
background:url('img/select_slice.png') repeat-x 0 -34px;
to the
.tzSelect .selectBox:hover,
.tzSelect .selectBox.expanded{
selector will make the menus turn blue in IE when the mouse enters the menu.
In order to take the value of the option and move to a link you add .trigger('change') (tzSelect.js file):
select.val(option.val()).trigger(‘change’);
I have two dropdown menus in the same page. On one I have to move to a link but not in the other. If I add a class to the script file and change the .trigger change:
$('.mynewclass'}.val(option.val()).trigger(‘change’);
The .trigger change applies to both. I tried to .unbind('change') but that didn't work. Is there a way to stop the .trigger('change') from the other menu?
I found the solution to having two dropdown menus in the same page with different functions. One has a link to the value.
jquery.tzSelect.js before:
select.val(option.val());
Add:
if dropDown.hasClass('dropDown mynewclass')){
select.val(option.val()).trigger('change');
}
else
On the script.js after:
className : 'hasDetails'
});
Add your new class:
//mynewclass menu class
$('select.sortBy').tzSelect({
render : function(option){
return $('',{
html: '<a href="'+option.text()+'" / rel="nofollow">'+
option.text()+''
});
},
className : 'mynewclass'
});
You can modify the html to fit your needs. Replace mynewclass with you class name.
Hope this help.
The html: didn't upload correctly, change it it fit your needs.
If you've upgrade to jQuery 1.6, you need to change a little bit of code.
From this:
var selectBoxContainer = $('',{
    width       : select.outerWidth(),
    className   : 'tzSelect',
    html        : ''
});

var dropDown = $('',{className:'dropDown'});
To this:
var selectBoxContainer = $('',{
    width       : select.outerWidth(),
    'class'     : 'tzSelect',
    html        : ''
});

var dropDown = $('',{'class':'dropDown'});
jQuery decided to stop supporting the 'className' property. It's detailed here: http://bugs.jquery.com/ticket/9150
Looks like some of the HTML tags above were stripped. Just change those two instances from 'className' to 'class' (with the apostrophes). Do not change 'className' in the 'options' object because that's not related to this bug. That's just a coincidence.
hello i tried the plugin with the current Jquery 1.7.2 and with your changes it's working but the selected option, the one that is skipped in the dropdown, is not displayed. is there a workaround for this?
Thanks for the tip. Was not working with 1.7.1
the post action is not working, the select don't post the vars...and the "demo" code have the same problem.!!! UPS!!!
HELP, I have the code, like this, but the select don't POST the data.
¿What is wrong?. (if I delete class="makeMeFancy" on the select tag, the form work ok)
Any idea???
<!DOCTYPE html>
<html>
<head>
<meta http-equiv="Content-Type" content="text/html; charset=utf-8" />
<title>Tutorialzine CSS3 Select Replacement Plugin | Tutorialzine Demo</title>
<link rel="stylesheet" type="text/css" href="css/styles.css" />
<link rel="stylesheet" type="text/css" href="tzSelect/jquery.tzSelect.css" />
</head>
<body>
<div id="page">
</div>
<script src="http://ajax.googleapis.com/ajax/libs/jquery/1.4.3/jquery.min.js"></script>
<script src="tzSelect/jquery.tzSelect.js"></script>
<script src="js/script.js"></script>
</body>
</html>
Thanks Brian, exactly, this code is WORKING, and post ok the vars when you pickup the select whit the mouse.(an automatic post).
My form have an "on change event" to do the submit:
<select class="regularSelect" name="id_categorias" onChange="this.form.submit();">
and my tz.select.js have:
(function($){
})(jQuery);
With the above changes for jQuery > 1.6.0 it works on FireFox and Chrome, but not IE 8. IE chokes on the "class" in selectBoxContainer
Expected identifier, string or number Thoughts?
Well, solved my own issue. If the 2 appropriate className references get changed to 'class' (including the quotes) it works!
Hello,
I tried several ways, including the changes suggested in the comments, but I can not run this code on jQuery v1.7.2.
Does anyone have an idea (or a solution .. ^ ^)?
thanks
Thank you so much for this plugin and tutorial!
I have a question: how can i remove the selected option from the dropdown menu?
Thank you!
Line 37: if(i==select.attr('selectedIndex')){
is not working correctly. select.attr('selectedIndex') will always return "0" and with jQuery 1.9.0 it returns "undefined". I have read somewhere that 'selectedIndex' should not be returned as it is a property of 'select' and not an attribute. Changing line 37 to
if(i==select[0].selectedIndex){
will fix that. If you also replace all instances of 'className' with 'class' (as pointed out earlier) this code will work with all jQuery versions >1.4