Coding a Rotating Image Slideshow w/ CSS3 and jQuery
Today we are going to use jQuery and CSS3 rotations, along with the jQuery rotate plugin, to create a beautiful slideshow. You can use it to spice up your web sites, product pages and other projects with some CSS3 magic.
HTML
Following the tradition, we will first lay down the HTML markup of the slideshow. The main container element is the #slideShowContainer div, which holds the #slideShow div and the previous / next links (turned into arrows with CSS).
index.html
<!DOCTYPE html>
<html>
<head>
<meta http-equiv="Content-Type" content="text/html; charset=utf-8" />
<title>Rotating Slideshow With jQuery and CSS3 | Tutorialzine Demo</title>
<link rel="stylesheet" type="text/css" href="css/styles.css" />
</head>
<body>
<div id="slideShowContainer">
<div id="slideShow">
<ul>
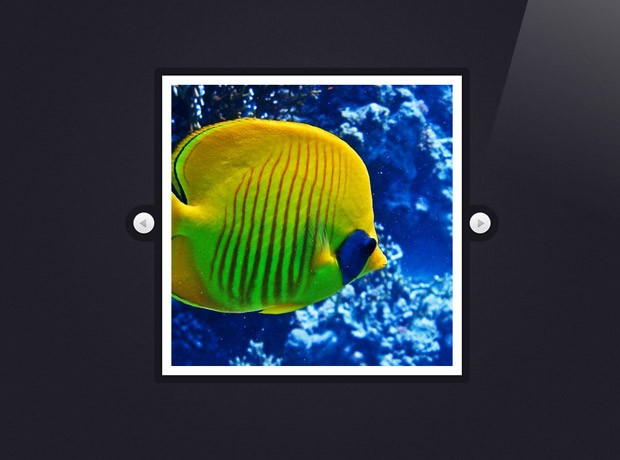
<li><img src="img/photos/1.jpg" width="100%" alt="Fish" /></li>
<li><img src="img/photos/2.jpg" width="100%" alt="Ancient" /></li>
<li><img src="img/photos/3.jpg" width="100%" alt="Industry" /></li>
<li><img src="img/photos/4.jpg" width="100%" alt="Rain" /></li>
</ul>
</div>
<a id="previousLink" href="#">»</a>
<a id="nextLink" href="#">«</a>
</div>
<script src="http://ajax.googleapis.com/ajax/libs/jquery/1.4.4/jquery.min.js"></script>
<script src="js/jquery.rotate.js"></script>
<script src="js/script.js"></script>
</body>
</html>
The slides are defined as LI elements inside of an unordered list. Notice that the width of the images is set to 100%. This way they will scale according to the width of the #slideShow div.
At the bottom, we include the jQuery library, our own script.js file, and the jQuery rotate plugin. We are using the plugin, so we can work with CSS3 rotations in a cross-browser fashion, as you will see in the last step of this tutorial.

CSS
This layout relies heavily on relative and absolute positioning. You can see the styling of the slideshow below.
styles.css
#slideShowContainer{
    width:510px;
    height:510px;
    position:relative;
    margin:120px auto 50px;
}

#slideShow{
    position:absolute;
    height:490px;
    width:490px;
    background-color:#fff;
    margin:10px 0 0 10px;
    z-index:100;

    -moz-box-shadow:0 0 10px #111;
    -webkit-box-shadow:0 0 10px #111;
    box-shadow:0 0 10px #111;
}

#slideShow ul{
    position:absolute;
    top:15px;
    right:15px;
    bottom:15px;
    left:15px;
    list-style:none;
    overflow:hidden;
}

#slideShow li{
    position:absolute;
    top:0;
    left:0;
    width:100%;
    height:100%;
}

#slideShowContainer > a{
    border:none;
    text-decoration:none;
    text-indent:-99999px;
    overflow:hidden;
    width:36px;
    height:37px;
    background:url('../img/arrows.png') no-repeat;
    position:absolute;
    top:50%;
    margin-top:-21px;
}

#previousLink{
    left:-38px;
}

#previousLink:hover{
    background-position:bottom left;
}

a#nextLink{
    right:-38px;
    background-position:top right;
}

#nextLink:hover{
    background-position:bottom right;
}
Although the #slideShow div is set to a width of 490px, its full size is actually 510px. This 20px difference scales down the slide images (as they are locked to the width of the #slideShow div), which are reduced from their normal size of 480px down to 460px. As you will see in the next step, we are using a jQuery animation to zoom in the slideshow to its full size. This way, even at full zoom, the images are actually at their regular size and there is no loss of quality.
jQuery
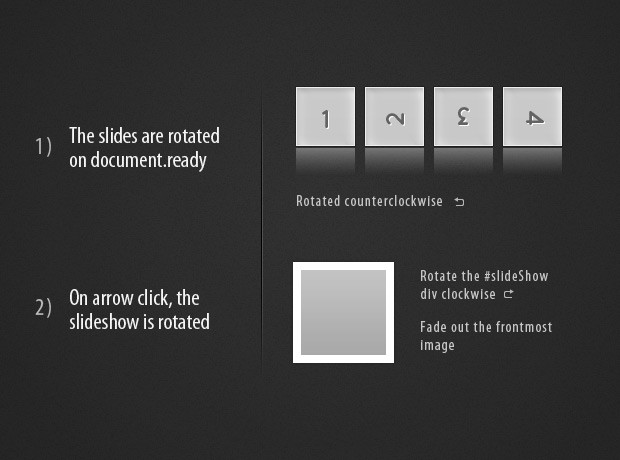
Although most modern browsers support CSS3 rotation, it is still rather tedious to work with the various vendor-specific properties. Luckily, there are plugins available that handle the cross-browser nonsense for us. I chose the jQuery rotate plugin, as it also integrates perfectly with the animate() and css() methods of the library, which means we can easily animate the rotation of elements. As you will see in a moment, we are using this in our custom rotateContainer event, which rotates the #slideShow div.
script.js - Part 1
$(document).ready(function(){

    var slideShow = $('#slideShow'),
        ul = slideShow.find('ul'),
        li = ul.find('li'),
        cnt = li.length;

    // As the images are positioned absolutely, the last image will be shown on top.
    // This is why we force them in the correct order by assigning z-indexes:

    updateZindex();

    if($.support.transform){

        // Modern browsers with support for css3 transformations

        li.find('img').css('rotate',function(i){
            // Rotating the images counter-clockwise
            return (-90*i) + 'deg';
        });

        // Binding a custom event. the direction and degrees parameters
        // are passed when the event is triggered later on in the code.

        slideShow.bind('rotateContainer',function(e,direction,degrees){

            // Zooming in the slideshow:

            slideShow.animate({
                width       : 510,
                height      : 510,
                marginTop   : 0,
                marginLeft  : 0
            },'fast',function(){

                if(direction == 'next'){

                    // Moving the topmost image containing Li at
                    // the bottom after a fadeOut animation

                    $('li:first').fadeOut('slow',function(){
                        $(this).remove().appendTo(ul).show();
                        updateZindex();
                    });
                }
                else {

                    // Showing the bottommost Li element on top
                    // with a fade in animation. Notice that we are
                    // updating the z-indexes.

                    var liLast = $('li:last').hide().remove().prependTo(ul);
                    updateZindex();
                    liLast.fadeIn('slow');
                }

                // Rotating the slideShow. css('rotate') gives us the
                // current rotation in radians. We are converting it to
                // degrees so we can add +90 or -90.

                slideShow.animate({
                    rotate:Math.round($.rotate.radToDeg(slideShow.css('rotate'))+degrees) + 'deg'
                },'slow').animate({
                    width       : 490,
                    height      : 490,
                    marginTop   : 10,
                    marginLeft  : 10
                },'fast');
            });
        });

        // By triggering the custom events below, we can
        // show the previous / next images in the slideshow.

        slideShow.bind('showNext',function(){
            slideShow.trigger('rotateContainer',['next',90]);
        });

        slideShow.bind('showPrevious',function(){
            slideShow.trigger('rotateContainer',['previous',-90]);
        });
    }
I am using jQuery's $.support object to test whether the visitor's browser supports CSS3 transformations. We are only going to display the rotation in browsers with transformation support, like the newer versions of Firefox, Chrome, Safari and Opera, while falling back to a plain fade in/out version of the slideshow in the rest.
Internet Explorer does provide a solution for rotating elements via its proprietary filter syntax, but it can't handle the technique we are using for this slideshow. So, in effect, you are going to see a working slideshow in any browser, but only enjoy the fancy version in those that have support for it.
In the code above, you can see that we are binding a number of custom events. showNext and showPrevious are what we are using to control the slideshow. These in turn execute the rotateContainer event, and pass the direction and degrees as parameters (you could merge them into a single parameter, but I find it clearer this way).
script.js - Part 2
  else{
        // Fallback for Internet Explorer and older browsers

        slideShow.bind('showNext',function(){
            $('li:first').fadeOut('slow',function(){
                $(this).remove().appendTo(ul).show();
                updateZindex();
            });
        });

        slideShow.bind('showPrevious',function(){
            var liLast = $('li:last').hide().remove().prependTo(ul);
            updateZindex();
            liLast.fadeIn('slow');
        });
    }

    // Listening for clicks on the arrows, and
    // triggering the appropriate event.

    $('#previousLink').click(function(){
        if(slideShow.is(':animated')){
            return false;
        }

        slideShow.trigger('showPrevious');
        return false;
    });

    $('#nextLink').click(function(){
        if(slideShow.is(':animated')){
            return false;
        }

        slideShow.trigger('showNext');
        return false;
    });

    // This function updates the z-index properties.
    function updateZindex(){

        // The CSS method can take a function as its second argument.
        // i is the zero-based index of the element.

        ul.find('li').css('z-index',function(i){
            return cnt-i;
        });
    }

});
In the second part of the code, you can see the fragment that is executed only in browsers that do not support CSS3 transformations. Notice that in this case, we also define the same showNext and showPrevious events, but here they just fade in / out the images, without starting a rotation.
The updateZindex() function is important, as otherwise the slides would be displayed in reverse order. This function loops through the elements in the order they currently are, and assigns a z-index property, so they are displayed correctly.
With this our Rotating Slideshow is complete!
Conclusion
Using jQuery we created a beautiful rotating slideshow, with which you can showcase your images and add a bit of interactivity to your pages.
How would you improve this example? Be sure to share your thoughts in the comment section below.
Bootstrap Studio
The revolutionary web design tool for creating responsive websites and apps.
Learn more
Nice tutorial as always.
very nice !!!
very nice piece of work thanks for the tutorial
Awesome technique. Will definitely incorporate this on a future website!
Very nice slideshow effect! Bookmarked!
Nice example and good to see and learn how to write proper code. But don't think I could use it in any of my projects, just too playful.
I discovered that the people want a simple gallery. even the good "old" lightbox gallery is somehow too much.
All I can say is great tutorial.
Very nice use of Javascript closure in UpdateCSS function.
its really cool.........i like it.
thank u........
i like to learn such new things...........
Really Fun
This is a really great tutorial.. thanks..!!
great....
Great Tut !!!
Great tutorial as usual! I hope to try this out my portfolio page.
Thanks for sharing!
Unusual way to show pictures in the slideshow.
However there are not many websites where that kind of slideshow could be used.
Of course I'm aware that this is not the only effect that can be used:)
Cheers.
Rotating don't work on Internet Explorer 9.
Awesome, but not very smooth in Firefox
I like this tutorial very much
hohohoho...its a cool
thanks^^
Check out the awesome twitpic gallery I made using this! http://zackify.net/twitgallery/
WOW! Great tutorial.
It looks the best in Safari (impressive)
Best regards!
amazing :)
Look really amazing :)
This is awesome !!!!!!!!!!!!
Great tutorial and great rotating css 3 and jquery effect I love it for one of my sites, thank you!
Very beautiful effect. Your site rocks!
That's a very nice gallery, really nice transition. Thanks.
hello, how I can do to automatically change the image every 30 seconds?
You might find this article interesting. If you follow the steps you should be able to make this slideshow auto-advance as well.
no, do not succeed
I am having problems with the gallery. After I click through all of my images it will start to only rotate them at 90 degrees and then 180 degrees until I go through all of the photos. I want a full rotation on every click.
Also
I need to change the dimensions of the photos from what you have in this sample from 480 x 480 px to other dimensions.
You could use this Jquery plugin to get the rotation working in IE as well:
http://code.google.com/p/jqueryrotate/wiki/Examples
If you have other after the slider, the script will start removing the other on your page. To fix this,
replace:
var liLast = $('li:last').hide().remove().prependTo(ul);with:
var liLast = $(ul.find('li:last')).hide().remove().prependTo(ul);in the:
slideShow.bind('showPrevious',function(){
Hi, Great tutorial and really nice affects. I'm having a problem, though, in the rotate.js -- in the function UpdateZindex() -- it's updating the z-index for ALL the ul's on the page preceding the /div that I want to be rotated. Any ideas on how to limit the z-index update to just the slideshow /div???
Not sure if you figured it out, but I figured I'd post the solution as others may run into the same problem. Basically the script.js code was not correctly identifying which list items to make changes too. So you have to explicitly state it via the IDs.
Make the following changes
Declarations: var slideShow = $('#slideShow'),
ul = $('#slideShow ul'),
li = $('#slideShow li'),
cnt = li.length;
Line 41: $('#slideShow li:first').fadeOut('slow',function(){
Line 89: $('#slideShow li:first').fadeOut('slow',function(){
Line 96: var liLast = $('#slideShow li:last').hide().remove().prependTo(ul);
Actually, you don't need to make the changes to the declarations area... just the three specific lines.
thanks! i don't want the rotation, so i took out a chunk of code and still have a beautiful, functional slideshow (surprising how hard it can be to find that!).
I have a problem with the gallery if I usemore than of 8 pictures.
Apparently the UpdateZindex() stop to work properly and I have a 90° rotation every time the user press the next button. You can see the problem if you test the demo.
Any ideas?
I also have the same problem, if I have more than 4 images at the end of the first cycle <li>, the second cycle, I see the images rotated by 90 ° in the direction, how do I fix this problem?
I wanted to thank you for this! With some small jiggering, I managed to implement this for great effect for a client! It's a totally awesome script!
Pretty cool scripting!
I too am seeing odd rotation--I think a bit different from the above reports (using Firefox 13). With 18 images listed, going through the second time rotates them 180 degrees (and back to normal on a third go-round). Cutting back to four images results in a 90 degree rotation with each cycle.
Also, I'm not crazy about the handling of non-square images, as I see either end of the next image crisscrossed underneath the present image at any given time. Is there any way to eliminate this (without just cropping my images to squares)?
hello
can we use this for both personal and commercial for free?
Thanks & Regards
Nadeem
I am having the flip problem with over four graphics as well, sorry to be doing a 'me too', but can anybody give me a fix, please?
TIA
Keith
Hi. I need to make this slide to autoplay.
I am a beginer in javascript.
Can somebady help me to make this script to autoplay? I meen this script.
THX.
very good,I like it
First of all a big thanks for your effort! I have little knowledge of html&css (just started), but your tutorial helped me include a proper slideshow in my homepage. But I also have the problem, that the pics get rotated wrong after you went through the slideshow the first time. I tried to google the prob but with little to no success. Isnt there a way of defining the last picture in the slideshow as such, so the show would stop at the end?
Please give me a little tip how to do it or where to look it up!
Greetings from Germany!
Great script, but there is an error on line 41 of script.js.
If I have more than one <ul> on my website it clone the first of it.
It must be
ul.children('li:first').fadeOut('slow',function(){
    $(this).remove().appendTo(ul).show();
    updateZindex();
});
instead of
$('li:first').fadeOut('slow',function(){
    $(this).remove().appendTo(ul).show();
    updateZindex();
});