Creating a Stylish Coming Soon Page with jQuery
When starting work on a new website idea, the first thing you probably do is to acquire the domain name and set up some sort of a coming soon page (remember those construction site gif animations? Don't use them!).
It is actually a good idea to invest some time in the development of this page. This is the first encounter visitors have with you and your product. You can even use it as a marketing channel and let people subscribe to your launch newsletter.
This is why, today we are creating a stylish coming soon page, using PHP, MySQL and jQuery. It will allow you to collect visitors' emails and store them in a simple database table. On the presentation side, it features a slick slideshow with the help of the Nivo Slider plugin.
The HTML
First lets take a look at the HTML markup of the coming soon page. The page was designed to be lightweight and has only a minimal amount of code.
coming-soon.php
<!DOCTYPE html>
<html>
<head>
<meta http-equiv="Content-Type" content="text/html; charset=utf-8" />
<title>AJAX-ed Coming Soon Page with jQuery and PHP | Tutorialzine Demo</title>
<link rel="stylesheet" type="text/css" href="css/styles.css" />
<link rel="stylesheet" type="text/css" href="css/nivo-slider.css" />
</head>
<body>
<div id="page">
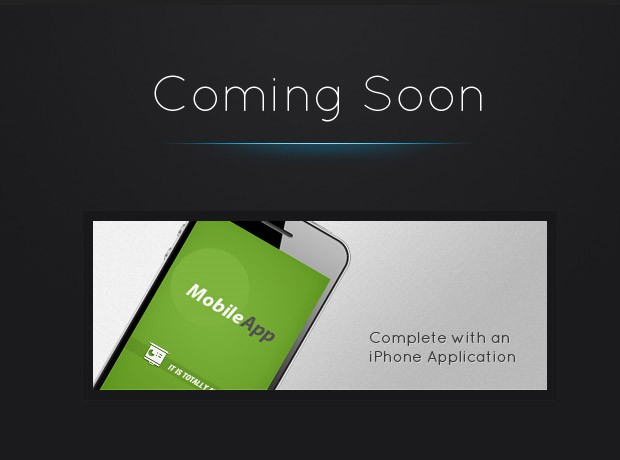
<h1>Coming Soon</h1>
<div id="slideshowContainer">
<div id="slideshow">
<img src="img/slides/slide1.jpg" width="454" height="169" alt="Coming Soon: Our Awesome Web App">
<img src="img/slides/slide2.jpg" width="454" height="169" alt="Extensive Functionality">
<img src="img/slides/slide3.jpg" width="454" height="169" alt="Complete with an iPhone App">
</div>
</div>
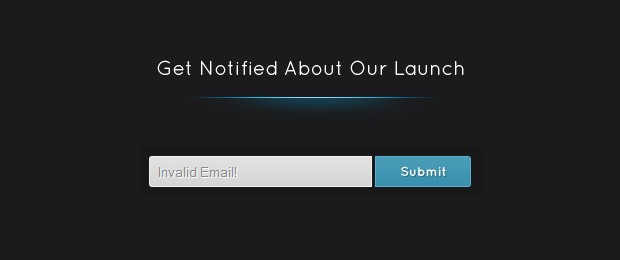
<h2>Subscribe</h2>
<form method="post" action="">
<input type="text" id="email" name="email" value="<?php echo $msg?>" />
<input type="submit" value="Submit" id="submitButton" />
</form>
</div>
<script src="http://ajax.googleapis.com/ajax/libs/jquery/1.4.3/jquery.min.js"></script>
<script src="js/jquery.nivo.slider.pack.js"></script>
<script src="js/script.js"></script>
</body>
</html>
In the head section, we include the stylesheets - our own styles.css and nivo-slider.css, used by the Nivo Slider plugin. You can potentially merge these two files into one to requests, but it would be an overkill in this case.
In the body section, we define the main markup - basically two headings, a form, and a div container with three images, used by the slider.
At the bottom we include three JavaScript files. The first one imports jQuery 1.4.3 from Google's CDN, which is the newest version of the library at the moment of this writing. After it comes the nivo slider js include file, and lastly our own script.js, which is discussed in detail in the last section of this tutorial.
The CSS
The CSS styles, which affect the page, are defined in styles.css. To make it easier to modify and include into an existing design, some of the rules are prefixed with the #page selector, which limits the effect of the rules only to the specified elements - CSS namespacing.
css/styles.css
#page{
    width:330px;
    margin:70px auto 100px;
}

#slideshow{
    height:169px;
    overflow:hidden;
    width:454px;
}

#slideshowContainer{
    padding:10px;
    background-color:#181819;
    margin:30px 0 50px -72px;
    width:454px;
    border:1px solid #1f1f20;
}

#page h1,
#page h2{
    text-indent:-9999px;
    overflow:hidden;
    height:105px;
    background:url('../img/coming_soon.png') no-repeat;
}

#page h2{
    height:76px;
    background:url('../img/get_notified.png') no-repeat;
    margin-bottom:20px;
}

#page form{
    background-color:#181819;
    display:block;
    height:31px;
    padding:10px;
    position:relative;
    width:323px;
    margin-left:-7px;

    -moz-border-radius:3px;
    -webkit-border-radius:3px;
    border-radius:3px;
}

#email{
    background:url('../img/submit_form.png') no-repeat;
    border:none;
    color:#888888;
    height:31px;
    left:10px;
    line-height:31px;
    padding-left:8px;
    position:absolute;
    text-shadow:1px 1px 0 #FFFFFF;
    top:10px;
    width:215px;
    outline:none;
}

#submitButton{
    background:url('../img/submit_form.png') no-repeat right top;
    border:none;
    cursor:pointer;
    height:31px;
    left:236px;
    line-height:31px;
    position:absolute;
    text-indent:-99999px;
    text-transform:uppercase;
    top:10px;
    width:96px;
}

#submitButton:hover{
    background-position:right bottom;
}
Things are pretty much clear here. Something that is worth noting, is probably the negative text-indent technique, which is used extensively to display a background image and hide the contents of the element. A gotcha of this method, when applied to submit buttons, is that you need to force the text into uppercase with text-transform, otherwise it would not work in older versions of IE.
The PHP
To make this page as simple as possible, the PHP code that handles the form submission, is located at the top of the document. This also makes it easier to handle situations in which JavaScript is not available, and the form is submitted in the normal way (notice that in the HTML step the action attribute of the form is empty - it will be submitted to the same page).
coming-soon.php
require "includes/connect.php";

$msg = '';

if($_POST['email']){

    // Requested with AJAX:
    $ajax = ($_SERVER['HTTP_X_REQUESTED_WITH']  == 'XMLHttpRequest');

    try{
        if(!filter_input(INPUT_POST,'email',FILTER_VALIDATE_EMAIL)){
            throw new Exception('Invalid Email!');
        }

        $mysqli->query("INSERT INTO coming_soon_emails
                        SET email='".$mysqli->real_escape_string($_POST['email'])."'");

        if($mysqli->affected_rows != 1){
            throw new Exception('This email already exists in the database.');
        }

        if($ajax){
            die('{"status":1}');
        }

        $msg = "Thank you!";

    }
    catch (Exception $e){

        if($ajax){
            die(json_encode(array('error'=>$e->getMessage())));
        }

        $msg = $e->getMessage();
    }
}
If the form was submitted via AJAX (we can tell if this is so by checking for the X_REQUESTED_WITH header) we output the responses as JSON, otherwise we assign them to the $msg variable that is later printed to the page.
As we are using the MySQLi extension, after we insert the email in the coming_soon_emails table (it contains only an email column and a timestamp) we need to check the affected rows property. The email column is defined as a primary key, and the insert will fail on a duplicate email address.
Installation Notes: if you want to set up the Coming Soon Page on your host, you will need to create the coming_soon_emails table by running table.sql (available in the zip download) in phpMyAdmin. After this, remember to add your MySQL connection details to includes/connect.php.
The jQuery
As we are using the Nivo Slider plugin, a lot of the work has been done for us, and we can move our attention to handling the form submission and AJAX responses.
js/script.js
$(window).load(function() {

    // Creating the Nivo Slider on window load

    $('#slideshow').nivoSlider({
        pauseTime:5000,
        directionNav:false,
        controlNav:false
    });
});

$(document).ready(function(){

    // Binding event listeners for the form on document ready

    $('#email').defaultText('Your Email');

    // 'working' prevents multiple submissions
    var working = false;

    $('#page form').submit(function(){

        if(working){
            return false;
        }
        working = true;

        $.post("./coming-soon.php",{email:$('#email').val()},function(r){
            if(r.error){
                $('#email').val(r.error);
            }
            else $('#email').val('Thank you!');

            working = false;
        },'json');

        return false;
    });
});

// A custom jQuery method for placeholder text:

$.fn.defaultText = function(value){

    var element = this.eq(0);
    element.data('defaultText',value);

    element.focus(function(){
        if(element.val() == value){
            element.val('').removeClass('defaultText');
        }
    }).blur(function(){
        if(element.val() == '' || element.val() == value){
            element.addClass('defaultText').val(value);
        }
    });

    return element.blur();
}
Notice that the Nivo Slider slideshow is created on the window.load event. This is done, so that we can be sure that all the images are loaded and can be displayed. Although this is the first code block on the page, it is actually executed last.
In the document. ready block, we bind an event listener for the form's submit event. As the handler returns a boolean false value, the form will not get submitted, instead we are sending an AJAX post request back to the same page and get either a successful response, or an error, which gets outputted as the value of the email input box.
With this our Stylish AJAX-ed Coming Soon Page is complete!
Wrapping it up
You can use this page to introduce early visitor to the features of your upcoming website. You can extend it with an arbitrary amount of slides, and maybe improve its SEO by adding a paragraph or two about each slide.
The biggest benefit by far is giving an option for email subscriptions. You can later just pop into phpMyAdmin and export a friendly CSV file, ready for import in your favorite email marketing application.
Bootstrap Studio
The revolutionary web design tool for creating responsive websites and apps.
Learn more
Very clean and slick. Thanks
This is awesome, excellent job!
Great look and feel, thanks for sharing!
Great post! Simple and elegant.
Although Im usually against having a "coming soon" page because of various personal and usabilty reasons. I can see this being adapted for other types of pages.
simple but awesome
Yes, it's very simple, but i like it!
Your tuts are always close to real world. Thanks! ;)
Good tutorial as usual, thanks!
I'm gonna use this one, for a week maybe: http://www.lorageorgieva.com/
dude , you should not use the Graphics ;)
When I saw the image that you have at the top of this post, I thought the glowing light from the blue bar was going to move back and forth like Knight Rider, haha. Other than that slight disappointment, it looks great! :)
Easy to adapt to any layout. Excellent. Thanks for sharing.
thanks! very nice as usual :)
Thank you for the awesome comments, folks!
this is awesome!
nice tutorial
I'll be definitely using this in my next project :)
Sublime! Thats what I'm going to do right now. Thanks.
Very useful tutorials. NICE WORK LIKE ALWAS!
Great stuff dude :)
awesome tutorial and cool design. I am getting a change to learn a lot form your website. :) Thanks putting up this one.
Love the simplicity of it, will be using something similar to this in the near future.
What is the font in the "Comming Soon"-text called? :)
This is the free "Quicksand" font. It's really stylish.
Thanks :D
Very nice clean design, keep up the good work!!
Very nice clean design
For those interested in creating a simple holding page, we are currently working on a project called PregoApp (www.pregoapp.com) which enables you to create a coming soon page in just a couple minutes.
At present, they're very simple but we are working on releasing a number of themes and giving the ability for people to customise them themselves.
Hope this is helpful and of interest to your readers.
Cool!
This is what I needed and it came handy.
Thanks and best regards.
This doesn't work!
When you download the source files and change the connect.php info and enter the table, the form does not display a thank you message nor does it enter the data into the database.
Anyone else getting this error?
yes i am having similar problems
I am not able to refresh (when press the refresh button on FF3.6) the page so that I get the original message 'Your mail' in the place holder
i guess the original tutorial didn't release the var in case the page is refreshed
Does anyone have any links that can elaborate on the "Installation Notes"
I'm not as versed as some other folks when it comes to database stuff- really would appreciate some more info
Thanks
I changes the name from coming-soon.php to index.php. I also changed this:
$.post("./coming-soon.php",{email:$(‘#email’).val()},function(r){
to this:
$.post("./index.php",{email:$(‘#email’).val()},function(r){
and it breaks the submission code. Can anyone help me with what else needs to be changed, thank you.
Even i m facing same problem when i uploaded it to server . it works fine locally but when i uploaded it to windows based server which is able to run php. it gets stuck over here i tried to play upon jquery
$.post("./index.php",{email:$(‘#email’).val()},function(r){
this would be very helpful..thank u so much for such a good script :)
I tried the code, but anything i input an email to the subscription form i get a message saying email already exist in the database. I have tired several email and also the slider does not slide.
Thanks in Advance
RE:
I have been able to fix the issue with the email already exist thing, I had to create a table in the database i used for the page which is coming_soon_emails . But its left with the slider to slide.