Making an AJAX Web Chat (Part 2) - CSS and jQuery
In part two of this two-part tutorial, we will be creating the jQuery and CSS front end of our AJAX Web Chat. In the first part, we discussed the PHP & MySQL side. You can read the first part here.
Now lets continue from where we left off last time.
CSS
The chat styles are self-contained and reside in chat.css. These styles are independent from the rest of the page, so it is easier to embed the chat window into an existing website. You just need to include the HTML markup we discussed last week, and include the stylesheet and JavaScript files.
chat.css - Part 1
/* Main chat container */

#chatContainer{
    width:510px;
    margin:100px auto;
    position:relative;
}

/* Top Bar */

#chatTopBar{
    height:40px;
    background:url('../img/solid_gray.jpg') repeat-x #d0d0d0;
    border:1px solid #fff;
    margin-bottom:15px;
    position:relative;

    color:#777;
    text-shadow:1px 1px 0 #FFFFFF;
}

#chatTopBar .name{
    position:absolute;
    top:10px;
    left:40px;
}

#chatTopBar img{
    left:9px;
    position:absolute;
    top:8px;
}

/* Chats */

#chatLineHolder{
    height:360px;
    width:350px;
    margin-bottom:20px;
    outline:none;
}

.chat{
    background:url('../img/chat_line_bg.jpg') repeat-x #d5d5d5;
    min-height:24px;
    padding:6px;
    border:1px solid #FFFFFF;

    padding:8px 6px 4px 37px;
    position:relative;
    margin:0 10px 10px 0;
}

.chat:last-child{
    margin-bottom:0;
}

.chat .gravatar{
    background:url('http://www.gravatar.com/avatar/ad516503a11cd5ca435acc9bb6523536?size=23') no-repeat;
    left:7px;
    position:absolute;
    top:7px;
}

.chat img{
    display:block;
    visibility:hidden;
}
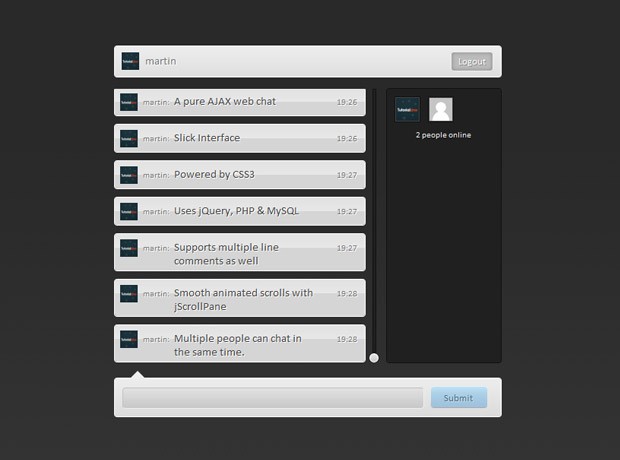
We start off by styling the #chatContainer div. It is horizontally centered on the page, with the help of an auto margin. As you saw in the previous part of the tutorial, this div is further divided into a top bar, chats area, user area, and the bottom bar.
The top bar displays the user's login information. It is assigned a relative positioning so that the avatar, name and logout button can be positioned accordingly.
After this comes the div that holds all of the chats - #chatLineHolder. This div has a fixed width and height, and as you will see in the jQuery part of this tutorial, we are using the jScrollPane plugin to turn it into a fancy scrollable area with custom sidebars.
chat.css - Part 2
/* Chat User Area */

#chatUsers{
    background-color:#202020;
    border:1px solid #111111;
    height:360px;
    position:absolute;
    right:0;
    top:56px;
    width:150px;
}

#chatUsers .user{
    background:url('http://www.gravatar.com/avatar/ad516503a11cd5ca435acc9bb6523536?size=30') no-repeat 1px 1px #444444;
    border:1px solid #111111;
    float:left;
    height:32px;
    margin:10px 0 0 10px;
    width:32px;
}

#chatUsers .user img{
    border:1px solid #444444;
    display:block;
    visibility:hidden;
}

/* Bottom Bar */

#chatBottomBar{
    background:url('../img/solid_gray.jpg') repeat-x #d0d0d0;
    position:relative;
    padding:10px;
    border:1px solid #fff;
}

#chatBottomBar .tip{
    position:absolute;
    width:0;
    height:0;
    border:10px solid transparent;
    border-bottom-color:#eeeeee;
    top:-20px;
    left:20px;
}

#submitForm{
    display:none;
}
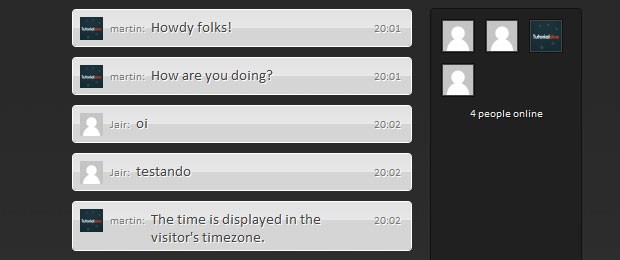
In the second part we style the #chatUsers container and the user divs. Each active chat user is represented by a 32 by 32 px gravatar. The default one is defined as a background, and when the real background images are loaded, they are shown above them. This prevents the annoying flickering that would usually occur before the image is loaded.
The rest of the code deals with the bottom bar and the submit forms. You may find interesting the way the .tip div is turned into a pure CSS triangle using a zero height and width, along with a large border value. We've used this trick in previous tutorials as well.
chat.css - Part 3
/* Overriding the default styles of jScrollPane */

.jspVerticalBar{
    background:none;
    width:20px;
}

.jspTrack{
    background-color:#202020;
    border:1px solid #111111;
    width:3px;
    right:-10px;
}

.jspDrag {
    background:url('../img/slider.png') no-repeat;
    width:20px;
    left:-9px;
    height:20px !important;
    margin-top:-5px;
}

.jspDrag:hover{
    background-position:left bottom;
}

/* Additional styles */

#chatContainer .blueButton{
    background:url('../img/button_blue.png') no-repeat;
    border:none !important;
    color:#516D7F !important;
    display:inline-block;
    font-size:13px;
    height:29px;
    text-align:center;
    text-shadow:1px 1px 0 rgba(255, 255, 255, 0.4);
    width:75px;
    margin:0;
    cursor:pointer;
}

#chatContainer .blueButton:hover{
    background-position:left bottom;
}
In the last part of the code, we override the default styling of the jScrollPane div. By default it is shown with purple scrollbars, which is not very suitable for our design. Instead of coding our own stylesheet from scratch, we just include the default one and override some of the rules.
Lastly, you can see the styles of the blue button. You can assign this class to any regular anchor or button, and you will get a pretty blue button.
jQuery
Moving to the last step of this tutorial - the jQuery code. The chat works by listening for events on the login and submit forms (and the logout button), and by scheduling AJAX request back to the server for checking for new chats and users.
As you saw in the first part of the tutorial last week, on the PHP side the AJAX requests are handled by ajax.php. jQuery issues a number of AJAX requests:
- Logging a user in: this is done by a single POST request;
- Logging a user out: also a single POST request;
- Checking for logged in users: this is done once every 15 seconds;
- Checking for new chats: a GET request is fired every second. This could potentially mean a heavy load on your webserver, this is why the script is optimized on the back end, and depending on the activity of the chat, requests are decreased to one every 15 seconds.
As you will see in the code below, we've defined custom wrapper for jQuery's $.get and $.post AJAX functions, which will aid us in not having to fill in all the lengthy parameters for issuing a request.
Also, all of the chat code is organized in a single object called chat. It consists of a number of useful methods, which you will see in the fragments below.
script.js - Part 1
$(document).ready(function(){

    chat.init();

});

var chat = {

    // data holds variables for use in the class:

    data : {
        lastID         : 0,
        noActivity    : 0
    },

    // Init binds event listeners and sets up timers:

    init : function(){

        // Using the defaultText jQuery plugin, included at the bottom:
        $('#name').defaultText('Nickname');
        $('#email').defaultText('Email (Gravatars are Enabled)');

        // Converting the #chatLineHolder div into a jScrollPane,
        // and saving the plugin's API in chat.data:

        chat.data.jspAPI = $('#chatLineHolder').jScrollPane({
            verticalDragMinHeight: 12,
            verticalDragMaxHeight: 12
        }).data('jsp');

        // We use the working variable to prevent
        // multiple form submissions:

        var working = false;

        // Logging a person in the chat:

        $('#loginForm').submit(function(){

            if(working) return false;
            working = true;

            // Using our tzPOST wrapper function
            // (defined in the bottom):

            $.tzPOST('login',$(this).serialize(),function(r){
                working = false;

                if(r.error){
                    chat.displayError(r.error);
                }
                else chat.login(r.name,r.gravatar);
            });

            return false;
        });
The purpose of the init() method is to bind all event handlers for the chat and start the timeout functions that are used to schedule the checks for new chats and online users. You can see that we've used our own wrapper functions - $.tzGET and $.tzPOST. These lift the burden of having to specify a long list of parameters and targets for the ajax requests.
script.js - Part 2
// Submitting a new chat entry:
$('#submitForm').submit(function(){
var text = $('#chatText').val();
if(text.length == 0){
return false;
}
if(working) return false;
working = true;
// Assigning a temporary ID to the chat:
var tempID = 't'+Math.round(Math.random()*1000000),
params = {
id : tempID,
author : chat.data.name,
gravatar : chat.data.gravatar,
text : text.replace(/</g,'<').replace(/>/g,'>')
};
// Using our addChatLine method to add the chat
// to the screen immediately, without waiting for
// the AJAX request to complete:
chat.addChatLine($.extend({},params));
// Using our tzPOST wrapper method to send the chat
// via a POST AJAX request:
$.tzPOST('submitChat',$(this).serialize(),function(r){
working = false;
$('#chatText').val('');
$('div.chat-'+tempID).remove();
params['id'] = r.insertID;
chat.addChatLine($.extend({},params));
});
return false;
});
// Logging the user out:
$('a.logoutButton').live('click',function(){
$('#chatTopBar > span').fadeOut(function(){
$(this).remove();
});
$('#submitForm').fadeOut(function(){
$('#loginForm').fadeIn();
});
$.tzPOST('logout');
return false;
});
// Checking whether the user is already logged (browser refresh)
$.tzGET('checkLogged',function(r){
if(r.logged){
chat.login(r.loggedAs.name,r.loggedAs.gravatar);
}
});
// Self executing timeout functions
(function getChatsTimeoutFunction(){
chat.getChats(getChatsTimeoutFunction);
})();
(function getUsersTimeoutFunction(){
chat.getUsers(getUsersTimeoutFunction);
})();
},
In the second part of the script, we continue with binding event listeners. In the submit form, you can see that when the user adds a new chat, a temporary one is created and shown immediately, without waiting for the AJAX request to complete. Once the write has completed, the temporary chat is removed from the screen. This gives users the feeling that the chat is lightning fast, while the real write is performed in the background.
Near the end of the init method, we run two self executing named functions. The functions themselves are passed as parameters to the respective chat.getChats() or chat.getUsers() method, so that additional timeouts can be scheduled (you can see this in part 5 of the code).
script.js - Part 3
    // The login method hides displays the
    // user's login data and shows the submit form

    login : function(name,gravatar){

        chat.data.name = name;
        chat.data.gravatar = gravatar;
        $('#chatTopBar').html(chat.render('loginTopBar',chat.data));

        $('#loginForm').fadeOut(function(){
            $('#submitForm').fadeIn();
            $('#chatText').focus();
        });

    },

    // The render method generates the HTML markup
    // that is needed by the other methods:

    render : function(template,params){

        var arr = [];
        switch(template){
            case 'loginTopBar':
                arr = [
                '<span><img src="',params.gravatar,'" width="23" height="23" />',
                '<span class="name">',params.name,
                '</span><a href="" class="logoutButton rounded">Logout</a></span>'];
            break;

            case 'chatLine':
                arr = [
                    '<div class="chat chat-',params.id,' rounded"><span class="gravatar">'+
                    '<img src="',params.gravatar,'" width="23" height="23" '+
                    'onload="this.style.visibility=\'visible\'" />',
                    '</span><span class="author">',params.author,
                    ':</span><span class="text">',params.text,
                    '</span><span class="time">',params.time,'</span></div>'];
            break;

            case 'user':
                arr = [
                    '<div class="user" title="',params.name,'"><img src="',params.gravatar,
                    '" width="30" height="30" onload="this.style.visibility=\'visible\'"'+
                    ' /></div>'
                ];
            break;
        }

        // A single array join is faster than
        // multiple concatenations

        return arr.join('');

    },
Here the render() method deserves most of our attention. What it does, is assemble a template depending on the passed template parameter. The method then creates and returns the requested HTML code, incorporating the values of the second parameter - the params object as needed. This is used by most of the other methods discussed here.
script.js - Part 4
// The addChatLine method ads a chat entry to the page

    addChatLine : function(params){

        // All times are displayed in the user's timezone

        var d = new Date();
        if(params.time) {

            // PHP returns the time in UTC (GMT). We use it to feed the date
            // object and later output it in the user's timezone. JavaScript
            // internally converts it for us.

            d.setUTCHours(params.time.hours,params.time.minutes);
        }

        params.time = (d.getHours() < 10 ? '0' : '' ) + d.getHours()+':'+
                      (d.getMinutes() < 10 ? '0':'') + d.getMinutes();

        var markup = chat.render('chatLine',params),
            exists = $('#chatLineHolder .chat-'+params.id);

        if(exists.length){
            exists.remove();
        }

        if(!chat.data.lastID){
            // If this is the first chat, remove the
            // paragraph saying there aren't any:

            $('#chatLineHolder p').remove();
        }

        // If this isn't a temporary chat:
        if(params.id.toString().charAt(0) != 't'){
            var previous = $('#chatLineHolder .chat-'+(+params.id - 1));
            if(previous.length){
                previous.after(markup);
            }
            else chat.data.jspAPI.getContentPane().append(markup);
        }
        else chat.data.jspAPI.getContentPane().append(markup);

        // As we added new content, we need to
        // reinitialise the jScrollPane plugin:

        chat.data.jspAPI.reinitialise();
        chat.data.jspAPI.scrollToBottom(true);

    },
The addChat() method takes a parameter object with the content of the chat, author and gravatar, and inserts the new chat line in the appropriate place in the #chatContainer div. Each chat (if not a temporary one) has a unique ID which is assigned by MySQL. This id is assigned as a class name to the chat in the form of chat-123.
When the addChat() method is run, it checks whether the previous chat entry exists (for chat-123 it would check chat-122). If it exists, it inserts the new chat after it. If it doesn't, it just appends it to the div. This simple technique manages to insert all the chats in the right order and keep them that way.
script.js - Part 5
// This method requests the latest chats
    // (since lastID), and adds them to the page.

    getChats : function(callback){
        $.tzGET('getChats',{lastID: chat.data.lastID},function(r){

            for(var i=0;i<r.chats.length;i++){
                chat.addChatLine(r.chats[i]);
            }

            if(r.chats.length){
                chat.data.noActivity = 0;
                chat.data.lastID = r.chats[i-1].id;
            }
            else{
                // If no chats were received, increment
                // the noActivity counter.

                chat.data.noActivity++;
            }

            if(!chat.data.lastID){
                chat.data.jspAPI.getContentPane().html('<p class="noChats">No chats yet</p>');
            }

            // Setting a timeout for the next request,
            // depending on the chat activity:

            var nextRequest = 1000;

            // 2 seconds
            if(chat.data.noActivity > 3){
                nextRequest = 2000;
            }

            if(chat.data.noActivity > 10){
                nextRequest = 5000;
            }

            // 15 seconds
            if(chat.data.noActivity > 20){
                nextRequest = 15000;
            }

            setTimeout(callback,nextRequest);
        });
    },

    // Requesting a list with all the users.

    getUsers : function(callback){
        $.tzGET('getUsers',function(r){

            var users = [];

            for(var i=0; i< r.users.length;i++){
                if(r.users[i]){
                    users.push(chat.render('user',r.users[i]));
                }
            }

            var message = '';

            if(r.total<1){
                message = 'No one is online';
            }
            else {
                message = r.total+' '+(r.total == 1 ? 'person':'people')+' online';
            }

            users.push('<p class="count">'+message+'</p>');

            $('#chatUsers').html(users.join(''));

            setTimeout(callback,15000);
        });
    },
Here we are taking care of managing the AJAX requests. In the getChats() method, you can see that we are determining when to run the function again depending on the noActivity property of the local data object. On each request that does not return new chats, we increment the counter. If it reaches a certain threshold, the next request is delayed.
script.js - Part 6
    // This method displays an error message on the top of the page:

    displayError : function(msg){
        var elem = $('<div>',{
            id        : 'chatErrorMessage',
            html    : msg
        });

        elem.click(function(){
            $(this).fadeOut(function(){
                $(this).remove();
            });
        });

        setTimeout(function(){
            elem.click();
        },5000);

        elem.hide().appendTo('body').slideDown();
    }
};

// Custom GET & POST wrappers:

$.tzPOST = function(action,data,callback){
    $.post('php/ajax.php?action='+action,data,callback,'json');
}

$.tzGET = function(action,data,callback){
    $.get('php/ajax.php?action='+action,data,callback,'json');
}

// A custom jQuery method for placeholder text:

$.fn.defaultText = function(value){

    var element = this.eq(0);
    element.data('defaultText',value);

    element.focus(function(){
        if(element.val() == value){
            element.val('').removeClass('defaultText');
        }
    }).blur(function(){
        if(element.val() == '' || element.val() == value){
            element.addClass('defaultText').val(value);
        }
    });

    return element.blur();
}
And lastly these are our helper methods and functions. The displayError() method shows the friendly red bar at the top of the page if an error occurs. After this come our custom $.tzGET and $.tzPOST wrappers, and finally the defaultText plugin, which we developed a while back for showing placeholder text.
With this our AJAX chat is complete!
To wrap it up
In this two part tutorial,we went through developing a complete chat solution with PHP classes, a MySQL database and an agile jQuery front end. You can use it to provide live support for your website, or leave your site visitors have a fun time with it. It is a great solution for small to medium sized chats (less than 20 people simultaneously).
If you liked this tutorial, be sure to follow us on twitter for useful web dev links, and subscribe to our RSS feed.
Bootstrap Studio
The revolutionary web design tool for creating responsive websites and apps.
Learn more
Really well thought out tutorial, thanks =)
Muchas gracias!
Master at Work :)
Thanks man!
Awesome! I'll definitely be using this. Thanks man.
Very nice and can be adapted for other backends.. Thank you! :)
When I login or logout,the online list would not auto refresh.
In Chrome specially on localhost, in the login or the logout just add a location.reload();
New level of awesomeness :D
Great concept, time effort and result. Nice work
Still no smiles in chat :)
Great use of css and jquery... Very amazing result, thanks for sharing!!
Fantastic tutorial, thanks so much.
This is amazing! Works like a charm in the demo. I will try this out for a customer support section on a client's site. Thank you very much!
This is absolutely sick... Attempting to incorporate it into my website as we speak...
Sound would a great addition so when minimize you get notify someone has posted or responded a comment.
THANK YOU! for this amazing! TUT.
Looks great! just needs to break long words...
Take a look at PHP functions, specially the users feedbacks :
http://php.net/manual/fr/function.wordwrap.php
I will try and implement this on a site and maybe send a link back. THIS is a really nice idea and very well done!
superbl! thx!
It's worth noting that in the bottom of the chat.class.php file, you can adjust the gravatar querystring to add attributes like rating, etc... more info here:
http://en.gravatar.com/site/implement/images/php/
is this pure used jQuery pug-in???
WOW...its a rock master...
arigato ^^
It works on my site :)
Very good chat!!! I am admired. Easy and modern. Well done. I will use it on site
One of the most complex and yet so easy to implement scripts I have ever seen. Worked within a couple of minutes.
Would be very helpful though if there was a translation configuration file where all the labels were in. I must translate everything into my language and experiencing some trouble in finding them all. But ... I will succeed :-)
Thanks a million Martin
wow, it works like a treat and is all layed out so well, thank you, thank you, thank you,
NOTE: in your "to wrap it up" section you said:
"it is a great solution for small to medium sized chats (less than 20 people simultaneously)."
what would need to be done to make it handle a much larger amount of users, say 1000 at a time?
Why are you firing GETs every second rather than using a long-lasting HTTP request and pushing updates from the server? It seems like that would decrease the load on the webserver, decrease the bandwidth usage, and improve the responsiveness of the chat client.
long-lasting HTTP request is for live feeds, and bandwidth consumption is independent from the technique used, but related to the amount of data used ;)
will be better with smyles
I have converted this tutorial to Zend framework :)
Works like a charm :)
This Ajax web chat is wonderful, But how to let user sign-in with their Facebook account instead of just input Nickname & Email address?
Because i think it's not really good idea for authentication, others user can in put some users Nickname and act like him/her, Please help.. Thanks
Great work, thanks! Do you have something similar for ASP.NET?
Wondering if there is a filter function to block curse words?
or a way to kick people out from admin panel?
What can be done with admin functions? Like user ban Anyone solved this?
The first idea is that after login, super users can change their status (role) by sending command to the server, this command will change the status from simple user to super user. With this system of commands within the chat, we can pass many commands like kicking or banning users, banning IPs, adding bad words.
But we need more mysql tables, example for surper users we can have :
superuser(email, role, password) and the command will be for example :
login:password
For kicking a user:
kick:username
.
.
.
Thank you for the awesome tutorial,
I was trying to modify it to delete all the webchat_lines when the last user has logged off.
But, I am not sure how to do that.
I was thinking of editing logout() function in Chat.class.php to include a line that checks if the count of current users is 0, then delete everything from webchat_lines.
However, I am not sure how to get the count from a SQL query to use in a comparison.
Any help shall be appreciated.
Thank you.
So simple:
well I wish to know how to change gravatar to nothing, also could I use another username data from my current username at site I already have?
cause I want to make this great chat implement inside my site so no need data to log in or register just work based one the database already have.
Hi there!! :D
Reviewing the code I made a modification to make it a little safer, the changes are:
look for the line 56 of file ajax.php and change by:
case 'submitChat':
$chatText = str_rot13(trim($_POST['chatText']));
$response = Chat::submitChat($chatText);
and find the line 130 of file Chat.class.php and change by:
$chats[] = str_rot13($chat);
I use the function str_rot13 (http://mx2.php.net/manual/en/function.str-rot13.php)
Credits also to @xombra :D
Btw, sorry for my bad english
This is really awesome tutorial....I have customized your code as per my requirement and its saved lot of time and easy to customize it...thanks man...
I have one issue but i don't understand why its happening???
I have the same layout with a extra link next to the submit button in the bottom bar...this link will need to show my conversation alone...but when i clicking that link the session is cleared out...i run the same URL in new tab or new window, its not happening and session is maintained properly...
do u know why this happening like this?
sorry sorry its my mistake...i have given the same class name which is given for logout button.
Now its working fine after changing the classname....
I got similar script and in my case is big lag with more than 100 posts :/
Can be server problem? (slow)
Hello
Very nice Ajax chat.
Is there a possibility to make it different for every user?
I mead like a private chat...
THIS IS SO AWESOME!!! Thanks alot!! helped in my school project alot!!! Loved the way thhe js script were implemented!! Thanks alot for your tutorial!! Totally worth it!! :)
can we make smiles, can we stylize text ? please help
For Emoticons, you can clone a method and change its code.
Emoticons are simply patterns (letters, numbers and special chars) that can be parsed and replaced by their equivalent images.
You can create two array, one will contain patterns, the other for each pattern we will have an image (it is possible to have many patterns for one images). A method can be like this way:
parse_emoticons : function(chatText){ var codes = emoticons_code[emoticons_set]; var images = emoticons_image[emoticons_set]; for (var kk=0;kk<codes.length;kk++){ var alt = images[kk]; alt = alt.replace(/\.png/g, ''); alt = alt.replace(/\.gif/g, ''); chatText = chatText.replace(codes[kk],' <img src="'+emoticons_dir+emoticons_set+'/'+images[kk]+'" alt="'+alt+'"> '); } return chatText; },What about adding a login / register script for the chat in a new tutorial? I think with a account it's a bit cooler ;)
The main goal is to have a tiny chat room that can be so simple to use and use few resources.
It's great. But, i think some improvement is needed for JscrollPane.
Anyways, your algorithm is great, and the message are well synchronized.
Awesome Work.!!
Yes of course, JscrollPane is not so far the best plugin for scollbars. I changed it to "jquery mCustomScrollbar".
Very very very nice chat. I used some of your code it's really epic.
I do have a problem. I got an error that it used over 20% of my server's memory. Because the chat doens't delete posts. How could I make it delete the first post when a new post shows? please help
kind regards,
Auguste
Belgium
Its not working !!! :'( ... i downloaded the source files and my database configurations are host name='localhost', username = 'root', password='', db_name='chat' .... everything is showing up but when i try to log in with different email and nick names, its showing Nick is in use. Please help :/
You must create the necessary tables, in your Database. Had the same problem, in reality the chat wasnt finding the tables inside the database so it got confused
Great style ! Would be perfect with a private chat room.
It is a very good chat! Congratulations!
I want to contribute with a little detail: When a chat is send it and the text box "chatText" is cleaned, the focus of the cursor disapears, so it is necesary to put the cursor with the mouse. To fix this, I put the next line between lines 35 and 36 in script.js part 2 :
$('#chatText').focus();
It worked good, but when I press the enter key or clic in "submit" button twice, the focus disapears again.
Can somebody fix this?
Thanks.
add a delay for submit button, example 500ms, if current time is less than 500ms, the button still disabled. The same technique as the variable called "working".
Hello there, i absolutely love this script, but i'm a novice at javascript. I would like to use this in conjunction with my own login system. So i would like to remove the sign in function with nick and email. And check to see if a user is logged on or not in my system instead. So what i figure is I need to edit atleast the script.js file to remove anything that is related to the login functionality, and just show the input box from the get-go. Can you please help me do that?
Sincerely Nony
"It is a great solution for small to medium sized chats (less than 20 people simultaneously)"
What if amount of users will be hundred or more? Will chat survive with this load?
Tested with ubuntu 10.10 server in production mode (public IP) with 50 users with NO PROBLEM at ALL, no server overload :)
Has anyone been able to add smilies to this chat system?
Hi, first of all, thanks for this chat, it's working great !
I just have a little issue, i'm trying to make a webchat where people can talk about Mathematics and so, i'd like the chat to display LaTeX formula. I'm thinking of using MathJax (http://www.mathjax.org/) but when I include the script in the html file it do not work like i want to : if i put some more html with TeX formula it works but if someone submit a message with TeX inside the right delimiters, when the message is shown inside the chat, there is no render for the formula (it will show ( x^2 ) instead of the LaTeX render).
Anyone knows why or have an idea to fix it ?
Special chars are not allowed for security reasons, try to deal with them. Escape "\" with another "\" so you will have : \.
Any char not from this set must be escaped : [0-9a-zA-Z]
Hello Martin! First of all great tutorial! I just want to know is there a way to restrict the number or users. And is there a way to remove the login and email all together?
Nice chat, but too slow with large number of users. I'am making joomla component with acl and removing posts on it.
Joomla is crazy slow, try other CMS, best is wordpress with less plugins ;)
Great tutorial !
Here an enhanced version of this tutorial (http://hpics.li/2d03733)
I realise this is quite an old comment but I am quite intrigued as to how you implemented all of the extra features in this image, would you still have the code for this and be willing to share it?
Translated in arabic : http://hpics.li/2ce4670
Great Job! Perfect for a private chat in for instance an admin panel. But I can't seem to get the Gravatar to work.
Hello,
Is it possible to have chat between only two users of website?
E.g: Tom and Sabrina are chating and Tom & Roy are chating then Sabrina can't able to see the chat between Tom & Roy.
Is this possible with your chat module?
Let me know any further information.
Thanks.
Hello,
not working, help me. Plugged in the SQL, see the chat, but when you drive the name and e-mail, writes that not all fields are filled.
I want to ask , how can I add play() sound or beep notification when users post their messages, and where is the proper place to add it? Also want to know, is there possibility to play this sound on mobile (android or Iphone)? Thank you in advance!