BounceBox Notification Plugin With jQuery & CSS3
Earlier this week, while working on ZineScripts' coupon code system, I found the need to be able to dynamically create and present a message box to Zine's visitors. The usual routine would include digging through jQuery's plugin repository and ending up with using a lightbox alternative, but I decided to take the time and build an one-off notification solution, which I am sharing with you today.
Step 1 - XHTML
Going straight to the point, what do you need to create this effect?
The only thing you need is to create a div on your page and put some content inside it. Something like this:
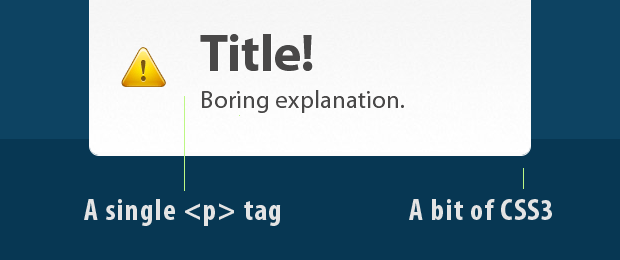
<div id="box">
<p><b>Title!</b>Boring explanation.</p>
</div>
In our example the title of the message, the message body, and the warning icon are all created by using a single <p> tag with some CSS wizardry. The warning icon is its background, and the title is a regular bold tag contained inside the paragraph.
Step 2 - CSS
The plugin, we are doing today, adds its own CSS rules for the box positioning, which make the bounce effect possible, but we still need to code the design of the box in our stylesheet file.
styles.css - Part 1
/* The bouncing box */

#box{
    background:url('img/box_bg.jpg') repeat-x center top #fcfcfc;
    height:115px;
    padding:20px;
    margin-top:-10px;
    padding-top:30px;
    width:400px;
    border:1px solid #fcfcfc;
    color:#494848;
    text-shadow:1px 1px 0 white;
    font-family:'Myriad Pro',Arial,Helvetica,sans-serif;
}

#box p{
    font-size:25px;
    background:url('img/warning.png') no-repeat 10px center;
    padding-left:90px;
}

#box p b{
    font-size:52px;
    display:block;
}

#box,
#main,
a.button{
    -moz-border-radius:10px;
    -webkit-border-radius:10px;
    border-radius:10px;
}
Here we are styling the design of the bounceBox. There are also a couple of rules that are applied inline by jQuery, which assign a 'fixed' positioning to the box and center it in the middle of the page, which is required for the animation. This way there is a clear division between the styles for design and those for functionality.
styles.css - Part 2
/* Styling the big button */

a.button{
    color:white;
    letter-spacing:-2px;
    padding:20px;
    display:block;
    text-shadow:1px 1px 0 #145982;
    font-family:'Myriad Pro',Arial,Helvetica,sans-serif;
    font-size:80px;
    font-weight:bold;
    text-align:center;
    width:350px;
    border:1px solid #60b4e5;

    margin:60px auto;

    /*
        CSS3 gradients for webkit and mozilla browsers,
        fallback color for the rest:
    */

    background-color: #59aada;
    background-image: -moz-linear-gradient(#5eb2e2, #4f9cca);
    background-image: -webkit-gradient(linear, 0% 0%, 0% 100%, from(#5eb2e2), to(#4f9cca));
}

a.button:hover{
    /* Lighter gradients for the hover effect */
    text-decoration:none;
    background-color: #5eb2e2;
    background-image: -moz-linear-gradient(#6bbbe9, #57a5d4);
    background-image: -webkit-gradient(linear, 0% 0%, 0% 100%, from(#6bbbe9), to(#57a5d4));
}
In the second part of the code we apply a number of CSS3 rules to the button to achieve that polished look. Notice the two gradient rules which are targeted at Mozilla Firefox and the Webkit browsers (Safari & Chrome). Unfortunately, unlike with other CSS3 rules, they don't share a common syntax for displaying a gradient, which raises the burden on the developer in some degree.
It is also important to specify a fallback background color in case the browser does not support CSS gradients.

Step 3 - jQuery
First lets start by creating our bounceBox plugin. As we've seen before, creating a jQuery plugin is just a matter of extending the $.fn object with a new function. The 'this' of the new function is equivalent to the jQuery set of elements that the method was called on.
bouncebox-plugin/jquery.bouncebox.1.0.js
(function($){

    /* The plugin extends the jQuery Core with four methods */

    /* Converting an element into a bounce box: */
    $.fn.bounceBox = function(){

        /*
            Applying some CSS rules that center the
            element in the middle of the page and
            move it above the view area of the browser.
        */

        this.css({
            top     : -this.outerHeight(),
            marginLeft  : -this.outerWidth()/2,
            position    : 'fixed',
            left        : '50%'
        });

        return this;
    }

    /* The boxShow method */
    $.fn.bounceBoxShow = function(){

        /* Starting a downward animation */

        this.stop().animate({top:0},{easing:'easeOutBounce'});
        this.data('bounceShown',true);
        return this;
    }

    /* The boxHide method */
    $.fn.bounceBoxHide = function(){

        /* Starting an upward animation */

        this.stop().animate({top:-this.outerHeight()});
        this.data('bounceShown',false);
        return this;
    }

    /* And the boxToggle method */
    $.fn.bounceBoxToggle = function(){

        /*
            Show or hide the bounceBox depending
            on the 'bounceShown' data variable
        */

        if(this.data('bounceShown'))
            this.bounceBoxHide();
        else
            this.bounceBoxShow();

        return this;
    }

})(jQuery);
We are defining four separate methods which convert the div to a bounceBox (and apply the positioning CSS rules), show it, hide it or toggle between the two by using the animate() jQuery method.
For the toggling we are keeping an internal variable with the data method, which marks whether the box has been shown or hidden.
All of these methods are available to you after you include the jQuery library and the jquery.bounce.1.0.js files to the page. For the neat bounce effect, you will need the jQuery easing plugin as well, which is included in the plugin directory in the zip.
It is really easy to use the plugin, as you can see from the code below.
script.js
$(document).ready(function(){

    /* Converting the #box div into a bounceBox: */
    $('#box').bounceBox();

    /* Listening for the click event and toggling the box: */
    $('a.button').click(function(e){

        $('#box').bounceBoxToggle();
        e.preventDefault();
    });

    /* When the box is clicked, hide it: */
    $('#box').click(function(){
        $('#box').bounceBoxHide();
    });
});
The code above is executed when the document ready event is fired so we are sure that all the page elements are available to jQuery. The first thing we then do is to covert the #box div to a bounceBox, and bind listeners to the click event on the button and the box itself.
You can put whatever HTML code you want in the box div and it will be properly converted to a bounceBox. You can also have more than one bounce box on the page in the same time.
With this our BounceBox plugin is complete!
Conclusion
You can use this jQuery plugin to present notifications to the user in an eye-catching manner. You can easily put a registration form, newsletter signup or even some kind of advertisement as the content of the box div. Feel free to experiment and share what you've done in the comment section.
Bootstrap Studio
The revolutionary web design tool for creating responsive websites and apps.
Learn more
This is great keep up the great work , hope u can finish soon zinescripts !
Great demo, your work speaks volumes.
Very nice. I could see myself using this for a contact form.
great, tanks for script
Awesome tut. i love it.
10 how would i use ajax to have it drop down automatically for there is a change in mysql database.
Use the value of return from ajax to call a function and trigger a click, so that the button will be called automatically
This is a nice little function which can be used for numerous things.
A little tweaking and it could be used as an auto-dropdown notice on forums or community sites telling people what possibilities they get if they sign up.
It can be used to show error messages on forms if a person forgot to fill out some form fields.
Yet another great and useful tutorial.
Thanks for your great work Martin ^_^
Thanks for the tut.
This will be excellent for an April Fools joke page :). Ideas, ideas.
Thanks.
Hey,
you can gradient image ;)
Replace it with:
background-image: -moz-linear-gradient(top, #F6F6F6, #FEFEFE); / FF3.6 /
background-image: -webkit-gradient(linear,left top,left bottom,color-stop(0, #F6F6F6),color-stop(1, #FEFEFE)); / Saf4+, Chrome /
filter: progid:DXImageTransform.Microsoft.gradient(startColorStr='#F6F6F6', EndColorStr='#FEFEFE'); / IE6,IE7 /
-ms-filter: "progid:DXImageTransform.Microsoft.gradient(startColorStr='#F6F6F6', EndColorStr='#FEFEFE')"; / IE8 /
sry
Very nice tutorial..thanks..
Good job Man! Can i use this plugin?
Very well explained. good for people who want to use PDO.
Thanks
Well isn't that just a cute little animation. Nice!
Great, it works like we need it, keep it up (Y)
{applause]
I think I would want you on my team if I were to be putting together any sort of web-app for the masses.
Thanks once again for keen explanation and sweet integration. Not to mention all the ideas that are flying now about.
;)
Great! I love it, maybe will use it on my website.
Great tut
Toggle jquery with a bit of css3
Great little tutorial, and as mentioned by Goatie, it's very versatile!
And it's shown me just how easy it is to write a simple jQuery plugin
Thanks
Thank you for the awesome comments folks! Really appreciate it!
It's recommended that jQuery plugins take up a single function in the jQuery namespace, and that access to "internal methods" be provided, well...internally, via passing arguments to that one public function, rather than adding four separate functions to jQuery to manipulate the state of your plugin.
Note that it's #1 on this list of requirements provided as far back as 2007 by Mike Alsup: http://www.learningjquery.com/2007/10/a-plugin-development-pattern
Great plugin, i'm looking forward to using this.
Two words: Sliced. Awesome.
It is possible to auto-hide the notification after a few seconds?
Again..a very nice tutorial..
Cool, it looks impressive. But I have the same question as Bogdan: can the notification be hidden automatically after a few seconds?
what to say ?
Do we need a plugin for silly thing ?
yeah I got what to say , hahahaha :)
@Goatie , Great Idea though !!!
@ adam j. sontag
Thank you for sharing this useful information. I will follow these rules when releasing plugins in the future.
@ Bogdan, @ Deluxe Blog Tips
Yes, you can hide the box automatically. You can do it internally right in the plugin, by adding a timeout with which you schedule a call to bounceBoxHide().
You can download an autohide version of the plugin from here. Use it instead of the regular version of the plugin. You can find an example of its usage in script.js.
Thank you very much..works like a charm..
Nice! Thanks.
I'm new to jquery, so forgive the stupid question. How can i shoot the box from php? For example after verifying something on the page execution i launch the box from php. How can i do this?
Great Job!!!
it is possible to change the position "x" when you show the box?
Thank you very much...
@ Alexander
You can use PHP to write the jQuery code in a script tag on the page. Something like this:
<script type="text/javascript">
$('#box').bounceBoxHide();
</script>
@ edson
You can modify the position of the bounceBox as you would normally do any absolutely positioned div. For example you can modify the horizontal positioning like this:
$('#box').css('left',200);However be sure to run this code after $('#box').bounceBox(); is run, as the plugin applies its own CSS properties to the bounceBox in order to center it.
Thank you very much…!!!!!!
I wonder, is it possible to combine this with jquery validation plugin?
wounderful tut - great script!
unfortunately I've to consider IE6 so I added some lines in the beginning of the css-part of your script to fix a IE6 bug:
thank you,
rolf
Hi, I have ported the plugin to the Ext Core library: http://www.artalat.com/2010/06/ext-ux-alertbox/
Beautiful! And useful.
How (and what) would I change to have this activated from a text link instead of "the big button."
Apologies if the answer is 'roll the eyes' simple.
The button is basically a regular link with a bit of styling applied. To open it from a specific link just change the selector on line 7 of script.js.
Currently:
$('a.button').click(function(e){Should be:
$('#yourLinkId').click(function(e){Martin, thank you. I really appreciate your reply. It tests out great with a link activation.
I have another two more questions. 1) How would you go about adding an extra bounce (or two)? 2) How do you add say a five-second time-out that closes the box (in addition to closing it with a click)?
Again, thanks. ~ Raubie
Oops. My apologies, you've already answered my second question by providing an autohide version. Thank you!
Great tutorial, is there any way to remove the bounce effect? i love it more without the bounce effect.
Yes, you can remove the bounce effect. Change line 29 of bouncebox-plugin/jquery.bouncebox.1.0.js from:
this.stop().animate({top:0},{easing:'easeOutBounce'});to:
this.stop().animate({top:0});Is it possible to have this show up after a few seconds and not on clicking the button? How?
you need to trigger the click for the button and set a timeout
Like this
setTimeout(function() {
$('a.button').trigger('click');
}, 4e3);
I tried using this with jQuery 1.8.0, but it looks like the box is not hidden properly now? - Do you know if there needs to be some changes for using the newest jQuery?
How do I get the black overlay like the one shown in zinescript link up top?
I have a question about this script, it's kewl by the way; how does one use it with multiple links? That is to say link one bounces content in id=box, link two bounces content in id=box2; or maybe they should be set by classes?
For example, one may wish to use it for a FAQ, whereby clicking on a particular question bounces a short answer - with a link to the FAQ page with more details. I can't figure out how to have it work with multiple ID's though.
Any help?