Simple Banner Rotator With PHP, jQuery & MySQL
In this tutorial we are making a simple PHP, jQuery & MySQL banner rotator, with which you can create and randomly display banners on your site. Each of the banners features a neat jQuery animation effect, which you can customize to fit your own needs.
Note: This tutorial is quite old and doesn't work in PHP7 and above. We are keeping it online only as a reference.
The database schema
Before we start coding, lets take a look at the database. All the banners are inserted into the banners MySQL table. It has the following structure:
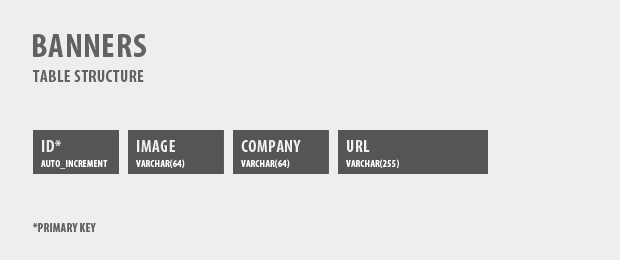
ID is a primary key, which is auto-incremented, which means that you don't need to add a number in that field if you are manually inserting new banners. Next is the image field, which holds the filename of the banner, after it is the company name and lastly the URL of the company's site, all of which are varchar fields (regular strings).
If you want to run the demo on your own host, you will need to recreate this table from the definitions inside table.sql in the download archive. Just paste the SQL colde in your MySQL manager. Also don't forget to fill in your MySQL login details in connect.php, before uploading the files to your server.
Step 1 - XHTML
The XHTML code of the banners is generated on the fly by PHP after a database query, and outputted to the page. Here is how the markup for a sample banner looks like:
demo.php
<div class="banner">
    <a href="http://www.rapidxhtml.com/">
        <img src="img/banners/rapidHTML.png" alt="Rapid HTML"
        width="125" height="125" />
    </a>
    <p class="companyInfo">Visit Rapid HTML</p>
    <div class="cornerTL"></div>
    <div class="cornerTR"></div>
    <div class="cornerBL"></div>
    <div class="cornerBR"></div>
</div>
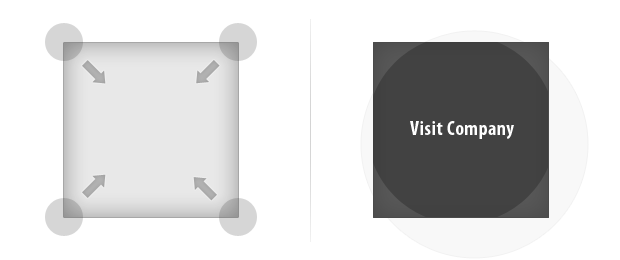
Inside each banner div, we have a hyperlink to the company's site, a standard 125 by 125 px banner, a paragraph with the company name, and four corner divs.
The paragraph and the corner divs are hidden by default and are shown when the user moves their mouse over the main .banner div. This ensures that the banners are perfectly functional even with JavaScript disabled, albeit without the fancy transition.
Step 2 - CSS
Lets move to styling the page. To ensure cross-browser compatibility, we first have to reset the default styles that browsers apply to page elements. This is simple to do with a universal page reset:
styles.css - Part 1
*{
    /* A universal page reset */
    margin:0;
    padding:0;
}

body{
    /* Setting default text color, background and a font stack */
    font-size:0.825em;
    color:#666;
    background-color:#fff;
    font-family:Arial, Helvetica, sans-serif;
}

.bannerHolder{
    /* The main banner unordered list */

    height:270px;
    width:270px;

    float:left;
    margin:20px 15px;
    padding:10px;
    background:#f7f7f7;
    border:1px solid #eee;

    /* CSS3 rounded corners */

    -moz-border-radius:12px;
    -webkit-border-radius:12px;
    border-radius:12px;
}

.bannerHolder li{
    /* Hiding the bullets of the li elements: */
    list-style:none;
    display:inline;
}

.banner{
    /* The banner divs */
    position:relative;
    width:125px;
    height:125px;
    overflow:hidden;
    float:left;
    margin:5px;
}

.banner img{
    /* The banner divs */
    display:block;
    border:none;
}
As the banners are organized in an unordered list, we first style the list itself (which is assigned the bannerHolder class), then the li elements inside it and lastly the banner divs.
As we have two groups of banners on the page, we have to stick to class names to target the elements in the CSS, as IDs must be unique and don't allow for more than one element with the same ID.
styles.css - Part 2
.banner div{
    /* The dark animated divs */

    position:absolute;
    z-index:100;
    background-color:#222;
    width:60px;
    height:60px;
    cursor:pointer;

    /*  Setting a really big value for border-radius
        will make the divs perfect circles */

    -moz-border-radius:100px;
    -webkit-border-radius:100px;
    border-radius:100px;
}

/*  Positioning the animated divs outside the
    corners of the visible banner area: */

.banner .cornerTL{ left:-63px;top:-63px; }
.banner .cornerTR{ right:-63px;top:-63px; }
.banner .cornerBL{ left:-63px;bottom:-63px; }
.banner .cornerBR{ right:-63px;bottom:-63px; }

.banner p{
    /* The "Visit Company" text */

    display:none;   /* hidden by default */

    left:0;
    top:57px;
    width:100%;
    z-index:200;
    position:absolute;

    font-family:Tahoma, Arial, Helvetica, sans-serif;
    color:white;
    font-size:11px;
    text-align:center;

    cursor:pointer;
}
In the second part of the code we style the animated rounded divs that slide into view on mouseenter. We are using the border-radius CSS3 property and by giving it a 100px value, we turn the divs into perfect circles. We also position each of the four divs just outside its parent div.

Step 3 - PHP
Moving to the PHP part, we will first take a look at the banner class.
banner.class.php
class Banner{

    private $data = array();

    public function __construct($row){
        $this->data = $row;
    }

    public function html(){

        /* This method returns the banner's HTML code */

        $d = &$this->data;
        $d['company'] = htmlspecialchars($d['company']);

        return '
            <div class="banner">
                <a href="'.$d['url'].'">
                    <img src="img/banners/'.$d['image'].'" alt="'.$d['company'].'"
                    width="125" height="125" />
                </a>
                <p class="companyInfo">Visit '.$d['company'].'</p>
                <div class="cornerTL"></div>
                <div class="cornerTR"></div>
                <div class="cornerBL"></div>
                <div class="cornerBR"></div>
            </div>';
    }

}
The constructor method of the class is executed when we create a banner object. It copies the $row variable we pass as a parameter to its internal private $data array.
The other method - html() - returns the HTML code of the banner.
You can see below how this class and its methods are used:
demo.php
$bannerResult = mysql_query("SELECT * FROM banners");

$banners = array();
while($row=mysql_fetch_assoc($bannerResult))
{
    $banners[] = new Banner($row);
}

// Randomizing the $banners array:
shuffle($banners);

// Splitting the banners array into smaller arrays with 4 banners each:
$bannerGroups = array_chunk($banners,4);
After selecting all the banners from the database, PHP fetches each row of the result as an associative array, and creates banner objects. After this the resulting $banners array is shuffled and split with the help of the in-build array_chunk() function.
The array_chunk() PHP function splits an array into smaller chunks. It takes an array as its first parameter and a number as its second. The number specifies how many elements you want in the resulting chunks. The function splits the original array into smaller ones and returns them as an array of arrays. Read more on array_chunk() at the PHP docs.
As we have 8 banners, we end up with two elements in $bannerGroups, which we can print to the page:
demo.php
<ul class="bannerHolder">
    <?php

        // Looping through the first group:
        foreach($bannerGroups[0] as $ban)
        {
            echo '<li>'.$ban->html().'</li>';
        }

    ?>
</ul>
With all the markup generated and styled, we can move on with the jQuery part of the tutorial.

Step 4 - jQuery
After including the jQuery library to the page, we can start writing our own JavaScript code in script.js.
script.js
$(document).ready(function(){

    // Lowering the opacity of all slide in divs
    $('.banner div').css('opacity',0.4);

    // Using the hover method
    $('.banner').hover(function(){

        // Executed on mouseenter

        var el = $(this);

        // Find all the divs inside the banner div,
        // and animate them with the new size

        el.find('div').stop().animate({width:200,height:200},'slow',function(){
            // Show the "Visit Company" text:
            el.find('p').fadeIn('fast');
        });

    },function(){

        // Executed on moseleave

        var el = $(this);

        // Hiding the text
        el.find('p').stop(true,true).hide();

        // Animating the divs
        el.find('div').stop().animate({width:60,height:60},'fast');

    }).click(function(){

        // When clicked, open a tab with the address of the hyperlink

        window.open($(this).find('a').attr('href'));

    });
});
Using the hover method, we bind two functions to the mouseenter and the mouseleave events. These respectively show and hide the four rounded divs and the paragraph tag.
Notice the use of the stop() function, which, as it name suggests, stops a running animation. Remember that if you need to stop a build-in effect like fadeOut(), you should pass two additional true parameters to the function.
Stopping animations is important, as firing a new animation before the old one has completed, will make them pile up, which is definitely not desired.
Finally, because the hyperlink is hidden below the divs and is thus unclickable, we listen to the click event on the main banner div, and open a new tab to the appropriate URL when the event occurs.
With this our simple banner rotating script is complete!
Conclusion
In this tutorial we demonstrated some of PHP's OOP features, jQuery animations and some interesting CSS effects. You are free to modify this code and use it any way you like.
What do you think? How would you modify this script?
Bootstrap Studio
The revolutionary web design tool for creating responsive websites and apps.
Learn more
Now THIS is one of the reasons I love this blog; this example is really great to look at, the idea is superb and the outcome is fantastic. How do you manage to do it ;) ?
Keep up the great work mate!
great tutorial! great blog!
looking forward to get more rss...
Pretty cool, but what is that "stop" for?
(in "el.find('div').stop().animate...")
And without that "stop(true, true)" in Line 18 the Fade-In of the text would be much nicer/smoother.
Can you add to the msql table a column for the number of impressions and the number of clicks on the banner? How would you count that with the PHP?
@ Marco
Thanks for the awesome comment! Glad you like it :)
@ Deoxys
If you move the mouse cursor over a banner and then instantly remove it (before the show animation has completed), will cause the animations to pile up and execute one after another. The right behavior would be to stop all the animations that are running and start the new one. Otherwise the script feels unresponsive.
You can remove these stop() methods and try it out to see what I mean.
The stop on line 18 is executed only once in the beginning of the animations so it doesn't make much of a difference performance-wise.
@ ken
To make the script count the clicks you can add a new INT column to the database named 'click', and point the hyperlinks of the banners to a new PHP file, in which you increment the click counter on the respective banner.
I made a simple script to do this: count_clicks.zip. Just download it and replace the original files of the demo with these.
As for the impressions you can probably consult your Google Analytics. Or you can create a new table and increment it on every page view. Your choice.
Yeah, I tried that out, and I see no differences. Just a nicer fade-in...
A quick test confirmed your observation. The problem arises from the fact that the callback function for the animation on line 16 is actually called 4 times, or once per animated div.
And stop(true,true) does exactly what it is supposed to - it switches the currently active animation to its end state. And as it is run 4 times, on the second run it makes the text completely visible, thus completely ruining the fadeIn effect.
The solution is simple - remove the stop method on line 18, as you suggested. The stop on line 28 will take care of any potential bugs.
Again, thank you for noticing!
Pretty. I like the effect. It's cool when you use no images, just the CSS3 with border-radius rules. It's creative. Thanks for sharing.
Great tutorial, great implementation that is simple and easy to follow.
Ок. Красиво и можно применить
I check Tutorialzine first time in the morning every day ! I think you are doing a great job...Honestly you deserve to be paid for this...
Love it!
Quick question though, why are you using a function called 'html'? In a previous tutorial you used the magic method '__toString'. Just wondering. :)
Hello, this a nice effect ! This blog increase creativity !
Perhaps the use of PDP is a better choice than mysql_ * (these functions are deprecated).
How can you modify the javascript file to open to "_self" target? (Not in a new tab/window)
I'm okay with HTML and CSS but I suck at javascript.
@Nat
Just replace "window.open" with "location" in line 37 of script.js and this should do.
Greets
@Deoxys
Awesome! Worked like, if not better, than a charm. Thanks!
Here is a MooTools version of this script
great tutorial thank you
Is a possible instead of 4 banners in the bannerholder to line up the banners in a single row to show them in a sidebar on a webpage?
@ Lyall Salkinder, thank you for the awesome MooTools implementation. I am sure that many people will find it useful.
@ Ann, yes it would be fairly easy to show all the banners in a single column. Just remove this line from demo.php:
And the second foreach block in the same file:
<?php

    foreach($bannerGroups[1] as $ban)
    {
        echo '<li>'.$ban->html().'</li>';
    }

?>
The only thing left for you to do is to modify a bit the first foreach block to loop through the $banners array, and not the $bannerGroups[0] array like this:
foreach($banners as $ban)
{
    echo '<li>'.$ban->html().'</li>';
}
This will show them in a single column.
@ Martin
Thanks for replying, I hope I can get it working.
WIl give it a try
@Martin, I tried it and works great, but.......
there are still 2 banners at 1 row. I really would like just 1 banner at each row is that also possible?
@ Ann, yes, just lower the width of .bannerHolder UL in the CSS. The banners should then show only one per row.
@Martin, Thank you so much, this is absolutely beautiful!
Ok this is solved for me i used an iframe tag to embed this in my CMS.
thanks!
I would like this banner rotator on a webpage.
But leave the files that come along with this script in a seperate folder.
So I include the part starting with: ul class bannerholder
and makes changes to require "folder/connect.php"
require "folder/banner.class.php"
Where do I have to make changes more? because I seem to have lost the connection with the database. I think I have to change the paths but on which files exactly?
found the solution myself I think:
in the file: banner.class.php on line 21 there you can change the path
I really like this banner! Thanks for the code snippets. It looks great!
I am using blogger, I and I hooked to this beautiful effect and functions.
But could you please, make it simpler to implement in blogger blogspot for some basic people like me?
Thanks a lot though I can't understand most parts, but I can tell you the result is by far the best!
Hi. This is exactly what i needed, but you could rewrite this in a more "humanized" language. It's too complex to implement for non-skilled people, like bloggers.
Cheers!
Say I have a column of 4, then I would like it to auto-refresh and pull the next 4 images. Is that possible?
Great...
And if i need to use a html banner instead a image banner?
Thank you.
Update banner.class.php to calculate impressions
add 'impressions' as new column in the table 'banners'
class Banner { private $data = array(); public function __construct($row) { $this->data = $row; } public function html() { require "connect.php"; /* This method returns the banner's HTML code */ $d = $this->data; mysql_query("UPDATE banners SET impressions=impressions+1 WHERE id=".$d['id']); $d['company'] = htmlspecialchars($d['company']); return ' <div class="banner"> <a href="click.php?id=' . $d['id'] . '"> <img src="img/banners/' . $d['image'] . '" alt="' . $d['company'] . '" width="125" height="125" /> </a> <p class="companyInfo">Visit ' . $d['company'] . '</p> <div class="cornerTL"></div> <div class="cornerTR"></div> <div class="cornerBL"></div> <div class="cornerBR"></div> </div>'; } }Why have i not found this blog sooner, everything in here is exactly what I've been looking for, thanks a lot for the awesome tuts
Great work