Carbon Fiber Signup Form With PHP, jQuery and CSS3
Today we are making a carbon fiber - style form, build using progressive enhancement. This means that we first ensure that the form works well without JavaScript and fancy CSS support (think of IE6 here) and later move on by layering over cool styling, AJAX and jQuery magic.
The form features its own custom tooltip validation, and is even perfectly usable with JavaScript disabled.
Step 1 - XHTML
The first step includes creating the XHTML backbone of the form. It has to be simple, and, according to the principles defined by progressive enhancement, must be perfectly usable by itself.
demo.html
<div id="carbonForm">
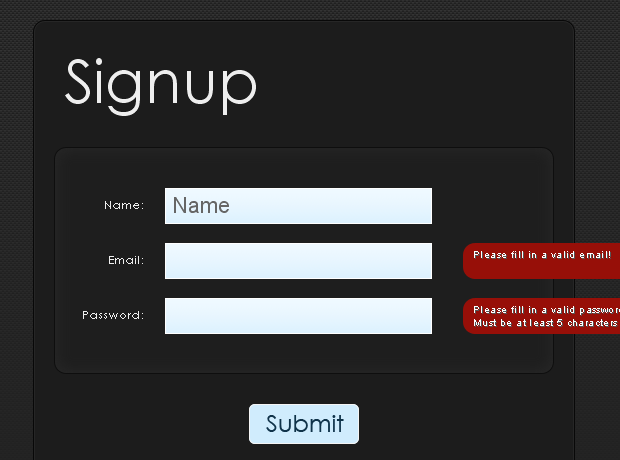
<h1>Signup</h1>
<form action="submit.php" method="post" id="signupForm">
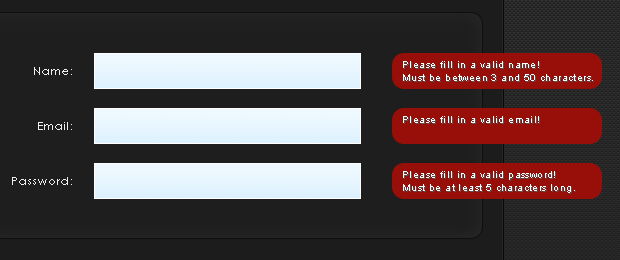
<div class="fieldContainer">
<div class="formRow"></div>
<!-- Two more formRow divs -->
</div>
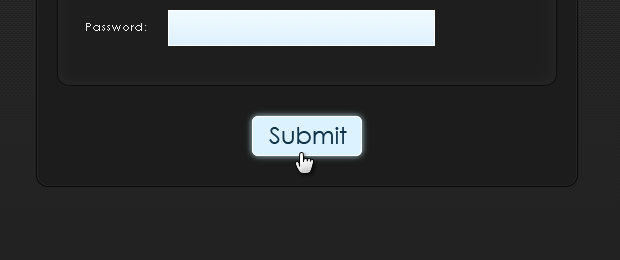
<div class="signupButton">
<input type="submit" name="submit" id="submit" value="Signup" />
</div>
</form>
</div>
The carbonForm div is the main container for the form. It is centered in the middle of the page with the CSS margin property, and then centered vertically with jQuery (take a look at our MicroTut for more info about centering).
Inside it we have the heading and the form with the fieldContainer div. Inside it there are three formRow divs, which share the markup given below:
demo.html
<div class="formRow">
    <div class="label">
        <label for="name">Name:</label>
    </div>

    <div class="field">
        <input type="text" name="name" id="name" />
    </div>
</div>
Each pair of label and input elements is positioned inside its own wrapping divs, which are floated to the left. This allows for the layout of the form you can see in the demonstration page. It is important to have the text box names the same as their ids, because this is used to display the error tooltips as you will see in the next steps.
Step 2 - CSS
The form relies heavily on CSS to achieve the carbon fiber effect. A number of CSS3 rules are used as well, which successfully mimic the effects previously possible only in graphic suites as Photoshop. Only the most interesting styles are given here, you can see the rest in styles.css in the download archive.
styles.css
#carbonForm{
    /* The main form container */
    background-color:#1C1C1C;
    border:1px solid #080808;
    margin:20px auto;
    padding:20px;
    width:500px;

    -moz-box-shadow:0 0 1px #444 inset;
    -webkit-box-shadow:0 0 1px #444 inset;
    box-shadow:0 0 1px #444 inset;
}

.fieldContainer{
    /* The light rounded section, which contans the fields */
    background-color:#1E1E1E;
    border:1px solid #0E0E0E;
    padding:30px 10px;

    /* CSS3 box shadow, used as an inner glow */
    -moz-box-shadow:0 0 20px #292929 inset;
    -webkit-box-shadow:0 0 20px #292929 inset;
    box-shadow:0 0 20px #292929 inset;
}

#carbonForm,.fieldContainer,.errorTip{
    /* Rounding the divs at once */
    -moz-border-radius:12px;
    -webkit-border-radius:12px;
    border-radius:12px;
}

.formRow{
    height:35px;
    padding:10px;
    position:relative;
}

.label{
    float:left;
    padding:0 20px 0 0;
    text-align:right;
    width:70px;
}

label{
    font-family:Century Gothic,Myriad Pro,Arial,Helvetica,sans-serif;
    font-size:11px;
    letter-spacing:1px;
    line-height:35px; /* Neat line height trick */
}

.field{
    float:left;
}

.field input{
    /* The text boxes */
    border:1px solid white;
    color:#666666;
    font-family:Arial,Helvetica,sans-serif;
    font-size:22px;
    padding:4px 5px;
    background:url("img/box_bg.png") repeat-x scroll left top #FFFFFF;
    outline:none;
}

#submit{
    /* The submit button */
    border:1px solid #f4f4f4;
    cursor:pointer;
    height:40px;
    text-indent:-9999px;
    text-transform:uppercase;
    width:110px;

    background:url("img/submit.png") no-repeat center center #d0ecfd;

    -moz-border-radius:6px;
    -webkit-border-radius:6px;
    border-radius:6px;
}

#submit.active{
    /* Marking the submit button as active adds the preloader gif as background */
    background-image:url("img/preloader.gif");
}

input:hover,
input:focus{
    /* CSS3 glow effect */
    -moz-box-shadow:0 0 8px lightblue;
    -webkit-box-shadow:0 0 8px lightblue;
    box-shadow:0 0 8px lightblue;
}
Most of these rules are pretty straightforward. You may find interesting how we handle the submit button, as this element is quite tricky to style consistently cross-browser.
To hide the text of the button (in our case "Signup"), we can use the negative text-indent trick, but in IE it only works if we also specify the text-transform:uppercase rule. We also add a transparent background image consisting of the text "Submit" in Century Gothic, which is replaced with a rotating gif preloader if the button is assigned an "active" class.
We also use a number of CSS3 effects along with their vendor-specific versions for better compatibility. border-radius is for rounded corners, and with box-shadow we can mimic different glow and shadow effects.
Step 3 - jQuery
After including the jQuery library and our own script.js file in the page, we can move on to writing the JavaScript code that will breathe some life into the form.
script.js
$(document).ready(function(){
    // $(document).ready() is executed after the page DOM id loaded

    // Binding an listener to the submit event on the form:
    $('#signupForm').submit(function(e){

        // If a previous submit is in progress:
        if($('#submit').hasClass('active')) return false;

        // Adding the active class to the button. Will show the preloader gif:
        $('#submit').addClass('active');

        // Removing the current error tooltips
        $('.errorTip').remove();

        // Issuing a POST ajax request to submit.php (the action attribute of the form):
        $.post($('#signupForm').attr('action'),
            $('#signupForm').serialize()+'&fromAjax=1',function(response){

            if(!response.status)
            {
                // Some kind of input error occured

                // Looping through all the input text boxes,
                // and checking whether they produced an error
                $('input[type!=submit]').each(function(){
                    var elem = $(this);
                    var id = elem.attr('id');

                    if(response[id])
                        showTooltip(elem,response[id]);
                });
            }
            else location.replace(response.redirectURL);

            $('#submit').removeClass('active');
        },'json');

        e.preventDefault();
    });

    $(window).resize();
});

// Centering the form vertically on every window resize:
$(window).resize(function(){
    var cf = $('#carbonForm');

    $('#carbonForm').css('margin-top',($(window).height()-cf.outerHeight())/2)
});

// Helper function that creates an error tooltip:
function showTooltip(elem,txt)
{
    // elem is the text box, txt is the error text
    $('<div class="errorTip">').html(txt).appendTo(elem.closest('.formRow'));
}
Clicking the submit button (or pressing the enter key while entering text in one of the fields) submits the form. The function that is bound to the submit event prevents this from happening with e.preventDefault() and issues an AJAX request to submit.php instead.
The response that is returned is evaluated as JSON code (a JavaScript object), which contains a special status property. Depending on its value, the script either shows error tooltips on the fields, or redirects the browser to the specified URL in the response.
sample error response
{
    "status"    : 0,    // Indicates that the response is an error
    "email"     : "Please fill in a valid email!",      // Error message
    "pass"      : "Please fill in a valid password!"    // Error message
}
The error tooltips are generated by the script while looping though all the fields in the form and checking whether their ids exist as properties in the response object. If they do, a tooltip is created with the showTooltip() function.
Also notice how we use the serialize() method on line 18 to send all the form fields at once. Also, on this same line, we set fromAjax=1, which is going to tell PHP to return the response as JSON.
Now lets see how this response is generated and how the form is validated.
Step 4 - PHP
The good thing about this form is that it is usable even if JavaScript is disabled. This works, because the action attribute of the form element is also set to submit.php. This means that we only have to implement the validation once no matter how the form is sent.
submit.php
// Error reporting:
error_reporting(E_ALL^E_NOTICE);

// This is the URL your users are redirected,
// when registered succesfully:

$redirectURL = 'https://demo.tutorialzine.com/2010/04/carbon-signup-form/demo.html';

$errors = array();

// Checking the input data and adding potential errors to the $errors array:

if(!$_POST['name'] || strlen($_POST['name'])<3 || strlen($_POST['name'])>50)
{
    $errors['name']='Please fill in a valid name!<br />Must be between 3 and 50 characters.';
}

if(!$_POST['email'] || !preg_match("/^[\.A-z0-9_\-\+]+[@][A-z0-9_\-]+([.][A-z0-9_\-]+)+[A-z]{1,4}$/", $_POST['email']))
{
    $errors['email']='Please fill in a valid email!';
}

if(!$_POST['pass'] || strlen($_POST['pass'])<5)
{
    $errors['pass']='Please fill in a valid password!<br />Must be at least 5 characters long.';
}

// Checking whether the request was sent via AJAX
// (we manually send the fromAjax var with the AJAX request):

if($_POST['fromAjax'])
{
    if(count($errors))
    {
        $errString = array();
        foreach($errors as $k=>$v)
        {
            // The name of the field that caused the error, and the
            // error text are grouped as key/value pair for the JSON response:
            $errString[]='"'.$k.'":"'.$v.'"';
        }

        // JSON error response:
        die ('{"status":0,'.join(',',$errString).'}');
    }

    // JSON success response. Returns the redirect URL:
    echo '{"status":1,"redirectURL":"'.$redirectURL.'"}';

    exit;
}

// If the request was not sent via AJAX (probably JavaScript
// has been disabled in the visitors' browser):

if(count($errors))
{
    echo '<h2>'.join('<br /><br />',$errors).'</h2>';
    exit;
}

// Directly redirecting the visitor if JS is disabled:

header("Location: ".$redirectURL);
All the encountered errors are added to the $errors array. This, depending on whether fromAjax was set or not, is later returned either as a JSON object, or directly printed to the screen.
With this our carbon fiber signup form is complete!
Conclusion
You can modify and build upon this form any way you like. At present, the form does not actually register users, but you can add the code necessary to do so. It will also do a great job as a contact form for your site.
Bootstrap Studio
The revolutionary web design tool for creating responsive websites and apps.
Learn more
Awsome tut, looking foward to more ;)
I was secretly hoping for a more "carbon" style form, but that is just a minor details. Other than that, a great example on how different techniques (jQuery, CSS, HTML and PHP) can work together. Great work mate, keep it up!
Always good tutos...
thanks you
Great tutorial - looks good, easy to follow along, and useful for a variety of applications. The "Carbon Fiber" themed tutsare great, are you guys planning on integrating them all for an awesome site?
Great tutorial, as always.
One question, how can I change redirection with a message without a page refresh.
Thanks.
Fonts with a space in it must be in quotes (") in the CSS.
For example "Century Gothic", "Myriad Pro", Arial, sans-serif ....
Great tut.
Keep it up!
Thanks for the comments folks!
@ Jeremy Bayone
The carbon theme may find its way in future tutorials (similar to our "colorful" series).
@ Dejan
The easiest way to replace the redirect with something else is to modify line 34 of script.js. It currently just uses location.replace() to redirect the browser.
@ Deoxys
Thank you for noticing! Seem to have neglected that.
Great tutorial, Looking forward to playing with the demo.
Like the carbon style. Matching the AUTOS blog or website.
Great tutorial. Love the outcome :)
I like how you pulled off the AJAX submission on this app. Do you know of any good articles on AJAX and PHP security? I've read Bulletproof AJAX but it didn't go too into depth with PHP and AJAX submission security.
I want to appreciate you guyz for every tutorial you've been posting here. Ever since i came across this site, my pace of learning increased...thks so much and you know what i'm proudly NIgerian...thks a lot
When I submit the form, it takes me to the submit.php instead of loading AJAX. I do have javascript enabled.
Eduardo, which browser are you using?
Nice tuto !
I tried a lot of thing but i still could not get a second password field to check if it is the same as the first password field
You will need to update submit.php by adding more code to it, to perform the check. Insert this check after line 26 in submit.php & provide your own custom error message. Just follow the style of the other error messages and see how they are being done. If you do not know what to add, then add the following code and that should take care of it.
// You will need to name the confirm password
// input name as confirm_pass for this to work.
// Or change here accordingly.
if ( $_POST['pass'] != $_POST['confirm_pass'] )
{
    $errors['confirm_pass'] = 'Passwords don't match';
}
Try it out & let us know if it helps. Good luck!
Could someone please let me know the PHP code that's necessary to have this send as a contact form?
Thanks!
Hey @Martin Angelov
I'd like to have a database, where it all saves. Put i can't find out where to add the "mysql_connection" in the sumbit form. So it only inputs when theres no errors. I have a database called "accounts" under it are there "name", "pass", "email".
Can you help me make a script so i can get the informations from "form" to my database.?
And i tried Creating a script where it check'd if the email alrdy was in use? Can you also help with that?
In case then Thanks!
/Flipperz
Hi, im trying to implement this code with Trigger.io but didn't work ! any suggestion please.
what i should change it ?