Coding a CSS3 & HTML5 One-Page Website Template
Web development is an area in which you have to keep up with the latest technologies and techniques, so that you are at the top of your game. And no wonder - this is an area which changes with an amazing pace. What is the standard now will be obsolete in just a couple of years.
But changes do not come from nowhere. The early adopters are already using what we are going to use day-to-day a few years from now. One of these technologies is HTML5 - the new version of the fundamental language of the web.
Today we are making a HTML5 web template, using some of the new features brought by CSS3 and jQuery, with the scrollTo plug-in. As HTML5 is still a work in progress, you can optionally download a XHTML version of the template here.
Step 1 - The Design
Every design process starts with an initial idea which you later build upon. At this stage, designers usually go with programs such as Photoshop, to work on the details and see how it will all fit together.
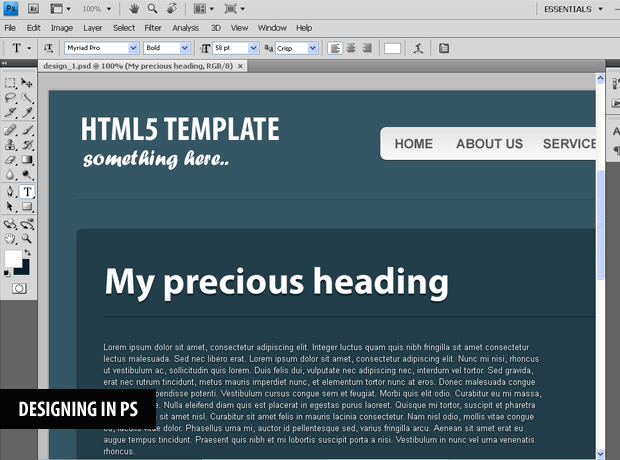
After this, the design is hand coded with HTML and CSS going hand by hand, moving from designing the background, colors and fonts, to detail work on the content section.
Step 2 - HTML
It is a good time to note, that HTML5 is still a work in progress. It will remain so probably till around 2022 (I am absolutely serious about this). However some parts of the standard are complete, and can be used today.
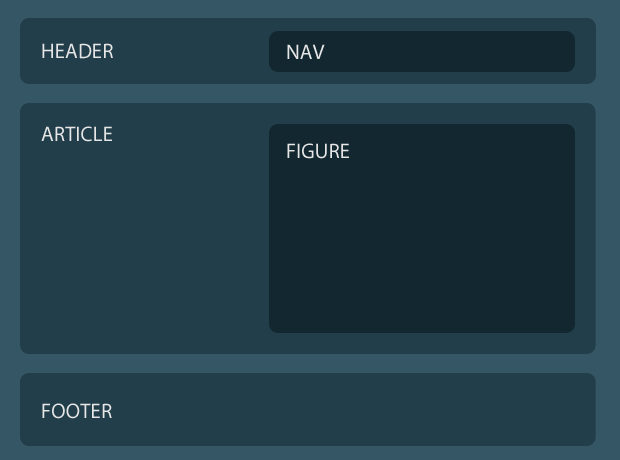
In this tutorial, we are using a few of the tags introduced with this new version of HTML:
- header - wraps your page header;
- footer - wraps your page footer;
- section - groups content into sections (e.g. main area, sidebar etc);
- article - separates the individual articles from the rest of the page;
- nav - contains your navigation menu;
- figure - usually contains an image used as an illustration for your article.
These are used exactly as you would use normal divs. With the difference being that these tags organize your page semantically. In other words, you can present your content in such a way, that the subject matter of your page can be more easily determined. As a result services, such as search engines, will bring you more targeted visitors and thus boost your revenue (and theirs actually).
However, there are some implications in using HTML5 today. One of the most notable is the IE family of browsers, which does not support these tags (it can be fixed with a simple JavaScript include file though). This is why you should base your decision for moving to HTML5 on your site's audience. And just for this purpose, we are releasing a pure XHTML version of this template as well.
template.html - Head section
<!DOCTYPE html> <!-- The new doctype -->
<html>
<head>
<meta http-equiv="Content-Type" content="text/html; charset=utf-8" />
<title>Coding A CSS3 & HTML5 One Page Template | Tutorialzine demo</title>
<link rel="stylesheet" type="text/css" href="styles.css" />
<!-- Internet Explorer HTML5 enabling script: -->
<!--[if IE]>
<script src="http://html5shiv.googlecode.com/svn/trunk/html5.js"></script>
<style type="text/css">
.clear {
zoom: 1;
display: block;
}
</style>
<![endif]-->
</head>
You can notice the new <DOCTYPE> at line one, which tells the browser that the page is created with the HTML5 standard. It is also much shorter and easier to remember than older doctypes.
After specifying the encoding of the document and the title, we move on to including a special JS file that will enable Internet Explorer (any version) to render HTML5 tags properly. Again, this means that if a visitor is using IE and has JavaScript disabled, the page is going to show all messed up. This is why, depending on your audience, you should consider the regular XHTML version of this template, which works in any browser and is released free for all of our readers here.
template.html - Body Section
<body>

    <section id="page"> <!-- Defining the #page section with the section tag -->

    <header> <!-- Defining the header section of the page with the appropriate tag -->

        <h1>Your Logo</h1>

        <h3>and a fancy slogan</h3>

        <nav class="clear"> <!-- The nav link semantically marks your main site navigation -->

            <ul>

                <li><a href="#article1">Photoshoot</a></li>
                <li><a href="#article2">Sweet Tabs</a></li>
                <li><a href="#article3">Navigation Menu</a></li>

            </ul>

        </nav>

    </header>
Here we use the new section tags, which divide your page into separate semantic sections. Outermost is the #page section which is set to a width of 960px in the style sheet (a fairly standard width with older computer displays in mind). After this comes the header tag and the navigation tag.
Notice the href attributes of the links - the part after the hash symbol # corresponds to the ID of the article we want to scroll to.
template.html - Article
<!-- Article 1 start -->
<div class="line"></div> <!-- Dividing line -->
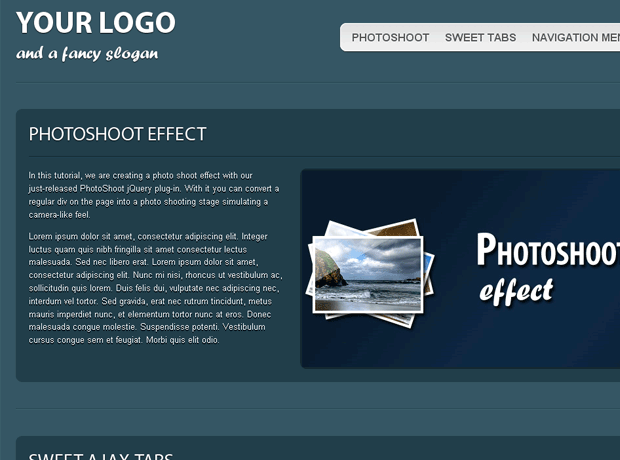
<article id="article1"> <!-- The new article tag. The id is supplied so it can be scrolled into view. -->
<h2>Photoshoot Effect</h2>
<div class="line"></div>
<div class="articleBody clear">
<figure> <!-- The figure tag marks data (usually an image) that is part of the article -->
<a href="https://tutorialzine.com/2010/02/photo-shoot-css-jquery/">
<img src="https://tutorialzine.com/img/featured/641.jpg" width="620" height="340" /></a>
</figure>
<p>In this tutorial, we are creating a photo shoot effect with our just-released PhotoShoot jQuery plug-in. With it you can convert a regular div on the page into a photo shooting stage simulating a camera-like feel.</p>
<p>Lorem ipsum dolor sit amet, consectetur adipiscing elit. Integer luctus quam quis .... </p>
</div>
</article>
<!-- Article 1 end -->
The markup above is shared between all of the articles. First is the dividing line (the best solution semantically would be an <hr> line, which in HTML5 has the added role of a logical dividing element, but unfortunately it is impossible to style in a cross-browser fashion, so we will stick with a DIV). After this we have the new article tag, with an unique ID, which is used by the navigation to scroll the page.
Inside we have the title of the article, two paragraphs and the new figure tag, which marks the use of images in the article.
template.html - Footer
        <footer> <!-- Marking the footer section -->

            <div class="line"></div>

            <p>Copyright 2010 - YourSite.com</p> <!-- Change the copyright notice -->
            <a href="#" class="up">Go UP</a>
            <a href="https://tutorialzine.com/" class="by">Template by Tutorialzine</a>

        </footer>

    </section> <!-- Closing the #page section -->

    <!-- JavaScript Includes -->

    <script src="http://ajax.googleapis.com/ajax/libs/jquery/1.3.2/jquery.min.js"></script>
    <script src="jquery.scrollTo-1.4.2/jquery.scrollTo-min.js"></script>
    <script src="script.js"></script>

    </body>

</html>
Lastly, we have the footer tag, which does exactly what you expect it to do. At the bottom of the page are the rest of the JavaScript includes, which add the jQuery library and the scrollTo plug-in, which we are going to use in the next steps.
Step 3 - CSS
As we are using HTML5, we have to take some extra measures with the styling. The tags that this new version of HTML introduces, are not yet provided with a default styling. This is however easily fixed with a couple of lines of CSS code and the page works and looks as it is supposed to:
styles.css - Part 1
header,footer,
article,section,
hgroup,nav,
figure{
    /* Giving a display value to the HTML5 rendered elements: */
    display:block;
}

article .line{
    /* The dividing line inside of the article is darker: */
    background-color:#15242a;
    border-bottom-color:#204656;
    margin:1.3em 0;
}

footer .line{
    margin:2em 0;
}

nav{
    background:url(img/gradient_light.jpg) repeat-x 50% 50% #f8f8f8;
    padding:0 5px;
    position:absolute;
    right:0;
    top:4em;

    border:1px solid #FCFCFC;

    -moz-box-shadow:0 1px 1px #333333;
    -webkit-box-shadow:0 1px 1px #333333;
    box-shadow:0 1px 1px #333333;
}

nav ul li{
    display:inline;
}

nav ul li a,
nav ul li a:visited{
    color:#565656;
    display:block;
    float:left;
    font-size:1.25em;
    font-weight:bold;
    margin:5px 2px;
    padding:7px 10px 4px;
    text-shadow:0 1px 1px white;
    text-transform:uppercase;
}

nav ul li a:hover{
    text-decoration:none;
    background-color:#f0f0f0;
}

nav, article, nav ul li a,figure{
    /* Applying CSS3 rounded corners: */
    -moz-border-radius:10px;
    -webkit-border-radius:10px;
    border-radius:10px;
}
We basically need to set the display value of the new tags to block, as you can see from the first couple of lines. After this we can style them as we would do with regular divs.
We style the horizontal lines, the articles, and the navigation buttons, with the latter organized as an unordered list inside of the nav tag. At the bottom we assign the border-radius property for four different types of elements of once, which saves a lot of code.
styles.css - Part 2
/* Article styles: */

#page{
    width:960px;
    margin:0 auto;
    position:relative;
}

article{
    background-color:#213E4A;
    margin:3em 0;
    padding:20px;

    text-shadow:0 2px 0 black;
}

figure{
    border:3px solid #142830;
    float:right;
    height:300px;
    margin-left:15px;
    overflow:hidden;
    width:500px;
}

figure:hover{
    -moz-box-shadow:0 0 2px #4D7788;
    -webkit-box-shadow:0 0 2px #4D7788;
    box-shadow:0 0 2px #4D7788;
}

figure img{
    margin-left:-60px;
}

/* Footer styling: */

footer{
    margin-bottom:30px;
    text-align:center;
    font-size:0.825em;
}

footer p{
    margin-bottom:-2.5em;
    position:relative;
}

footer a,footer a:visited{
    color:#cccccc;
    background-color:#213e4a;
    display:block;
    padding:2px 4px;
    z-index:100;
    position:relative;
}

footer a:hover{
    text-decoration:none;
    background-color:#142830;
}

footer a.by{
    float:left;

}

footer a.up{
    float:right;
}
In the second part of the code, we apply more detailed styling to the elements. A width for the page section, a hover property for the figure tag and styles for the links inside of the footer. There are also a few styles that are not included here, but you can see them in styles.css.
Now lets continue with the next step.
Step 4 - jQuery
To enhance the template, we will create a smooth scrolling effect once a navigation link has been clicked, using the scrollTo jQuery plug-in that we included in the page earlier. To make it work we just need to loop through the links in the navigation bar (and the UP link in the footer) and assign an onclick event which will trigger the $.srollTo() function, which is defined by the plug-in.
script.js
$(document).ready(function(){
    /* This code is executed after the DOM has been completely loaded */

    $('nav a,footer a.up').click(function(e){

        // If a link has been clicked, scroll the page to the link's hash target:

        $.scrollTo( this.hash || 0, 1500);
        e.preventDefault();
    });

});
With this our template is complete!
Wrapping it up
In this tutorial, we leveraged the new semantic features provided by HTML5, to design and code a one-page web template. You can use it for free both personally and commercially, providing you leave the back link intact.
If you like this tutorial, be sure to check out our twitter stream as well, where we share the latest and greatest design and development links.
Bootstrap Studio
The revolutionary web design tool for creating responsive websites and apps.
Learn more
Good resource I need to get on the ball with HTML5...
Love it - cool template and a great insight into HTML5.
awesome tutorial... really your tutorials are one of the best....really gr8 1...
Great Work! Thanks.
Thanks, looking for posts like this
Really nice tutorial, people need to see how easy it is to build with html5 today. A couple of thing that did bother me though in your markup.
You use a section as a page wrapper, it would be better to use a div as the wrapper is only presentation and has no meaning in itself.
Your header H1 and H3 could be wrapped in a hgroup
Thank you for the comments fellas!
@ Stephane
You are absolutely right about the hgroup. Thank you for pointing that out! I updated the demo and the zip.
You may be right for the outermost section. I am going to leave it like this for now.
I am not sure about the figure either. The definition is somewhat too general. It all depends on what you consider "main flow of the document". You could enclose it in the first paragraph of the article description, but it is supposed be illustrative for the whole article section.
Guess HTML5 finally turned code into poetry. Lets hope that search engines are good at literature.
@Martin Angelov
Yes, Figure is too general right now, I use it more like something you could find in a book/dictionary, something that has meaning in itself and can be detach from the flow and still be useful. That's what I do right now but I already did a couple of html5 site where I didn't think of figure that way.
I really like how HTML 5 make for more semantic code but right now I still find that I spend too much time thinking of how to best mark-up my content. I'm constantly changing the way I'm doing things, still learning.
@Martin Angelo
First off I love this blog/site. It's one of my favourite feeds.
I don't think it's the outermost section that is the problem as that one seems to me to be the correct way to use section. I believe the problem is wrapping the "main" content in a section seems to be a superfluous use of section or at least that is what I read at HTML5-Doctor (http://html5doctor.com/the-section-element/)
I also would like to note that am pretty sure that the hr tag is consistently style-able in all the current versions of the major browsers; just not the previous versions of some of them (opera and ie). So I understand not using it in a production environment but I like styling hrs now that it looks good in all the browsers.
Thanks for the great template/info.
Apparently I spoke too soon about the hr consistent styling, it seems Firefox subtracts the borders from the height for hrs... very strange. Oh well, I am sure there are numerous other inconsistencies I haven't found yet either... teach me to open my big mouth. :)
A nice and easy to understand tutorial on HTML 5 with this example template. Thank you for such a detailed post on going about it.
Thanks alot for this great tutorial :)
I've been looking into creating HTML5 websites, but I found that the javascript fixes for IE don't fix the layout if you print it out. Also, you should consider using instead of .
Looks like the code got removed from my post. What I mean is you should consider changing <div class="line"></div> to <hr/>.
nice work. anyhow when I validated CSS of the demo, it gave 16 errors.
Once again, an awesome job, both in concept/execution and explanation.
Curious though, from user's standpoint, might it be wise to put a 'Go Up' at the bottom of every article? One is sort of in limbo, navigation-wise, halfway down the page, and the power exists to make this navigation tweak happen. ;)
Keep up the great work Martin!
Michael
@ Smashing Share
The validation errors are due to the use of CSS3 - it is not yet reached the status of a finished standard and is not supported by the validator. The rest of the code is valid and correct, so you can be sure that it works as expected.
@ Michael
Guess if there is more article sections (not just three), you might want to add a Go Up link below each one. This was actually the original idea, but I preferred to keep the design as clear as possible.
This post inspired me to create a CSS-only RSS icon
http://modxrules.com/articles/scalable-css-only-rss-icon
Twitter will follow :)
Amazing tutorial... as usual. Thanks!
Simple and detailed explanation. Thanks
hi,
very nice job as always !
I wonder how you did the slide menu on the left , the one to "go back to download".
Could you please publish also this sample (in the new microtut section, which is an excellent idea by the way ;-)
thanks.
Interesting insight into HTML5! Thanks!
I'll try it out soon!
Great post. Thnx.
An awesome job :)
Really great to see. Thank you.
Awesome stuff...cool to mess around with, but not sure if you really would want you site in HTML5 quite yet.
Great template! I will be experimenting with this, and hopefully it will render properly when css3 and html5 is fully support on browsers!
Hi Can anyone tell me how to create that side tab on the left on the as seen on this DEMO page. I have been looking for that and can find any cleat tutorial like the ones here.
Thanks
Oscar
The section id=”page” is not necessary.
html{
font-size:0.825em;
color:#fcfcfc;
background-color:#355664;
font-family:Arial, Helvetica, sans-serif;
}
body{
width:960px;
margin:0 auto;
position:relative;
}
gives the same result.
Thanks 4 HTMl5 Template and awesome tutorials.
To get the slideout thing on your website you have to extract it from the ONLINE demo code and get the new script.js & styles.css file as well.
Thank you! It's a leg up on moving forward. I'm an old web programmer from 10 years ago. It's amazing how much as changed...and yet, life at the leading edge is still spent with a text editor, html, css, and javascript!
Good work, thanks for sharing.
Very nice! I tried to use it for my daughter's small website (click my name to see), but I get a white edge at the top of the photo that has defied my efforts to eliminate.
@Lane Lester:
You have a top border on your image because you've cropped it wrong i suppose??
Why do you put your main 'NAV' inside a 'SECTION'?
NAV is also kind of a SECTION or am I wrong?
The navigation links are not working even when links are clicked . The links are properly given . Kindly visit the site and navigate to know me page . there the links are not working. Also when i open link in new tab it works.
Nice site! I think too many people are still using outdated browsers to for me to be comfortable using a site built fully on html5, but I'm looking forward to when all sites are built with html5.
i hope is not to late to start learn HTML 5 here.
Hi Martin,
Great site and excellent simple way you have explained the stuff. Many hearty thanks for this.
Thanks a lot for sharing this nice post. I got lot of from this example.
The JavaScript scrolling is messed in the iPad.
Thanks.
On every device this code is AWESOME. BUT not on the iPad!!!! :(
Please help, and make this web the coolest solution!
THANKS!
Hi, great tut. I was wondering if you could explain a way to make the navigation static so that when you click on one of the navigation options, it scrolls to where it's supposed to without the navigation scrolling up. Thanks.
Unusable experience on an iPad.This is common with javascript one page solutions. I found the only way to get around this is to use a media query and disable any fixed nav. However, in some cases, there is still a page flickering issue.
Hello,
I find this template very good with all is one page like I want to do for a website! I am not a developer and it is difficult for me to modify it...
Can you explain me:
Regards,
Maxime
Great tutorial!
One little detail, when I send it through the W3C Validator http://validator.w3.org I get errors for the missing "alt" attributes in the image tags. Is this just a small lapse or a common practice in HTML5?
Ok, pretend like I am an idiot. What are the benefits of html5 / css3? Is it worth it for me to find someone that can code in this new standard?
hey, thanks for the template. I would ask you how can i scroll with easing options?
This is great, thanks!
I was wondering how I might keep the article from scrolling to the very top of the page when the link was selected? Trying to get the article to scroll to the center of the page.
I was wondering if you could explain a way to make the navigation static so that when you click on one of the navigation options, it scrolls to where it's supposed to without the navigation scrolling up.
Nice tutorial, Good for beginners who wants to create their first website using HTML5.
thanks for tutorial. it help me a lot :)
Thank you for this tutorial. Although I am late to the party I can still use this to help me learn HTML5 and the CSS. You explain things well!
thanks for this helpful tutorial. its very useful for beginners.