AJAX-enabled Sticky Notes With PHP & jQuery
Today we are making an AJAX-enabled Sticky Note management system. It will give visitors the ability to create notes with a live preview, and move them around on the screen. Every movement is going to be sent to the back-end via AJAX and saved in the database.
We are using version 1.4 of jQuery and the fancybox plugin (you can also check our CSS3 Lightbox Gallery Tutorial, where we also used fancybox).
You can download the example files and keep the demo site open in a tab so that it is easier to follow the steps of the tutorial.
Note: This tutorial is quite old and doesn't work in PHP7 and above. We are keeping it online only as a reference.
Step 1 - XHTML
The first step is to create the necessary XHTML structure. The markup in the main demonstration file - demo.php is pretty straightforward, as you can see for yourself from the code below.
demo.php
<div id="main">
<a id="addButton" class="green-button" href="add_note.html">Add a note</a>

<?php echo $notes?>

</div>
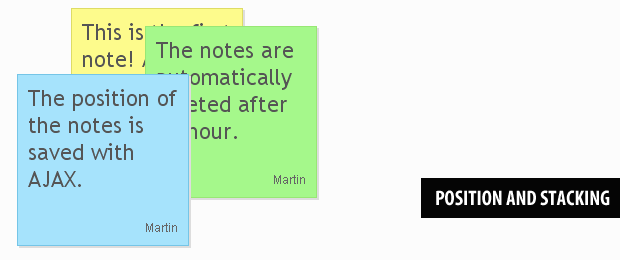
It contains the main div, which holds all the notes and limits their movement during the dragging process. The rest is generated dynamically by PHP after running a SELECT query against the database, and after storing the result in the $notes variable as you will see in the next step.
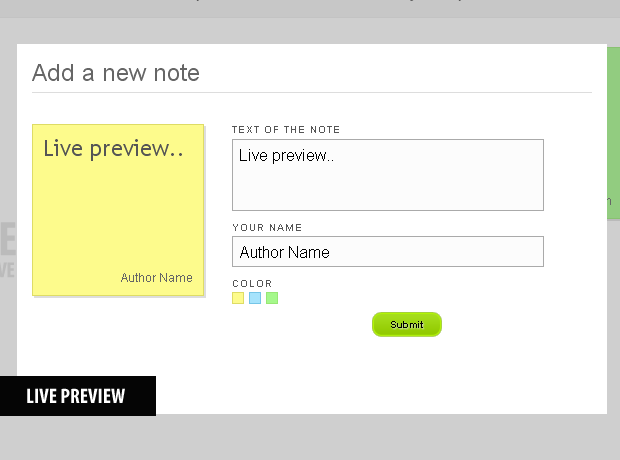
If you click the "Add a note" button on the demonstration site, you will see that a form with a live preview pops up. This functionality is provided by the fancybox, which fetches add_note.html (which contains the form) and shows it within a pop-up.
add_note.html
<h3 class="popupTitle">Add a new note</h3>

<!-- The preview: -->
<div id="previewNote" class="note yellow" style="left:0;top:65px;z-index:1">
<div class="body"></div>
<div class="author"></div>
<span class="data"></span>
</div>

<div id="noteData"> <!-- Holds the form -->
<form action="" method="post" class="note-form">

<label for="note-body">Text of the note</label>
<textarea name="note-body" id="note-body" class="pr-body" cols="30" rows="6"></textarea>

<label for="note-name">Your name</label>
<input type="text" name="note-name" id="note-name" class="pr-author" value="" />

<label>Color</label> <!-- Clicking one of the divs changes the color of the preview -->
<div class="color yellow"></div>
<div class="color blue"></div>
<div class="color green"></div>

<!-- The green submit button: -->
<a id="note-submit" href="" class="green-button">Submit</a>

</form>
</div>
In the form you can fill in the text of the note, your name and choose a color. Providing a way for users to see how their note will appear in the page in real time is a useful addition which serves another practical purpose - when clicking the submit button and the lightbox window closes, the preview note is copied to the main div, which saves us from writing additional code.
Step 2 - PHP
As mentioned earlier, PHP fills the $notes variable by running a query againts the database and outputs it on the page. Lets see how this works.
demo.php
$query = mysql_query("SELECT * FROM notes ORDER BY id DESC");

$notes = '';
$left='';
$top='';
$zindex='';
while($row=mysql_fetch_assoc($query))
{
    // The xyz column holds the position and z-index in the form 200x100x10:
    list($left,$top,$zindex) = explode('x',$row['xyz']);
    $notes.= '
        <div class="note '.$row['color'].'" style="left:'.$left.'px;top:'.$top.'px;  z-index:'.$zindex.'">
        '.htmlspecialchars($row['text']).'
        <div class="author">'.htmlspecialchars($row['name']).'</div>
        <span class="data">'.$row['id'].'</span>
    </div>';
}
The notes table not only stores the text and the author of the note, but it also has a dedicated column for the x and y coordinates, as well for the z-index (or stacking order). Those are stored in the xyz field of the table, which is updated by AJAX.
After the visitor clicks on the "Add a note" button, fancybox grabs add_note.html (which was covered in step one) and displays the live preview form. When it is submitted, the data is sent via AJAX to post.php, given below.
post.php
// Escaping the input data:
$author = mysql_real_escape_string(strip_tags($_POST['author']));
$body = mysql_real_escape_string(strip_tags($_POST['body']));
$color = mysql_real_escape_string($_POST['color']);
$zindex = (int)$_POST['zindex'];

/* Inserting a new record in the notes DB: */
mysql_query('   INSERT INTO notes (text,name,color,xyz)
VALUES ("'.$body.'","'.$author.'","'.$color.'","0x0x'.$zindex.'")');

if(mysql_affected_rows($link)==1)
{
    // Return the id of the inserted row:
    echo mysql_insert_id($link);
}
else echo '0';
After escaping all the input data and inserting it in the table, the script checks whether there were any rows affected after the insert query. If mysql_affected_rows returns 1, this would mean that the insert was successful and the automatically assigned auto_increment ID is outputted.
AJAX is also used to save the positions of the individual notes after the end of each movement. The JavaScript code that actually requests these AJAX calls is presented in step 4 of this tutorial. The PHP code is included below:
update_position.php
// Validating the input data:
if(!is_numeric($_GET['id']) || !is_numeric($_GET['x']) || !is_numeric($_GET['y']) || !is_numeric($_GET['z']))
die("0");

// Escaping:
$id = (int)$_GET['id'];
$x = (int)$_GET['x'];
$y = (int)$_GET['y'];
$z = (int)$_GET['z'];

// Saving the position and z-index of the note:
mysql_query("UPDATE notes SET xyz='".$x."x".$y."x".$z."' WHERE id=".$id);

echo "1";
After making sure that the input data is valid, the script updates the xyz field of the row for the note in question and prints 1 on success.
Lets continue with step three.
Step 3 - CSS
All the markup is in place, so it is time to throw in some fancy styling. The styles are defined in styles.css. I divided the file in three parts.
styles.css - Part 1
.note{
height:150px;
padding:10px;
width:150px;
position:absolute;
overflow:hidden;
cursor:move;
font-family:Trebuchet MS,Tahoma,Myriad Pro,Arial,Verdana,sans-serif;
font-size:22px;
/* Adding a CSS3 shadow below the note, in the browsers which support it: */
-moz-box-shadow:2px 2px 0 #DDDDDD;
-webkit-box-shadow:2px 2px 0 #DDDDDD;
box-shadow:2px 2px 0 #DDDDDD;
}
#fancy_ajax .note{ cursor:default; }
/* Three styles for the notes: */
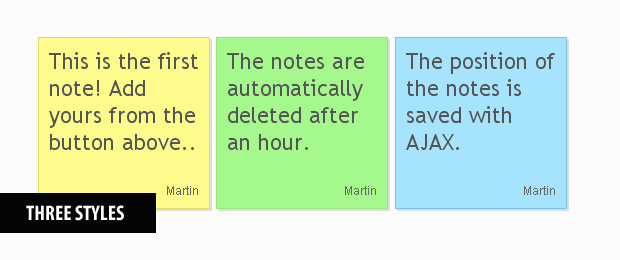
.yellow{
background-color:#FDFB8C;
border:1px solid #DEDC65;
}
.blue{
background-color:#A6E3FC;
border:1px solid #75C5E7;
}
.green{
background-color:#A5F88B;
border:1px solid #98E775;
}
/* Each note has a data span, which holds its ID */
span.data{ display:none; }
/* The "Add a note" button: */
#addButton{
position:absolute;
top:-70px;
left:0;
}
In the first part we define the appearance of the notes and provide three color schemes - yellow, blue and green. Those color classes are also used in the live preview form when creating a note.
Every note has special span element with a class name of data, which holds the internal ID it is assigned in the database. This ID is used by jQuery and returned with the AJAX calls back to the server in order to update the note's position and z-index. We are hiding this span from view with display:none.
styles.css - Part 2
/* Green button class: */
a.green-button,a.green-button:visited{
    color:black;
    display:block;
    font-size:10px;
    font-weight:bold;
    height:15px;
    padding:6px 5px 4px;
    text-align:center;
    width:60px;

    text-shadow:1px 1px 1px #DDDDDD;
    background:url(img/button_green.png) no-repeat left top;
}

a.green-button:hover{
    text-decoration:none;
    background-position:left bottom;
}

.author{
    /* The author name on the note: */
    bottom:10px;
    color:#666666;
    font-family:Arial,Verdana,sans-serif;
    font-size:12px;
    position:absolute;
    right:10px;
}

#main{
    /* Contains all the notes and limits their movement: */
    margin:0 auto;
    position:relative;
    width:980px;
    height:500px;
    z-index:10;
    background:url(img/add_a_note_help.gif) no-repeat left top;
}
The second part of the file defines the green button class, complete with a hover state and a CSS3 text-shadow. These are a few tiny details that may not look like much, but leave a good overall impression to the user.
styles.css - Part 3
h3.popupTitle{
    border-bottom:1px solid #DDDDDD;
    color:#666666;
    font-size:24px;
    font-weight:normal;
    padding:0 0 5px;
}

#noteData{
    /* The input form in the pop-up: */
    height:200px;
    margin:30px 0 0 200px;
    width:350px;
}

.note-form label{
    display:block;
    font-size:10px;
    font-weight:bold;
    letter-spacing:1px;
    text-transform:uppercase;
    padding-bottom:3px;
}

.note-form textarea, .note-form input[type=text]{
    background-color:#FCFCFC;
    border:1px solid #AAAAAA;
    font-family:Arial,Verdana,sans-serif;
    font-size:16px;
    height:60px;
    padding:5px;
    width:300px;
    margin-bottom:10px;
}

.note-form input[type=text]{    height:auto; }

.color{
    /* The color swatches in the form: */
    cursor:pointer;
    float:left;
    height:10px;
    margin:0 5px 0 0;
    width:10px;
}

#note-submit{   margin:20px auto; }
In the last part of styles.css, we add CSS rules for the live preview form, staring from the H3 heading and finishing with the color swatches on the bottom.
Step 4 - jQuery
jQuery manages the front-end and all of the AJAX requests. In order to be able to use the library, we first need to include a few lines to the head section of demo.php:
demo.php
<link rel="stylesheet" type="text/css" href="styles.css" />
<link rel="stylesheet" type="text/css" href="fancybox/jquery.fancybox-1.2.6.css" media="screen" />

<script type="text/javascript" src="http://ajax.googleapis.com/ajax/libs/jquery/1.4.0/jquery.min.js"></script>
<script type="text/javascript" src="http://ajax.googleapis.com/ajax/libs/jqueryui/1.7.2/jquery-ui.min.js"></script>
<script type="text/javascript" src="fancybox/jquery.fancybox-1.2.6.pack.js"></script>

<script type="text/javascript" src="script.js"></script>
We include jQuery and jQuery UI from Google's content repository network, as well as the rest of the css and js files needed for this tutorial. Now lets dig a bit deeper into our jQuery script.
script.js - Part 1
$(document).ready(function(){
    /* This code is executed after the DOM has been completely loaded */

    var tmp;

    $('.note').each(function(){
        /* Finding the biggest z-index value of the notes */

        tmp = $(this).css('z-index');
        if(tmp>zIndex) zIndex = tmp;
    })

    /* A helper function for converting a set of elements to draggables: */
    make_draggable($('.note'));

    /* Configuring the fancybox plugin for the "Add a note" button: */
    $("#addButton").fancybox({
        'zoomSpeedIn'       : 600,
        'zoomSpeedOut'      : 500,
        'easingIn'          : 'easeOutBack',
        'easingOut'         : 'easeInBack',
        'hideOnContentClick': false,
        'padding'           : 15
    });

    /* Listening for keyup events on fields of the "Add a note" form: */
    $('.pr-body,.pr-author').live('keyup',function(e){

        if(!this.preview)
            this.preview=$('#previewNote');

        /* Setting the text of the preview to the contents of the input field, and stripping all the HTML tags: */
        this.preview.find($(this).attr('class').replace('pr-','.')).html($(this).val().replace(/<[^>]+>/ig,''));
    });

    /* Changing the color of the preview note: */
    $('.color').live('click',function(){

        $('#previewNote').removeClass('yellow green blue').addClass($(this).attr('class').replace('color',''));
    });
First the script finds the maximum z-index value, so that it can cache it into the zIndex variable and increment it before assigning it to the notes in the beginning of every drag movement. This way, when you start dragging a note, it is moved to the top of the stack.
Another interesting moment is that we use the jQuery live() method to listen for events, instead of the regular bind(). This is so, because the page elements we are listening for events on, are created only when the form is shown and, once defined, live() event listeners are active on all elements yet to be created.
script.js - Part 2
  /* The submit button: */
    $('#note-submit').live('click',function(e){

        if($('.pr-body').val().length<4)
        {
            alert("The note text is too short!")
            return false;
        }

        if($('.pr-author').val().length<1)
        {
            alert("You haven't entered your name!")
            return false;
        }

        $(this).replaceWith('<img src="img/ajax_load.gif" style="margin:30px auto;display:block" />');

        var data = {
            'zindex'    : ++zIndex,
            'body'      : $('.pr-body').val(),
            'author'        : $('.pr-author').val(),
            'color'     : $.trim($('#previewNote').attr('class').replace('note',''))
        };

        /* Sending an AJAX POST request: */
        $.post('ajax/post.php',data,function(msg){

            if(parseInt(msg))
            {
                /* msg contains the ID of the note, assigned by MySQL's auto increment: */
                var tmp = $('#previewNote').clone();

                tmp.find('span.data').text(msg).end().css({'z-index':zIndex,top:0,left:0});
                tmp.appendTo($('#main'));

                make_draggable(tmp)
            }

            $("#addButton").fancybox.close();
        });

        e.preventDefault();
    })
});
Here we are listening for the click event on the form submit link. Once clicked, the data is validated and sent with the $.post method. If the insert was successful, the lightbox is hidden and the newly created note is added to the page. Notice that we are using the make_draggable function, which is included below.
script.js - Part 3
var zIndex = 0;

function make_draggable(elements)
{
    /* Elements is a jquery object: */
    elements.draggable({
        containment:'parent',
        start:function(e,ui){ ui.helper.css('z-index',++zIndex); },
        stop:function(e,ui){

            /* Sending the z-index and positon of the note to update_position.php via AJAX GET: */
            $.get('ajax/update_position.php',{
                x       : ui.position.left,
                y       : ui.position.top,
                z       : zIndex,
                id  : parseInt(ui.helper.find('span.data').html())
            });
        }
    });
}
In the last part of script.js, we have the make_draggable function. It turns a set of jQuery elements passed as a parameter into draggable objects. I've moved this functionality into a separate function because we need to create draggables in twice - once on initial page load, and once when we add a new note to the page.
Step 5 - MySQL
If you plan on running and building upon this demo, you'll need to set up a working version on your server. You'll need to execute the code from table.sql of the download archive in phpMyAdmin and fill in your database credentials in connect.php.
With this our AJAX-ed Sticky Note system is complete!
Conclusion
Today we created an Ajax Enabled Sticky Note Management System and demonstrated how we could use one of the readily available plug-ins for the jQuery library to build a dynamic interface, complete with a live preview.
What do you think? How would you improve this code?
Bootstrap Studio
The revolutionary web design tool for creating responsive websites and apps.
Learn more
awerson!
It's great to use in Web 2.0 sites
This is pretty cool, the only thing also really necessary would be a delete function, so you can get rid of old sticky notes. Other than that, really good use of ajax.
Excellent, but .. table.sql file? = (
Great tutorial! We once did a jQuery plugin for the client side part; would be interesting to integrate it with this. Greets, and keep up the good work!
fantastic !but it can be add only once,To add the second message you must refresh the page,otherwise it will be edit the message you have just posted!
Great! An option to delete notes would be fine :)
dlbClick on Chrome make unusuable things ;)
Nicely done, for a 10k-coding contest, I have made a similar thing under 10k (inc. pictures). Instead of using ajax, I have used HTML5 databases.
Therefore it only works in safari 4, the newest Chrome and Opera beta.
My little project can be found here. http://mix10k.visitmix.com/Entry/Details/151
Thanks for the comments fellas!
I noticed the bug which gets the first note edited, while you enter a second one. It is because the live preview has an ID of previewNote, which gets cloned and you end up with two divs with the same ID. No wonder it is buggy.
I changed the id to a class selector in script.js and everything is OK. You can re-download the file from the archive.
@ Freese
It will not be too difficult to implement delete functionality, but you'll need to make sure that the user is allowed to only delete his own notes (maybe by using cookies and sessions).
@ Matthijn
This is a great experiment. Hope we are all going to use HTML5 freely soon.
@ Xesbeth
table.sql was included in the zip archive. You can re-download it.
This is one of the coolest tutorials I've seen in a while! It seems like the ideas are limitless when it comes to Ajax, thanks for sharing this amazing tutorial!
No comment... as usual :))))
Keep up
Humm... no server-side check of the note's positions. That sucks :s
A little js-side ajax loop and here we goooo...
cf. http://www.flickr.com/photos/geekfg/4287889313/
Perfect !! :))
Very nice, this is a cool tutorial!
Very nice tutorial. I really like the live preview.
Thanks.
great work!! option to resize the text and special attention to links would be good!, because since this is online, notes could be links as well :)
keep it up!
just one word. "GREAT"
Awesome! I love your tutorials.
@ FGRibreau
The main reason there are no server-side checks is because I didn't want to over-complicate it and limit the movement of the notes.
The notes are reset every 15 min in the demo anyway, so it will not be a big of a deal.
If anyone wants to implement server-side validation of the positions, he would need to add an IF statement in update_position.php, similar to this one:
This would prevent the notes from getting programatically moved outside of the containment area (the parent main div).
Isn't there a simple jquery script that will assure that after the initial position is set (as it is), all additional sticky's will align accordingly both vertically and horizontally (taking into account the width of active area and vertically, they can "be added as you scroll"...another very nice bit of jQuery that lets anything below the fold appear with a nice dissolve "transition." The movable function, which is used quite often in many little jQ apps and games and certainly serves its purpose, but here, it seems that adding more field options, having it sortable, etc., would make it much more "Post-it" like in its purpose and function of reminding yourself (with the web, sharing the sticky to add some social-flavor) of a task, event, a quick note, etc. Stack-n-Drag is cool, but here, a slight overlay or none at all would seem more functional and fun? Nonetheless, GREAT JOB AS ALWAYS!
Great tutorial, looking for something like this for a site im working on, looks like we can adapt this. Great stuff, thanks!
I agree with Daniel, delete functionality would be awesome. I don't care about permissions - if you could just send me in the right path to implement a delete button on each note, that would make my day.
Thanks a lot !
Nice job!
A remove/delete button would be nice to cleanup old notes...
Nice tutorial, I'll have to give this one a try. A little folded corner in the sticky note might add more visual appeal.
nice article man! I really love the responsiveness of the notes when being dragged.. brilliant!
delete/edit functions will be nice to add
Nice tutorial. a Option to edit notes will be nice ;)
I was wondering if there's a way to filter certain word? If it can, this can be the greatest alternative to live chat ever!
Hello, i tried something like you too, but i found the existing jQuery Plugin not good enough. So created my own plugin. You can find it here:
http://jquery-sticky-notes.com
Features you may be interested: editable, resiable, draggable and a lot of callbacks.
is it personal or everyone see the same thing
I started a hobby project named "Luba", which also involves notes in a corkboard. This is interesting as it features a (virtually) infinite corkboard and notes that can be added with a simple double click and have some rich formatting (thanks to contentEditable attribute), pictures and youtube videos. Also, they can be edited, moved, resized and deleted, and changes are saved in the server and updated in all conected clients almost instantaneously. Notes block while being edited to avoid concurrency mess. The corkboard can be panned in all directions as much as you want with a mouse drag.
The project UI is in spanish, as it is my mother tongue,but it's so simple you won't need to read anything =)
http://luba.roeltz.com/
@ Daniel
A nice plug-in, Daniel. It would be interesting to see it incorporated into the demo.
@ free
It is not personal, everyone see it the same.
@ Röeltz
That is an amazing project! Have you considered translating it into English? It could become quite popular you know..
@Martin: I'm considering to enable user accounts, so anyone can have a corkboard for their own. But I guess some multilingual UI would be nice as well... if someone is going to ever really use it.
@Röeltz
You have a winner there, well done, let me know if you are sucessfull with User accounts, please.
Thanks
Nice concept but what about removing the notes and editing the notes?
@Josh:
you can use my jquery plugin(http://jquery-sticky-notes.com), your stickies will be editable and deletable.
great widget!!!. but i have some question, how can this widget functioning if we use it in frameset. Let say we have 3-colomn frameset, which 1-top frame,2-left frame and 3-content frame. Then add note button we place in top frame and popup add note form we target to be appear in the content frame. i have done this but the popup appear in top frame.... need help???
I like this project and it works fine. However, upgrading Fancybox from 1.2.6 to 1.3.0 breaks it.
Luv it, want to use it but haven't a clue what to use it for or if any of my projects could have use for it ...lol
Very Nice I really appreciate Martin Angelov very great work with jquery and php. I love it and hope you will post other nice tutorials like this one.
Nice tutorial, going to be playing with this tonight
question: does the post really get automatically deleted after an hour? is there a way to get that to stay longer or even stay there forever?
@jedidiah The notes are deleted only for the purposes of the demo. You can disable the deletion of the notes by removing (or commenting out) the "DELETE FROM notes" query at the top of demo.php.
Awesome functionality presented in this tutorial.
I've taken it and made some kind of forum based on it. It supports paged navigation (15 sticky notes per page), comments (aka threads) on a note, history and much more.
http://mh3.reign-of-the-rathalos.com/wall/
I really dig this!
Im gonna use this on my website. O well...gotta get mysql now.
Work perfect form me, but i'm from croatia and can't turnit to charset 1250. When i add note show it perfect and when i refresh page special charset for my language is gone. :(
@Luka
As the notes and the database work with utf-8, the only way to fix it is to convert your site to utf-8 as well (or at lest the page the notes are displayed on). You can try with this meta tag in the head section:
Working now! Thanks man!
Fantastic!
Love this!!!
Hey guys, this how you hide th individual notes. but im still couldnt figure out how to delete the a button by having button and make the notes selectable. once you selected, click the delete button and the note should be deleted.
$(".note .close").click(function()
{
I was wondering if there was a code that could be implemented to delete a note and also edit a note.....
To add delete feature in 3 steps -
(1) replace the hourly delete query
if($_REQUEST['del']){mysql_query("DELETE FROM notes WHERE id = {$_REQUEST['del']}");}
(2) add button to note (line 29 i think...)
<a href="YOURFILENAME.php?&del='.$row['id'].'">x</a>
(3) add this to css file
.dlbtn{position:absolute;top:-2px;left:2px;color:#000;}
That should do it! It dosen't use ajax but at least the notes go away...
Nice work!
i love it, it's very cool and new!
it works perfectly
thanks
I have modified the above code.
It includes an option to save the notes in public or private.
People can send sticky to others and it has a delete button(Yay!!!)
I'll upload the code somewhere soon. By the way this was pretty inspirin stuff.
Hi Vipin,
Have you uploaded the code with delete button option.
Can you please share the location..it will really helpful..
Hi, where is your code? Can I see it?
Hello Vipin
I read that you modified the code of Sticky Note (http://tutorialzine.com/2010/01/sticky-notes-ajax-php-jquery/). Could you tell me where I can find it please? I need to be abble to modify and delete a note. The code for deleting is not really ok, I hope yours will help me to do it too if it doesn't already ok for that.
Thanks
Grégoire (Quebec)
any idea on how to add more color classes?
I made 9 total classes with different colors, I added them to the removeClass() in the JS on line 36.
and even in the HTML file with the form that list the colors...
my problem is that these extra classes aren't showing...any idea?
Never mind I figured it out, still looking forward to an edit and delete sticky note option ;)
Well cool, but does anyone know how to add the date (dt from database) onto the sticky notes?
...or we could modify it a bit and get a nice puzzle game :)
but is there a way to delete an old note?
Very nice! A edit and delete options are necesary ;)
Fran that will be nice
This idea is fantastic~~As a beginner in jquery, how to make each note appear in a random place every time I refresh the page? Thank you
I didn't read that question entirely.. haha so to make random position everytime you refresh open your homepage
find where it says:
list($left,$top,$zindex) = explode('x',$row['xyz']);
//comment that out.
add above $notes in while loop:
$left = rand(0,800);
$top = rand(0,800);
That should generate random positions on your sticky notes every time you refresh the page.
I don't have any code to post just yet.
To add an edit button to this script:
ex: $('#editNote').fancybox();
add that underneath the $('#addButton') in the script.js file
B. make that link "edit-note.php?id=$row['note-id']; - that will pass the id number to the edit note page.
Make a file called edit_note.php
In there select from the database based on the id that we passed in the url. The just select all the information you need where you need it.
Hi all...can anyone help me to show data and time after inserted a new stickynotes in the database?
'.date ('d.m.Y | H:i:s', strtotime($row['dt'])).'
I've inserted the line of code above in the while stetement of demo.php to enable timestamp in the sticky notes. Works but timestamp will be show only after that i refresh the page. There's a way to show timestamp directly after I create a new sticky notes?
i'm going slighty mad :D
thanks all.
It all works great,
i am not a web-designer so i have a question.
When i call the demo.php into iframe in html file.
then it works fine, the demo.php file is inside my iframe from html file
but after 5 seconds it reloads to the orignal demo.php file and gone is my html file.
Is it possible that whatever it does, the demo.php stays in the iframe and doesn't go to its own file demo.php.
As mentioned i am a starter here
Very very very good ;)
only 1 thing, is possibile resize the sticky notes windows, similar to this: http://www.jquery-sticky-notes.com/#tab2
and drag not work in IE, damn IE!
hi, can you help me how to fix it on IE 9 the drag and drop method.
SAFARI, FF, AND CHROME and also on mobile was working perfectly.
IE 9 SUCKS!
I can't seem to drag the notes on my iPhone, is there a simple way to make it iPhone/iPad compatible?
Martin Great Job!
I have been playing with this for a few days and wondered if you could help with a few issues I am running into:
For some reason I can only create two rows, it can't seem to put notes below the second row. Is there a way to add additional allowable rows?
I appreciate any feedback or help you can provide.
Martin,
Didn't want you wasting time in responding, I fixed both issues by editing the style sheet.
Thanks
hi
good work!!
can you help me how to fix it on IE 9 the drag and drop method please :(
whis fix ie9 :)
<script src="http://ajax.googleapis.com/ajax/libs/jquery/1.7.2/jquery.min.js" type="text/javascript"></script>
<script src="http://code.jquery.com/ui/1.8.21/jquery-ui.min.js" type="text/javascript"></script>
Exelent guide !
Im trying to make a refresh of the notes position without reloading the entire page, but i dont really know how to do that.
im tryin to write a ajax request to reload the main div.... but im just not good enoug in js/html
Du you have any tips ?
Thanks
Hello
Good tuto
I build an application based on that tutorial and the example files. My team is working with Scrum Method and I was trying to kill excel stuff to manage Post-It for projects.
I am about to succeed with Kados : take a look at it on SourceForge.
It's Open Source and free. It's in French and in English
is not working in IE!!!
Hi,
Very Exelent guide, but i can't drag and drop the sticky notes on mobile devices (iphone, ipad).
Do you have any tips?
Thanks
Hey Guys, I've devised a super cool way to Trash and Delete notes!
This will 'Trash' each individual note from the view in real time and delete it behind the scene using ajax!
It's a neat little addition to this wonderful script!
Here's the code:
Add this line before the end </div> tag on line 29 of 'demo.php':
In the 'script.js' file, from line 6 to 10 - replace the function there as follows:
$('.note').each(function(){

     $("a.Trash").click(function ( event ) {

        event.preventDefault();

        var noteID = $(this).attr('href')

        $.get('notes/ajax/delete_note.php',{
              id    :   noteID
        });

        $(this).parent().animate({
            opacity: 0,
            left: '-=200',
            height: 'toggle', width: 'toggle'
        }, 300, function() {
            // Animation complete.
        });

    });

    /* Finding the biggest z-index value of the notes */

    tmp = $(this).css('z-index');
    if(tmp>zIndex) zIndex = tmp;
});
Create file 'delete_note.php' in ajax folder and put this code in there:
<?php

// Error reporting
error_reporting(E_ALL^E_NOTICE);

require "../connect.php";

// Validating the input data:
if(!is_numeric($_GET['id']))
die("0");

// Escaping:
$id = (int)$_GET['id'];

// Delete note:
mysql_query("DELETE FROM notes WHERE id=".$id);

?>
Finally, in 'styles.css' add the following style:
.Trash{
    position:absolute;
    top:150px;
    left:5px;
}
THATS IT!
I've added quite a few more mods too, having fun with this one!
FULL MARKS to Tzine! Great scripts!
hueman :)
To: Hueman.
it works perfect for me.
Thank you very much!
thanks, its working
This is great.
When the note is been posted it is moving to the top of the stack.
When the note is been posted, I want it to be moved to whatever mouse position is.
Can anybody help me with this ?
Any chance on getting this upgraded to work with JQuery 1.8.0 and above?