Advanced Event Timeline With PHP, CSS & jQuery
First I want to take the time to thank you, Tutorialzine's readers, for all your support the past year and to wish you a happy new 2010! A lot of interesting tutorials are on their way and there are also some nice changes planned which I am sure you'll like.
Now lets start the year with a brand new tut!
It all began last week, when I received this letter from one of our readers:
Hi,
I love your site! It's the best out there.
I was wondering if you could create one day a tutorial on how to create a sleek event timeline like Google's 10th Birthday Timeline, available at http://www.google.com/tenthbirthday/. That would be much appreciated! I am sure many other people would be grateful for that tutorial too.
Thanks, and happy new year!
Vinnie
I am always on the look for good tutorial ideas, so Vinnie sent his email right on time!
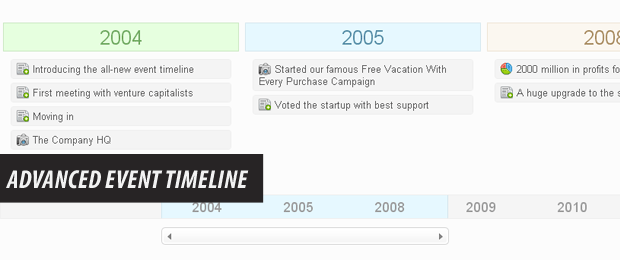
Today we are making an Advanced Event Timeline with the help of PHP, MySQL, CSS & jQuery, that will display a pretty time line with clickable events. Adding new ones is going to be as easy as inserting a row in the database.
Note: This tutorial is quite old and doesn't work in PHP7 and above. We are keeping it online only as a reference.
Step 1 - XHTML
First, be sure to grab the example files from the button above, so that you can easily follow what is going on.
The first step of this tut is to create the XHTML structure, as seen in demo.php.
demo.php
<div id="timelineLimiter"> <!-- Hides the overflowing timelineScroll div -->
<div id="timelineScroll"> <!-- Contains the timeline and expands to fit -->

<!-- PHP code that generates the event list -->

<div class="clear"></div>
</div>

<div id="scroll"> <!-- The year time line -->
<div id="centered"> <!-- Sized by jQuery to fit all the years -->
<div id="highlight"></div> <!-- The light blue highlight shown behind the years -->
<?php echo $scrollPoints ?> <!-- This PHP variable holds the years that have events -->
<div class="clear"></div>

</div>
</div>

<div id="slider"> <!-- The slider container -->
<div id="bar"> <!-- The bar that can be dragged -->
<div id="barLeft"></div>  <!-- Left arrow of the bar -->
<div id="barRight"></div>  <!-- Right arrow, both are styled with CSS -->
</div>
</div>

</div>
I have omitted some of the PHP code that generates the events so we can take a better look at the markup (we will get back to it in the next step).
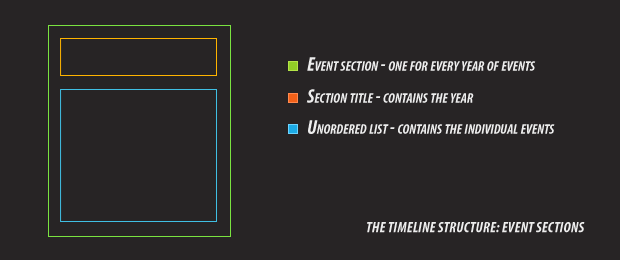
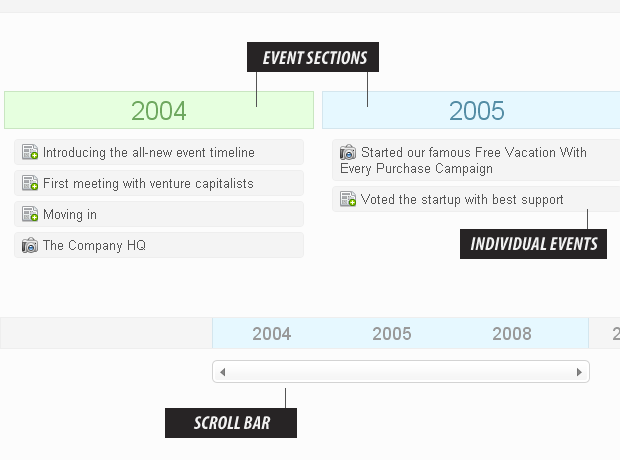
Te main idea is that we have two divs - timelineLimiter and timelineScroll positioned inside it. The former takes the width of the screen, and the latter is expanded to fit all the event sections that are inserted inside it. This way only a part of the larger inner div is visible and the rest can be scrolled to the left and right by a jQuery slider we will be making in step 4.
Now lets take a look at the PHP back-end.
Step 2 - PHP
PHP selects all the events in the database and groups the events by year in the $dates array. It later loops through it and outputs all the events as <li> elements inside of unordered lists which belong to each of the event years.
demo.php
// We first select all the events from the database ordered by date:

$dates = array();
$res = mysql_query("SELECT * FROM timeline ORDER BY date_event ASC");

while($row=mysql_fetch_assoc($res))
{
    // Store the events in an array, grouped by years:
    $dates[date('Y',strtotime($row['date_event']))][] = $row;
}

$colors = array('green','blue','chreme');
$scrollPoints = '';

$i=0;
foreach($dates as $year=>$array)
{
    // Loop through the years:

    echo '
        <div class="event">
        <div class="eventHeading '.$colors[$i++%3].'">'.$year.'</div>
        <ul class="eventList">';

    foreach($array as $event)
    {
        // Loop through the events in the current year:

        echo '<li class="'.$event['type'].'">
            <span class="icon" title="'.ucfirst($event['type']).'"></span>
            '.htmlspecialchars($event['title']).'

            <div class="content">
                <div class="body">'.($event['type']=='image'?'<div style="text-align:center"><img src="'.$event['body'].'" alt="Image" /></div>':nl2br($event['body'])).'</div>
                <div class="title">'.htmlspecialchars($event['title']).'</div>
                <div class="date">'.date("F j, Y",strtotime($event['date_event'])).'</div>
            </div>
            </li>';
    }

    echo '</ul></div>';

    // Generate a list of years for the time line scroll bar:
    $scrollPoints.='<div class="scrollPoints">'.$year.'</div>';

}
Thus the complete markup for the page is generated. Now we are ready to apply some styles.
Step 3 - CSS
After we've inserted the CSS stylesheet to the head section of the document, we can start laying down the rules. Only the more interesting ones are included here. You can view the rest in styles.css.
styles.css
.event{
    /* Contains the section title and list with events */
    float:left;
    padding:4px;
    text-align:left;
    width:300px;
    margin:0 5px 50px;
}

.eventList li{
    /* The individual events */
    background:#F4F4F4;
    border:1px solid #EEEEEE;
    list-style:none;
    margin:5px;
    padding:4px 7px;

    /* CSS3 rounded corners */
    -moz-border-radius:4px;
    -webkit-border-radius:4px;
    border-radius:4px;
}

.eventList li:hover{
    /* The hover state: */
    cursor:pointer;
    background:#E6F8FF;
    border:1px solid #D4E6EE;
    color:#548DA5;
}

li span{
    /* The event icon */
    display:block;
    float:left;
    height:16px;
    margin-right:5px;
    width:16px;
}

/* Individual background images for each type of event: */

li.news span.icon {     background:url(img/icons/newspaper.png) no-repeat; }
li.image span.icon {    background:url(img/icons/camera.png) no-repeat; }
li.milestone span.icon {    background:url(img/icons/chart.png) no-repeat; }

#timelineLimiter{
    /* Hides the overflowing timeline */
    width:100%;
    overflow:hidden;
    padding-top:10px;
    margin:40px 0;
}

#scroll{
    /* The small timeline below the main one. Hidden here and shown by jQuery if JS is enabled: */
    display:none;
    height:30px;

    background:#F5F5F5;
    border:1px solid #EEEEEE;
    color:#999999;
}

.scrollPoints{
    /* The individual years */
    float:left;
    font-size:1.4em;
    padding:4px 10px;
    text-align:center;
    width:100px;

    position:relative;
    z-index:10;
}
Here the .event class styles the event years sections (these are the divs that group events that have happened in the same year).
Near the middle of the code you can see that we've used some CSS3 rounded corners which work in the majority of browsers (not supported by IE and Opera).
We also define individual background images for each of the event types - image, news or milestone.
Step 4 - jQuery
The last step is to insert a layer of interactivity into the browser. We will be doing this with the help of the jQuery JavaScript library, included in the head section of demo.php.
I've split the code below in two parts so they are more comprehensible.
script.js - Part 1
$(document).ready(function(){

    /* This code is executed after the DOM has been completely loaded */

    /* The number of event sections / years with events */

    var tot=$('.event').length;

    $('.eventList li').click(function(e){

        showWindow('<div>'+$(this).find('div.content').html()+'</div>');
    });

    /* Each event section is 320 px wide */
    var timelineWidth = 320*tot;

    var screenWidth = $(document).width();

    $('#timelineScroll').width(timelineWidth);

    /* If the timeline is wider than the screen show the slider: */
    if(timelineWidth > screenWidth)
    {
        $('#scroll,#slider').show();
        $('#centered,#slider').width(120*tot);

        /* Making the scrollbar draggable: */
        $('#bar').width((120/320)*screenWidth).draggable({

            containment: 'parent',
            drag: function(e, ui) {

            if(!this.elem)
            {
                /* This section is executed only the first time the function is run for performance */

                this.elem = $('#timelineScroll');

                /* The difference between the slider's width and its container: */
                this.maxSlide = ui.helper.parent().width()-ui.helper.width();

                /* The difference between the timeline's width and its container */
                this.cWidth = this.elem.width()-this.elem.parent().width();

                this.highlight = $('#highlight');
            }

            /* Translating each movement of the slider to the timeline: */
            this.elem.css({marginLeft:'-'+((ui.position.left/this.maxSlide)*this.cWidth)+'px'});

            /* Moving the highlight: */
            this.highlight.css('left',ui.position.left)
        }

    });

    $('#highlight').width((120/320)*screenWidth-3);
}
});
As you may have noticed in the PHP section of the tut (if not check it out - around line 33) that with each event we include a set of div elements which contain additional information (title, text and date). Those are hidden with display:none in our CSS file, and are accessed by jQuery so that the pop-up window can be populated with data without the need of sending AJAX requests (not to mention that this content is visible to search engines and is great for SEO). So it is a win-win solution.
The data itself is being fetched in the second part of the script below:
script.js - Part 2
function showWindow(data)
{
    /* Each event contains a set of hidden divs that hold
additional information about the event: */

    var title = $('.title',data).text();
    var date = $('.date',data).text();
    var body = $('.body',data).html();

    $('<div id="overlay">').css({

        width:$(document).width(),
        height:$(document).height(),
        opacity:0.6

    }).appendTo('body').click(function(){

        $(this).remove();
        $('#windowBox').remove();
    });

    $('body').append('<div id="windowBox"><div id="titleDiv">'+title+'</div>'+body+'<div id="date">'+date+'</div></div>');

    $('#windowBox').css({

        width:500,
        height:350,
        left: ($(window).width() - 500)/2,
        top: ($(window).height() - 350)/2
    });
}
In this function we are basically treating the parameter passed from Part 1 above, where the function is called, as regular HTML and use the standard jQuery selectors thus populating the title, date and body variables.
Step 5 - MySQL
This last step is only needed if you plan to run the demo on your own server, or like an addition to your current site.
To make it all tick, you have to recreate the timeline MySQL table from timeline.sql, provided in the download archive. You will also need to fill in your database credentials in connect.php.
With this our Event Timeline is complete!
Conclusion
Today we created a timeline that you can modify to showcase the important events that mark your days. It is easily modifiable and you are free to use it in your or your clients' projects.
Be sure to leave a comment if you liked it : )
Bootstrap Studio
The revolutionary web design tool for creating responsive websites and apps.
Learn more
Another great tutorial =] You really put a lot of work into your tutorials. Thanks for them!
Very good tutorial. Maybe i will use your tutorial.
really nice tutorial and work i love jquery and thanks to jquery and guys like you who are making developer's life easy.
Nice tutorial with nice css.
good work.
I will try to add edit and add new events option ...
the best tutorial i ever seen on internet about PHP CSS and Jquery
The timeline 'bar' seems to stretch so wide that you can't really scroll. Am I missing something?
This is why I love you.
Awesom Tut! Just what I was looking for!! Thanks!!
Thanks a lot! The design and the connection of all features are fantastic!
I made it with CodeIgniter as a module (to add / edit / delete content) + a widget to show the whole event list.
The only problem I see the widget should be in the top part of the page because the content is not over the list, but in the top part. So, I need scroll up if the widget in the bottom part. Google shows its content over the list.
Thanks!
Very nicely done. Just one small enhancement I'd suggest: adding a close button to the pop-ups (or instructions to click outside it to close).
Perfect tutorial thanks !!
That's The Great Tut! Thx so much!!
The effort and presentation that goes in to your tutorials is awesome. Keep it up and this site will really take off
Any Chance we will see a Word Press Plugin of this? Anyone planning on porting over?
hi nice work you doing. I downloaded it but it gave me the following error:
Warning: mysql_connect() [function.mysql-connect]: Access denied for user 'ODBC'@'localhost' (using password: NO) in D:\wam\wamp\www\timeline\connect.php on line 17
Unable to establish a DB connection.
What do i do....
Great tutorial, a small enhancement would be to recalculate on browser resize :)
Got something to do this weekend!! THank You!
I am sure this will come in handy at some point (Ctlr-D)
Hi! Your featured slider is very cool! Will you write the tutorials about your featured slider? ^^ How to make it work with wordpress? :D!
Thanks for all of your tutorials !
Very cool tutorial but it does not work properly if you have a large screen. The horizontal time line scroll bar will not be created and then if you resize the screen there's still no scroll bar :(
Nice Work. FYI: On the mac version of FF 3.0 it is not showing up.
How about if we have lots of even (like 1000+)?
How it gonna look like?
I think that we can add ajax to load live shown data when user scroll to them.
Nice work!
Cool.. in fact its smoother than google tenth b'day .....
Brilliant love it :-) Just what I was looking for as a cool edition to my site before it goes live. Thanks again...
This is awesome. Great tut.
We've been looking for a slick way to show our company history and just couldn't find anything that had that 'wow' factor.
this is great!! thank u so much :)
really cool - i will adapt this for a twitter-api-based application - it's a perfect solution for my agenda - thx - great work
Wow, this website is a life saver as I use many of this website tutorial to help aid me to create my website. Now all I'm missing is a good flip image gallery effect.
Anyone else having problems with dates ranging back to the 1800s? They won't display for me. :(
Anything after the 1900s show on my timeline but anything before it get Dec.31-1969.
how to work with dates before 1969?
The standard date and time functions in computers do not go before 1970 (it is considered the birth of the UNIX era).
One possible solution is to change the date_event field in the table to string (it is currently a date/time field) and change this line in demo.php:
To something similar to this (providing that you fill the dates of the events in the form 22-10-2003):
This way instead of using the limited date/time functions we just extract the last portion of the string.
Keep up the informative writing. I loved reading your article. Thanks
That's one of the most amazing use of jquery I evr seen. Wonderfull! Thanks for sharing.
I am not sure to understand this:
how do you add an event? Do you have to edit by hand the database with phpmyadmin? What is the way to add an event using the interface
is there a way to have the slider to the right position by default?
Can I split years with your program.
If not, are there other similar php programs that can draw a time line?
Thank you for this great tutorial, it's exactly what I was looking for! I am having some trouble with the scrollbar in both IE and FF. It worked perfect with the original demo, but I've added my own events and now have data from 1917 through 2004. In FF, I'm not able to scroll all the way to the right and see my most recent events... I can only see 1917 through 1967. In IE, the small timeline extends beyond my browser width and therefore creates a horizontal scrollbar, instead of being hidden as in FF. However, this does allow me to view all my events but the page appears broken. I've tried playing with the CSS and Javascript, but haven't had any luck. Has anyone else ran into a similar problem?
very good tutorial... i liked it.. thank u...
Great tutorial!! The best tutorial I have ever seen! But can not work very well for IE6.0.Thanks very much!
Nice and standardized - if it only had keyboard access - thanks for the demo!
This is excellent, but is there any .ASP equivalent to this? Our server is IIS, so no .php is allowed :(
Thanks
For the problem wiyh years before 1800 I changed the line on de php file original = $dates[date('Y',strtotime($row['date_event']))][] = $row;
new =$dates[end(explode('-',$row['date_event']))][] = $row;
Too, I changed the format date, like this: 22-10-2003 (by default, the sistem get (read) : 2003-10-22
But when I use years like 1700, 1800, 1900, it re order the years...
1700 1900 1800
How may I get an a correct order?
I am sorry, forget muy comment..
For the problem wiyh years before 1800 I changed the line on de php file original ...
I get it., but changing the date just for years (without mounth and day). I will keeping tryng.
The program result very good!!!!!!!!! Congratulations.
excellent work!
This is an incredible post. Its amazing to see what CSS3 can do , at the same time its sad a lot of customers still want IE support which sucks at CSS3 big time. I am taking the liberty of adding this article to my CSS aggregator site. Hope you dont mind. :)
Awesome tutorial!!! thank you! :)
That's exactly the timeline i was searching. Thank you :-)
Very nice tutorial, only thing that I would add would be the following to the window .css jquery
$('#windowBox').css({
width:500,
height:350,
left: ($(window).width() - 500)/2 + $(window).scrollLeft(),
top: ($(window).height() - 350)/2 + $(window).scrollTop()
});
The addition of $(window).scrollLeft() and $(window).scrollTop() will help keep the window centered during scrolling.
Very good article!
But how to display the date in German? For example: 04.März 1989.
Well, found the solution on my own. If there is somone interested in it:
setlocale(LC_TIME, 'de_DE.UTF-8');
'.strftime('%d.%B %Y',strtotime($event['date_event'])).'
Exactly what i was looking for, if only we could zoom in and out it will be perfect. Thanks for the good share of knowledge
really nice tutorial and work i love jquery and thanks to jquery and guys like you who are making developer’s life easy.
Excellent work!
Thank you so much, I really appreciate it.
Your tutorials and demo's help a lot of people,
Keep up the good work.
Hi.
I have many events within a year and that causes the scrollbar is very down and out of place. I wonder if I can group the events by MONTH - YEAR.
This tutorial is GREAT !
Thanks !
Great tutorial,
just changed it for showing events per month, not per year. But one question:
I will show it within some content (so, I don't have screenWidth for max. place, just 500 px.
Is there a way to change the script therefore?
Thanks a lot, it works and it looks very nice :)
See you from Belgium
I have problems with the aplication in the ipad, why the function scroll is not operative. Can you help me?
I don´t know made the .js file for solution of this problem.
I think this isn´t very dificult, but i don´t know.
A lot of thanks.
The problem is caused for overflow: hidden. This option is not operative in IPAD.
For the solution i use in safari browser overflow: auto
For run this demo in IE 9 is necesary use the jquery 1.8.2 version.
This version of jquery arrange problems with draggable bars.
Thanks for the job...
That answered my issue. Thanks for sharing.