A Twitter List Powered Fan Page
Introduction
Recently, Twitter rolled out a great new feature on their site - lists. You can now create and compile a list of twitter users and make it easier for others to follow all at once.
Also, at the same time, they expanded their API to include list management functionality. This allows us to use these new tools to create a widget that flips lists the other way around - a fan page you can put in your sidebar, that allows your visitors to fill in their twitter name and join a specially crafted fan list in your twitter account.
So download the example files and lets start coding!
Important: Twitter recently made a radical change to their authentication API's, which makes it impossible for this example to work. However, one of our readers has been kind enough to rework it with the new APIs. Read more in our comment section on how to download and implement it.
Note: This tutorial is quite old and doesn't work with twitter's new API. We are keeping it online only as a reference.
Step 1 - XHTML
As usual, we start with the XHTML. As the widget is entirely AJAX based, this is the only code that you will need to include directly into your site. The rest is fetched asynchronously.
demo.html
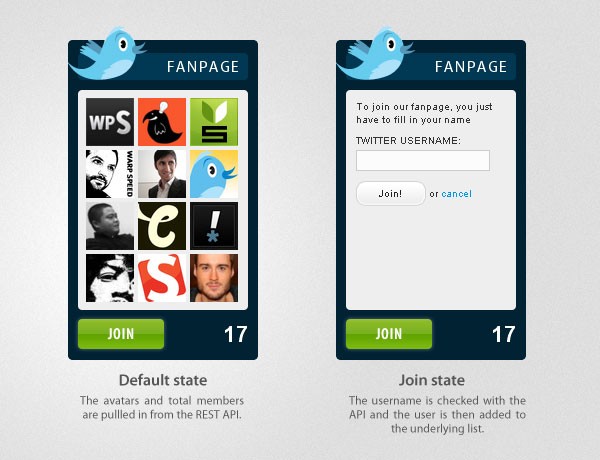
<div id="fanPage">

<div class="title">

<a class="fanPageLink" href="http://twitter.com" title="Go to fanpage!"><img src="img/twitter-bird.png" id="twitBird" alt="twitter bird" /></a>
<a class="fanPageLink" href="http://twitter.com" title="Go to fanpage!">Fanpage</a>

</div>

<div class="content">
<div class="fans"><img src="img/loader.gif" alt="loading.." /></div>
</div>

<div class="subscribe">
<a href="#" class="joinFP">Join!</a>

<div class="membersCount">
<a class="fanPageLink" id="counter" href="http://twitter.com" title="Total Fans"></a>
</div>

</div>
</div>
Here we have the main fanPage container DIV, which holds our the widget and inside it we have the title, content and subscribe DIVs.
These are later styled with CSS and populated with data via AJAX. Also notice that we have three links which share a FanPageLink class. Currently they point to the twitter's main site, but later we are going to edit their href attributes dynamically, and point them to the member page of the list.

Step 2 - CSS
Once we have the markup in place, we can move to the CSS. Here are only presented the rules that are directly used by the widget. You can view all of the code in demo.css in the source archive.
demo.css
#fanPage{
/* This is the container that holds the widget */
background-color:#002233;
color:white;
height:300px;
margin:30px auto;
padding:10px;
text-align:left;
width:170px;
}
#fanPage a, #fanPage a:visited{
/* This styles the title and total fans links */
color:white;
text-decoration:none;
}
#fanPage a:hover{
text-decoration:underline;
}
.title{
/* The title on the top */
background-color:#013853;
font-family:"Myriad Pro",Arial,Helvetica,sans-serif;
font-size:16px;
letter-spacing:1px;
margin:3px 0 10px;
padding:4px 8px;
position:relative;
text-align:right;
text-transform:uppercase;
}
#twitBird{
/* The twitter icon on the top */
left:-10px;
position:absolute;
top:-28px;
}
.content{
/* The div that holds the twitter avatars */
background-color:#eeeeee;
padding:6px;
text-align:left;
height:208px;
position:relative;
color:#333333;
}
#mask{
/* Inserted once you click the green "Join" button */
font-size:10px;
left:0;
padding:10px;
position:absolute;
top:0;
}
#mask label{
display:block;
font-weight:bold;
margin:8px 0 4px;
text-transform:uppercase;
}
#twitterName{
/* The twitter name input box */
background-color:#FCFCFC;
border:1px solid #CCCCCC;
color:#333333;
font-family:Arial,Helvetica,sans-serif;
font-size:12px;
padding:2px;
}
#mask a.greyButton,#mask a.greyButton:visited{
/* The default state of the gray join button */
display:inline-block;
height:19px;
margin-top:10px;
padding:6px 0 0;
text-align:center;
width:70px;
background:url(img/button_gray.png) no-repeat;
color:#222222;
}
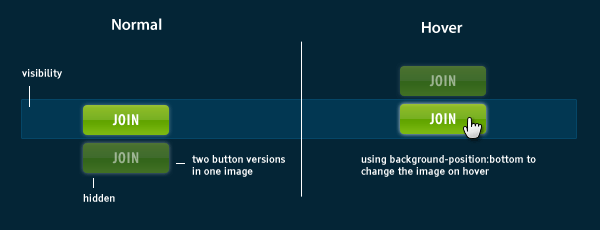
#mask a.greyButton:hover{
/* The hover effect on the "Join" button */
background-position:bottom left;
text-decoration:none;
}
div#mask a, div#mask a:hover, div#mask a:visited{
color:#0196e3;
}
#response{
/* The div that holds the response messages in the "Join area" */
margin-top:10px;
font-size:10px;
text-align:center;
}
.subscribe{
position:relative;
}
.membersCount{
/* The total number of fans div */
position:absolute;
right:0;
top:5px;
color:white;
display:block;
font-size:22px;
font-weight:bold;
}
.content img{
/* The twitter avatars */
margin:2px;
}
#fanPage, .content, .title{
/* Rounding three elements at once */
-moz-border-radius:4px;
-webkit-border-radius:4px;
border-radius:4px;
}
a.joinFP, a.joinFP:hover{
/* The green "Join" button */
display:block;
background:url(img/buttons.png) no-repeat;
width:94px;
height:38px;
text-indent:-9999px;
margin:5px 0 0 -4px;
}
a.joinFP:hover{
/* The hover state of the button */
background-position:bottom left;
}
a img{
border:none;
}
Nothing ground-braking here. Notice how we've set up CSS rounded corner rules to three types of elements at once (line 127). This way we make it easier to edit the roundness of the widget easier (it would be even better if all the browsers supported border-radius directly, and didn't need vendor-specific code).
Also you can see a demonstration of the technique I used to make the hover buttons below.
Step 3 - jQuery
As I mentioned earlier, the entire widget is AJAX based. This is actually a necessity, because communication with the twitter API would stall the website otherwise.
Here is the main idea behind the code below:
- The page, in which the widget is included is loaded into a visitor's browser;
- With it, script.js (which holds all of our jQuery code) is executed;
- $(document).ready() is run;
- An AJAX request is initiated, which loads the data from load.php and displays it on success;
- All the links with a fanPageLink class are pointed to the list members page on twitter;
- A click function is bonded to the green join button;
First half of script.js
$(document).ready(function(){
    /* Executed on DOM load */

    $.getJSON("load.php",function(data){

        /* Loading the widget data */
        if(data.error)
        {
            /* If there is an error, output and exit */
            $(".content").html(data.error);
            return false;
        }

        $(".content .fans").html('');
        /* Remove the rotating GIF */

        $.each(data.members,function(i,val){

            /* Loop through all the shown members and add them to the .content DIV */
            $(".content .fans").append('<a href="http://twitter.com/'+i+'" target="_blank"><img src="'+val+'" width="48" height="48" title="'+i+'" alt="'+i+'" /></a>');
        });

        $('#counter').html(data.membersCount);
        /* Set the member counter */

        $('.fanPageLink').attr('href',data.fanPage+'/members').attr('target','_blank');
        /* Set the .fanPageLink-s to point to the profile page */
    });

    $('.joinFP').click(function(e){

        /* IF the green button has been clicked.. */

        if($('.content').html().indexOf('id="mask"')!=-1)
        {
            /* ..and the form is already shown exit */
            e.preventDefault();
            return false;
        }

        /* ..in the other case, start a fade out effect */
        $(".content .fans").fadeOut("slow",function(){

            $('.content').append('<div id="mask">\
            To join our fan page, you just have to fill in your name\
            <label>Twitter username:</label>\
            <input id="twitterName" name="twitter" type="text" size="20" />\
            <a href="" class="greyButton" onclick="sendData();return false;">Join!</a> or <a href="#" onclick="cancel();return false;">cancel</a>\
            <div id="response"></div>\
            </div>');
        });

        /* Prevent the link from redirecting the page */
        e.preventDefault();
    });
});
Later if a click occurs on the green "Join" button, the avatars are faded out and a form appears on their place.
The second half of the code handles the sending of the data to add.php:
Second half of script.js
function sendData()
{
    /* This function sends the form via AJAX */
    $('#response').html('<img src="img/loader.gif" />');
    var twitter = $('#twitterName').val();
    if(!twitter.length)
    {
        $('#response').html('<span style="color:red">Please fill in your twitter username.</span>');
        return false;
    }

    $.ajax({
        type: "POST",
        url: "add.php",
        data: "twitter="+encodeURIComponent(twitter),
        /* Sending the filled in twitter name */
        success: function(msg){

            /* PHP returns 1 on success, and 0 on error */
            var status = parseInt(msg);

            if(status)
            {
                $('#response').html('Thank you for being a fan! You will be added in a few minutes. <a href="#" onclick="cancel();return false">Hide this form</a>.');
                $('#twitterName').val('');
            }
            else
                $('#response').html('<span style="color:red">There is no such twitter user.</span>');
        }
    });
}

function cancel()
{
    /* Hides the "Join" form */
    $('#mask').remove();
    $('.content .fans').fadeIn('slow');
}
The sendData function is called if the user clicks on the newly created gray "Join" button below the input field. It also checks the return status of the AJAX request to choose the proper status message.
Also remember that for above code the work, we need to include the jQuery library and script.js into the head section of the document:
<script type="text/javascript" src="http://ajax.googleapis.com/ajax/libs/jquery/1.3.2/jquery.min.js"></script>
<script type="text/javascript" src="script.js"></script>
Step 4 - PHP
Now that we followed all the code on the front-end, it is now time for the last part of this tutorial - the PHP back-end.
PHP has the important task of communicating with the twitter API. This is done via a special extension - CURL. For convenience, I made a special function - curlMe that wraps the CURL code and makes it easier to send requests from other places in the script.
functions.php
function error($msg)
{
    // Format the error as a JSON object and exit the script:
    die('{error:"'.$msg.'"}');
}

function fetchElement($element,$src)
{
    // Takes in an XML document as string $src, and returns the required nod value

    $match = array();
    preg_match_all('/<'.$element.'>(.*)<\/'.$element.'>/u',$src,$match);
    // Matching the required property in the xml

    return $match[1];

    // ..and returning it
}

function curlMe($url,$gp='')
{
    // Using CURL to communicate with the Twitter API

    global $username,$password;

    $cc = curl_init();

    curl_setopt($cc, CURLOPT_URL, $url);

    if($gp)
    {
        // If the $gp parameter is set, send it by a POST request:
        curl_setopt($cc, CURLOPT_POST, 1);
        curl_setopt($cc, CURLOPT_POSTFIELDS, $gp);
    }
    else
        curl_setopt($cc, CURLOPT_GET, 1);

    curl_setopt($cc, CURLOPT_HTTPAUTH, CURLAUTH_BASIC);
    curl_setopt($cc, CURLOPT_USERPWD, $username.':'.$password);
    curl_setopt($cc, CURLOPT_SSL_VERIFYPEER, false);
    curl_setopt($cc, CURLOPT_RETURNTRANSFER, 1);

    $xml = curl_exec($cc);
    curl_close($cc);

    return $xml;
}
Now that we've defined those functions, we can use them in any PHP file by just including or requiring functions.php in the script.
Adding new fans on the list is done in add.php
add.php
require "functions.php";
require "config.php";

if(!$_POST['twitter'])
die('0');

$userXML = curlMe("http://twitter.com/users/show.xml?screen_name=".urlencode($_POST['twitter']));
// Initiating an API request

if(strpos($userXML,'<error>Not found</error>') !== false)
{
    // If there is no such user, return an error:
    die('0');
}

// fetchElement returns an array, and the list function assigns its first element to $id:
list($id) = fetchElement('id',$userXML);

curlMe('http://api.twitter.com/1/'.$username.'/'.$list.'/members.xml','id='.$id);

echo 1;
As with any API, there are limits of usage. This is done to prevent abuse of the service and ruining everybody's day. Twitter enforces a 150 requests per hour rule, which limits how many times we can GET data for the twitter list.
This is why I build a simple caching mechanism, that stores the fetched data for 15 minutes after a request is made to the API.
Here is how it works:
- The widget makes an AJAX request to load.php;
- The php script checks to see if a cache file exists;
- If it does, it gets its contents and returns it;
- If it does not, or if the cache is older than 15 minutes, it fetches the data from the API, stores it in the cache file for later use and returns it;
This simple mechanism ensures that the widget will always have API calls to spare. You can see the code below:
load.php
require "functions.php";
require "config.php";

$cache_file = 'twitter.cache';
// The cache file

$cache_expire_time = 15*60;
// The cache expires after 15 minutes

$twitterers_shown = 12;

// If you are making changes and want to destroy the cache while testing,
// uncomment the line below:

//$cache_expire_time = 1;

if(!file_exists($cache_file) || time() - filemtime($cache_file) > $cache_expire_time)
{
    // If there isn't a cache file, or if it is older than allowed

    $xml = curlMe("http://api.twitter.com/1/".$username."/".$list."/members.xml");
    //$xml = curlMe("http://api.twitter.com/1/chouka/design/members.xml");

    if(strpos($xml,'<error>Not found</error>') !== false)
    {
        // If there is not such a list, create it automatically:
        curlMe('http://api.twitter.com/1/'.$username.'/lists.xml','name='.$list);
    }

    $usernames = fetchElement('screen_name',$xml);
    $avatars = fetchElement('profile_image_url',$xml);

    $json = '';
    foreach($usernames as $k=>$u)
    {
        if($k!=0) $json.=', ';
        $json.='"'.$u.'":"'.$avatars[$k].'"';
        // Generating the json object with a structure: username:avatar_image

        if($k>=$twitterers_shown-1) break;
    }

    // Getting the total number of fans requires an additional API call:

    $membersXML = curlMe("http://api.twitter.com/1/".$username."/lists/".$list.".xml");
    $membersCount = fetchElement('member_count',$membersXML);

    $json = '{members:{'.$json.'}, membersCount:'.$membersCount[0].',fanPage:"http://twitter.com/'.$username.'/'.$list.'"}';

    // Save the generated json variable in the cache for later use:
    $fp = fopen($cache_file,'w');

    if($fp == false)
    {
        error("Your cache file could not be created! You have to chmod the script directory to 777!");
    }

    fwrite($fp,$json);
    fclose($fp);
}
else
{
    $json = file_get_contents($cache_file);
    // Fetch the data from the cache file
}

echo $json;
Also you might notice that the API requires you to provide you username and password in order to use it. So if you are planning to run the demo on your own server, be sure to fill in your log-in information in config.php.
With this our Twitter List Powered Fan Page is complete!
Conclusion
Today we learned how to use the newly-released twitter lists and the REST API to create a community driven fan page.
As you may remember, this is actually not the first twitter widget we've made. If you just want to showcase your latest tweets in your blog, you can use the jQuery Twitter Ticker we made a few weeks back.
Also if you've customized this tutorial and used it in a site, it would be great to share what you've done with the community via our Tutorial Mashups feature, above the comment section.
Bootstrap Studio
The revolutionary web design tool for creating responsive websites and apps.
Learn more
That's excellent, I could use this for a myriad of projects.
great work
thanks
Cool, I like the panel with very clean design.
holly cheat! nice!
Very cool idea... too bad that spammers will destroy such fanpages :(
Great Tutorial! Turned this into a Wordpress Plugin. More features coming soon! http://bit.ly/2ydoOC
Thanks for the comments!
A great idea, Nick. This would surely benefit a lot of people.
Thanks for posting this, I think it's a great idea. Also Nick a wordpress plugin is just what I was looking for.
Wayne
Couldn't have been better!
Some good stuff here! I always love to see new ways to integrate twitter.
I think it is more attractive and effective than just the little "join me" bird.
P.S. How did you get so many followers? I'm stuck at 21 :)
(http://www.twitter.com/vunky)
Great tut! I just added it to my site http://markandandi.com but realized I can add anybody as a fan after adding APlusK. That's cool though.
Thanks,
Mark&Andi
Hey Mark.
Unfortunately it is not possible to ensure that the user is who he is claiming to be, without making him fill in his twitter credentials (which is not a good idea and will hit the number of people who actually join).
Also congrats on your design, the widget looks nice in the sidebar!
Hi, I try this code, But I can't see to manage to get my fans to load.
Where did I had to edit the code, only in the config file ?
Thanks guys
Hi thanks for this. I it easy to show thumbnails in random order? Have a hint on how to do that?
Thx
I got this to work but the number of fans is stuck on 2, even when I have 10 fans thumbnail listed.
Great work.could i use this in word press powered site?
@ Oscar
The script caches the number of fans for 15 minutes. So you will not be able to see any changes during this time.
@ TheShadow
Yes, one of our readers - Nick has made a wordpress plug-in, which displays the widget on your sidebar. Check it out here - http://bit.ly/2ydoOC
I'm afraid this solution is not compatible with jQuery v.1.4.2.
I tested with your Demo files several times. (I changed /1.3.2/ to /1.4.2/ and back in demo.html)
The source files were updated for jQuery 1.4.2.
Hello Martin,
Nice widget, but I have some problems with it. I'v introduced in config.php my twitter user name, password and also the name of my new list (fans)... I save the file and open in my browser the demo.html ... and nothing! the widget is loading and loading and nothing appear, I can not see my fans... Where could be the problem?
P.S. I'v downloaded the last version that works with jQuery 1.4.2
Martin please answer to my questions.
@ WPSMASH, can you share a link?
I can't give you a link because I am working on localhost now. Could be this the problem?
It could be. You have to make sure that you can fetch remote pages with CURL under PHP.
You can setup a test php script, and include "functions.php" inside it. Then just put a call to the curlMe function and try to fetch a remote page (e.g http://tutorialzine.com/). The function returns the remote page as a string, so printing it on screen should display the remote page.
Martin, thanks so much for this. You have saved me a whole bunch of work!
I was very impressed with the jquery twitter ticker: http://tutorialzine.com/2009/10/jquery-twitter-ticker/
I am also very impressed with this, both will be added to my site today.
I already have oAuth working on my site for anon or registered users so I will make the change on my site that twitter users will need to be authenticated with twitter in order to join and follow me. For me this is preferable as it represents an accurate following.
Nice trick to share with us, thank you!
Not working form me,im testing on normal server,and its loading and thats it,nothing happening..My username and pass are good...
Demo is not working :( . Please check
Would love to see this updated with OAuth so I could see it working.
I have updated this project with OAuth using the twitteroauth library by Abraham Williams. You can find it here: http://github.com/zachmau/twitter-oauth/tree/master/friendbox-xml
Great work, Zach!