A Beautiful Apple-style Slideshow Gallery With CSS & jQuery
Introduction
When speaking about design, there is one company that is impossible to go without. Apple values design - being a new product, a fancy catalog or their website - there is always something to admire.
This week, we are making an Apple-like slideshow gallery, similar to the one they use on their website to showcase their products. It will be entirely front-end based, no PHP or databases required.
So go ahead and download the example source code and continue with the first step.
Step 1 - XHTML
There is no need for a database nor a PHP back-end for this gallery. This means that it is really easy to incorporate into an existing site - you just have to change a few lines of html code.
Lets take a closer look at the XHTML markup:
demo.html
<div id="main"> <div id="gallery"> <div id="slides"> <div class="slide"><img src="img/sample_slides/macbook.jpg" width="920" height="400" /></div> <div class="slide"><img src="img/sample_slides/iphone.jpg" width="920" height="400" /></div> <div class="slide"><img src="img/sample_slides/imac.jpg" width="920" height="400" /></div> </div> <div id="menu"> <ul> <li class="fbar"> </li><li class="menuItem"><a href=""><img src="img/sample_slides/thumb_macbook.png" /></a></li><li class="menuItem"><a href=""><img src="img/sample_slides/thumb_iphone.png" /></a></li><li class="menuItem"><a href=""><img src="img/sample_slides/thumb_imac.png" /></a></li> </ul> </div> </div> </div>
The idea is simple - there are two main container DIVs - the one with id="menu" holds the thumbnails, and the other - "slides" holds the slides themselves.
To add a new slide, you'll just have to add new elements to both containers. The slides are JPGs, and the thumbnails are transparent PNGs, but you can use any image type you want.
You can even put any kind of HTML in as well. For example you could make a certain slide into a hyperlink by just putting the image inside of an anchor tag.
That said, it is important to have the width and height attributes set up of the slide images - it is used by jQuery to determine the width of the sliding area, as you'll see in a moment.
Also notice that the thumbnail LI elements. The first one is assigned a class name of fbar , used to only show a vertical dividing bar, and the others are assigned a menuItem class - used as the slideshow control buttons.
Now lets continue with the next step.

Step 2 - CSS
Lets see what lays hidden in our stylesheet. I've only included the styles that are directly used by the gallery. You can view the rest of the styles, used to show the demo, in demo.css.
demo.css
body,h1,h2,h3,p,quote,small,form,input,ul,li,ol,label{
    /* Page reset */
    margin:0px;
    padding:0px;
}

body{
    /* Setting default text color, background and a font stack */
    color:#444444;
    font-size:13px;
    background: #f2f2f2;
    font-family:Arial, Helvetica, sans-serif;
}

/* Gallery styles */

#gallery{
    /* CSS3 Box Shadow */
    -moz-box-shadow:0 0 3px #AAAAAA;
    -webkit-box-shadow:0 0 3px #AAAAAA;
    box-shadow:0 0 3px #AAAAAA;

    /* CSS3 Rounded Corners */

    -moz-border-radius-bottomleft:4px;
    -webkit-border-bottom-left-radius:4px;
    border-bottom-left-radius:4px;

    -moz-border-radius-bottomright:4px;
    -webkit-border-bottom-right-radius:4px;
    border-bottom-right-radius:4px;

    border:1px solid white;

    background:url(img/panel.jpg) repeat-x bottom center #ffffff;

    /* The width of the gallery */
    width:920px;
    overflow:hidden;
}

#slides{
    /* This is the slide area */
    height:400px;

    /* jQuery changes the width later on to the sum of the widths of all the slides. */
    width:920px;
    overflow:hidden;
}

.slide{
    float:left;
}

#menu{
    /* This is the container for the thumbnails */
    height:45px;
}

ul{
    margin:0px;
    padding:0px;
}

li{
    /* Every thumbnail is a li element */
    width:60px;
    display:inline-block;
    list-style:none;
    height:45px;
    overflow:hidden;
}

li.inact:hover{
    /* The inactive state, highlighted on mouse over */
    background:url(img/pic_bg.png) repeat;
}

li.act,li.act:hover{
    /* The active state of the thumb */
    background:url(img/active_bg.png) no-repeat;
}

li.act a{
    cursor:default;
}

.fbar{
    /* The left-most vertical bar, next to the first thumbnail */
    width:2px;
    background:url(img/divider.png) no-repeat right;
}

li a{
    display:block;
    background:url(img/divider.png) no-repeat right;
    height:35px;
    padding-top:10px;
}

a img{
    border:none;
}
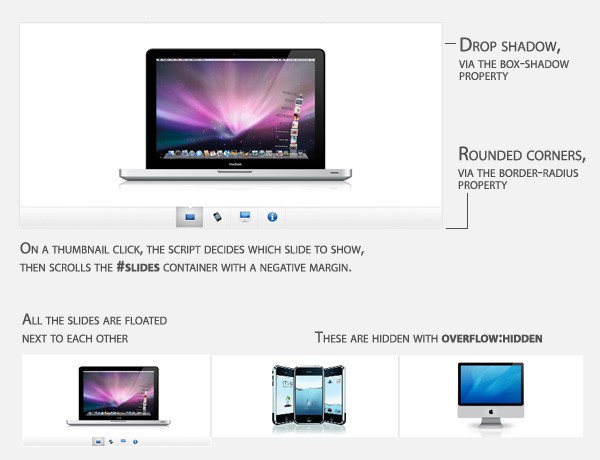
We have used a number of CSS3 specific properties in this slideshow gallery:
- box-shadow, which makes the gallery cast a light shadow around its edges. To use it, you have to provide offsets by X and Y (0 0 here), the blurring (3px in this example) and the color of the shadow;
- border-radius, which rounds the bottom corners of the gallery.
Unfortunately, these properties are only supported in Safari, Chrome and Firefox for now. However in the rest of the browsers you still have a completely functional gallery.
Now it is time for some jQuery magic.
Step 3 - jQuery
As I already mentioned, this gallery does not use any server-side code, so it is all up to the front end to make the slideshow tick.
script.js
$(document).ready(function(){
    /* This code is executed after the DOM has been completely loaded */

    var totWidth=0;
    var positions = new Array();

    $('#slides .slide').each(function(i){
        /* Loop through all the slides and store their accumulative widths in totWidth */
        positions[i]= totWidth;
        totWidth += $(this).width();

        /* The positions array contains each slide's commulutative offset from the left part of the container */

        if(!$(this).width())
        {
            alert("Please, fill in width & height for all your images!");
            return false;
        }
    });

    $('#slides').width(totWidth);

    /* Change the cotnainer div's width to the exact width of all the slides combined */

    $('#menu ul li a').click(function(e){

        /* On a thumbnail click */
        $('li.menuItem').removeClass('act').addClass('inact');
        $(this).parent().addClass('act');

        var pos = $(this).parent().prevAll('.menuItem').length;

        $('#slides').stop().animate({marginLeft:-positions[pos]+'px'},450);
        /* Start the sliding animation */

        e.preventDefault();
        /* Prevent the default action of the link */
    });

    $('#menu ul li.menuItem:first').addClass('act').siblings().addClass('inact');
    /* On page load, mark the first thumbnail as active */
});
The main idea behind this script is to loop through all the slides, sum up their widths and assign the sum to the slides container - the DIV with the id="slides". Because the slides are floated to the left and have enough room, they align next to each other.
Later, when you click a thumbnail, the script calculates which slide to show and scrolls the #slides div by assigning a negative margin via the animate method.
And with just 40 lines of code, the Apple-like slider gallery is finished!
Conclusion
In three easy steps we created a beautiful Apple-style slideshow gallery. It can be easily included into any website by just adding a few lines of code.
You are free to modify and built upon the gallery for your own projects. Also be sure to share what you've done with the community via our Tutorial Mashups (above the comment section).
Bootstrap Studio
The revolutionary web design tool for creating responsive websites and apps.
Learn more
Superb! thank you, your site became a simply chic find with such lessons!
Awesome tutorial , Thanks for this and keep it like that ;)
ah, this is really AWESOME ! great tut- simple to understand and implement . Thank you , great site btw :)
M.
What would it take to make it auto-advance (maybe even with a pause on hover)?
Gr8 tut easy to follow. Thanx
beautiful tutorial...very useful for me. Thanks
fantastic slideshow
Awesome, another useful tutorial
great!
it is very beautiful!
Thanks very much!
Hey
This looks great
Step 1 + 2 went O.K. but i didn't understand where do i need to put the script.js.
I am tiring to add the to a wordpress blog, would be happy to get help for step 3.
Thank you,
Asaf
"In three easy steps we created a beautiful Apple-style slideshow gallery. It can be easily included into any website by just adding a few lines of code."
What are the "few lines of code" ?
Hot and elegant! I'm loving you website! :D
Thanks for the fantastic comments!
@ asaf
The script.js is supposed to be included in the head section of the page you plan to show the slideshow on. In this case, it is included in the head of demo.html.
@ Doug C.
The few lines of code are the XHTML code for the gallery, covered in Step 1, and the lines that include script.js and demo.css in the head section of the page.
@ 2ndMile
To make it auto-advance you'll need to set up a special function in script.js, that clicks one of the thumbnails and is executed once very few seconds. Maybe something like this (outside of $(document).ready() ):
var current=1;
function autoAdvance()
{
$('#menu ul li a')[current%$('#menu ul li a').length].click();
current++;
}
And inside $document.ready(), above line 25:
var itvl = setInterval("autoAdvance()",10000);
Where 10000 is the delay between the change of the slide in milliseconds.
You'll want to stop the auto-advance if the user clicks manually selects one of the slides by clicking it. This is why you have to put this line inside of $('#menu ul li a').click() - somewhere before line 38:
clearInterval(itvl);
Thanks for the autoAdvance(). Although if you place clearInterval(itvl) inside the .click() function then clearInterval(itvl) is still called when the autoAdvance calls click().
Ive not tried a work around but imagine its just a case of only calling clearInterval() if there is actually a physical user click.
Thank you shall make use of this one! Also very clearly written tutorial which always helps!
Excellent tutorial. Really top notch.
Is it possible to replace a slide with an inline frame? So that an html page with links could slide on after the images?
Hi,
thanks for the tutorial.
i had to put the var itvl = setInterval(”autoAdvance()”,10000); line before the $(document).ready() ): function too.So the autoAdvance() works
Fantastic Tutorial.....
Tks.
Nice tutorial. thanks
thanks for the great post.
Has anyone tested the performance/smoothness of the animation in different browsers?
What's the verdict for smoothest browser? I was surprised at the results.
Oh! That's amazing! :)
This is a great tutorial and I think one of the best combinations of nice looking vs functional image galleries I have seen so far.
Two remarks, though:
This tutorial is great!
I've gotten the auto-advance working in IE8, but for some reason it's not working in Firefox... has anyone else had that problem or might be able to point me in the right direction to fixing this?
Great tutorial thank, but i cannot make the auto advance work. I think i made some wrong changes.
I was wondering if anyone could give me some tips, how would I go about changing the transition effect from a slide to a fade in/out?
Really cool slider, am going to use for sure!
Congrats on this one! Fantastic!
I would like to know how to make the thumbnails bigger. I intend to use a really big thumbnail (image as description) on my next project.
Thanks in advance ;)
This is an excellent tutorial :-) But I have one small problem. If I show the demo of this slideshow the arrow for the thumbs works in my safari-browser just on the first thumb. On the three other thumbs the active-bg will show not on the end of the demo slides.
I could not make it auto slide.. could anyone help please..
Could someone pretty please clear up this auto advance jscript addition?
I am an html wiz but still learning js. I tried following how to put in those js snippets to make it auto advance but it won't work for me. And I tried Mwanalezi suggestion but still nothing.
I am in love with this slider but I need one that auto advances.
Thanks for any help!
@ Dave
You could put an IFRAME instead of an image. You'll just have to make sure it is the same width as the images.
@ Alexandre
I prefer to gently advice visitors to turn on their JS than having to develop a fully fledged HTML gallery for those few people that have it disabled.
With all those modern sites around, a person who has intentionally disabled their JavaScript can not expect to have a fully featured browsing experience anyway.
The same is true for IE6 - some things have to be dropped eventually.
@ fishk
Make sure you are running the latest version of the browser. If it is the case, and there is still a problem, you could send me a URL.
@ Please
Can you share a link to the script?
Hey!!!!
Very nice tutorial!!! Congratulations!!!
I just have a question, is there a way to navigate using the keyboad next and previous keys!?
tks a lot!!!!
Please show a full code how to make auto-advance, where and what to add
i was also having trouble getting the menu to even out in firefox.
i did the following and it worked quite well for ie and firefox.
ul
{
margin:0px;
padding-left:350px;
}
Please, can you tell me how can I change the slide effect so i can make images fade in/out instead. Email me when you can please!
thanks, anyway, you are brilliant !
The autoAdvance do not work in the Mozilla firefox!!! how to do?
Slide show is supported ?
I means autoplay !
Please, Martin!!! The autoAdvance do not work in the Mozilla firefox!!! how to do?
this is a superb tutorial. many thanks. Cant seem to get the auto advance to work as i am new to js. can anyone show the code for this? would be very much appreciated
I have the code for a working auto-advance. If you want it, just email me at zing-blog-zine at huyzing point com
Please visit my site to see a working demo 1 page Site Template with this slider customized with the Header about 50 px taller, a nice logo, and a beautiful javascript drop-down menu.
Tested in IE8, FireFox, Chrome, & Safari so far...
Should ready for production soon...
Thanks Martin for your site and quick responses.
I have yet to add the Auto Advance (or figure out how for that matter lol.
And integrating the Contact Form onto my one page Template is another goal of mine to really make it pop.
I may try several techniques like a top drop-down bar with the form would be A+ although it's getting quite tricky with the styling and custom classes in CSS to keep multiple JS libraries and naming conventions from conflicting.
Also, this makes documentation more challenging.
Np, shouldn't be much longer now...
Working Demo
Thank you for the work. A very useful tutorial. I'll test it.
I added the auto-advance functionality to the demo page (but not to the download archive).
You can view the source I've used here (at the bottom of the file).
is he gallery can be useful in ie7
Hi, very nice one!
Would It be possible to allow an infinite number of photos and leave the thumbs centered below the photos? Now it just shows one line of thumbs.
Thanks for this tutorial :)
@ i Have tested demo i have same issue its not working in ie 6 and 7 positon of li is not inline
first i thougfht it was a conflict of css with my exsiting wordpress css as ul il li.a in the demo css are generic and without any classes i tried adding classed to them so far o success
but after looking at your site i thnik there is some other issue
Any quick response would be great help
thanks
how i can add slider for the thumbnails with more than 20 images
Really very nice tutorial
great slider..... i try to use it
Very beautiful tutorial
Nice, Awesome tutorial..very well explained..thanks for sharing.......
This is a great tuitorial, but since it isn't very compatible with Windows browsers or older browsers, I can't use it. Thanks, though!
Hi,
I have set this script up to use inline content which is going to have a gallery in it ( http://tutorialzine.com/2009/11/beautiful-apple-gallery-slideshow/ )
Below is my code, if i remove the gallery works. With that code in i get a javascript popup saying "Please, Fill in width and height for all your images" i am guessing it thinks the shadow box is a image and it cant read the width & height?
Thanks for looking,
Nick Bowers
I have put the html into a txt document
http://truckandmachinery.com.au/shadowbox-gallery.txt
hello,
this gallery is very beatiful but i can't solve my problem with the worst browser ever: firefox.
it looks like this: http://vserver2463.vserver-on.de/arnoldbechtoldt/other/new/projects.php
help: how can i fix the bug. screenshot: http://img695.imageshack.us/img695/8038/screencp.png
please help me | mail: [email protected]
tanks
great! Thank you!
The only problem I'm having is changing the ID of 'menu' to something else, like, 'slidethumbs.' I'm using 'menu' elsewhere so it's a conflict, but when I do change it, only the first slide appears. It slides off the screen as it should, but no other images appear.
Any ideas?
I should also say I've changed all the references to #menu I could find in the css and .js files, but still only the first photo appears.
I was looking for this a month back! Thanks!!
nice collect it to
ajax.wespai.com
very very nice and simple
How is it possible to reset the timer on clicking a thumbnail. So that it gives me the next image I clicked on. And not jumps to the next image (before I clicked).
yeah beautiful gallery. I will use it for my next website !
Wow, this one is a keeper. Just wondering if I were to use it for my website, will there be any legal issue?
no legal issue unless you use the apple images.
after all, it is just css and jquery
Stunning, I like it because it is generic. I could fit in into just about any web project.
hello, how can i change the white background of the gallery? when i change all the white color definitions in the css files, the gallery ist ever white.
IE6 Overflow Hidden Bug Solved
Just add
slides, #gallery
{overflow:hidden!important;
position:relative;
}
And it works perfectly!
there's a little bug in the menu, the arrow has some space between the frame, it's caused by the Macbook icon which is 34x34px while the other are 24x24....just make sure your icons have tghe same size!
What about stopping the animation on thumbnail click? I tried to clearInterval inside $('#menu ul li a').click(function(e) as suggsted above but this stops the animation after the second slide.
Where to clear the interval? Thanks!
Awesome! I been looking for this Apple slider for very long time! Thanks for this!
Fantastic script, thank you for sharing.
I am however having one small issue with it. I have added the script to appear inside a lightbox.
It works perfectly most of the time but every now and then it gives me the error: "Please, fill in width & height for all your images!"
Any idea why it is doing this only sometimes and what the cause may be? It is driving me crazy :(
You can see what i'm talking about here: http://www.brasstacks.com.au/test/ISS0005/portfolio.html - click on one of the thumbnails.
I've downloaded the slideshow. Got any tips on how to gett the slides to advance automatically.
Hi!
I´ve tried to make it "auto-advance", but i doode, cant understand where in the script to put the code, please publish the javascript code with the autoadvance code in the right place. Thanx for a great sideshow tutorial/chris
@ bnuttree
I couldn't replicate the bug. If everything works fine, you could just remove the alert box and return false statement.
@ Chris
The code for the auto advance is in place in the demo (you could just copy the source of script.js into your own version).
Just tested. the round corner and tumbnail is not fully supported in IE6 :(
Thanks a lot for this, love it. (also thank you for the auto advance)
Hi Martin,
I love this slideshow but I wonder if there is any possibility to stop the autoadvance when the mouse is over.
Angel
wow..... Great stuff
Very useful. Thank you...
Hello,
I been breaking my head and is there someone that can help me how to incorporate this into my site? I been trying for hours/weeks and about a month now, I have a bunch of dummy pages but to no avail so I'm asking here if someone knows the easy way to do this. This is how my site looks, I want to keep the same structure but instead of the little icons, I want them to rotate to the next image http://friendenemies.com/blogs.html
This is one of the billion page I been playing with but to no avail, someone please help!! http://friendenemies.com/blogs1.html
Thanks,
Chris ([email protected])
Awesome script, I absolutely love it! THANK YOU!
Apparently, I'm a total noob. I can't get this to work for me. The thumbnails are there, the first pic is there, but nothing happens when I click the thumbnails... it's almost as if the javascript isn't working at all. It looks very plain and just isn't working/moving. I'm not really sure how to edit the js file... can you tell me some things I should check? I know it's properly linked to my external js file, and I know javascript is enabled on my browsers.... and I also know it's damn near impossible to help without me posting the code I've got so far, but just if you have any thoughts on it please post. I don't want to flood the thread with code snippets.
Great work!
One question that I hope someone will be able to help with (I see that this may have been asked before, too, but was never answered):
When I click a thumbnail out order I would prefer that the slide show continues to the next slide when it resumes. Instead, it seems to remember the order it was moving in before I clicked and goes to the previous "next slide".
For example:
The slide show starts on slide 1, it automatically goes to slide 2, then I click on slide 4 manually… When the slide show resumes, it automatically goes back to slide 3 since that's what it was going to do before I clicked. I want it to just automatically move one forward and wrap back around to slide 1.
Does anyone know how to change the code so that it does this?
GREAT slideshow! I love it! Is it possible to add a "lightbox" effect to the images when you click on the large slide? I tried adding the lightbox js files and the slideshow stops working completely. I'm a total newb when it comes to js files. Any help would be appreciated. Thanks!!
Incredible slideshow! Thanks so much for sharing it with us all. It's exactly what I was looking for!
Any chance of implementing a way to stop the auto-advance after clicking a thumbnail? Or better yet, perhaps a play/pause button?? If you have any ideas, I'd really love to have play/pause as part of an already great slideshow. Thanks!!
Ying:
i have the same quistion, i also look if it is possible to add lightbox
February 4, 2010 at 11:23 pm
GREAT slideshow! I love it! Is it possible to add a “lightbox” effect to the images when you click on the large slide? I tried adding the lightbox js files and the slideshow stops working completely. I’m a total newb when it comes to js files. Any help would be appreciated. Thanks!!
Great tutorial thank you!
Hi!
Is there any way to get rid of the thumbnails without screwing up the slideshow? i´ve tried but then the slideshow stops....... thanx 4 a gr8 tutorial! / chris
thanks a lot. Helped me tremendous!!
looks real nice - will use it when i get a chance :)
Pretty nice effect and tutorial. This is a great function for the portfolio of a webdesigner. I'm concidering to use it for my portfolio. Thanks man!
Hi! I had a problem with this demo running Safari 4.0.4. It had to do with the icons beneath the slides. They first one was ok (the mac book) but the other three did show up just a little below making the little arrow apear a couple of pixels under. I fixed it using this css on the li class.
li{
/ Every thumbnail is a li element /
width:60px;
display: inline-table;
list-style:none;
height:45px;
vertical-align: top;
overflow:hidden;
}
Where you have a display of inline-table; instead of inline-block. That rendered it ok in Safari but made it bad in Firefox so then you have to att the vertical-align:t top; - part. Hopefully someone finds this useful. Good job otherwise!
Quick edit to previous post. You do not need the inline-table part. It just made it ok for Safari and Firefox but destroyed it for IE.
You only need the vertical-align: top; Leave the display at inline-block.
li{
/ Every thumbnail is a li element /
width:60px;
display: inline-block;
list-style:none;
height:45px;
vertical-align: top;
overflow:hidden;
}
Just the fix I needed!!! Thank you!!
I can only fit 9 thumbs on, what if you have more pics to put in this slideshow, how do you make the change?
Thanks
Thanks for this great slider, but any plans on making it work on wordpres?
Does anyone know how to add left and right arrows to the sides of the slides in order to create a previous and next slide? I've tried to add a variable to the script.js file and the css and nothing works.
Has anyone tried to add previous and next buttons to this wonderful, wonderful slider?
Hey great tutorial!
I love this slideshow. One thing that is really exciting moving forward is doing slideshows without JavaScript at all. I recently posted this: http://scottgale.com/blog/css3-rounded-corners-slideshow/2010/02/19/
It is a pure CSS slideshow. Hopefully everyone adopts CSS3 so we can bring web standards into the next generation. It is much easier on the processing engine to have this simply handled by CSS. It also helps in terms of scalability. Consistent transitions are very much a part of the design and they should be treated as such. Being able to overlay different transitions on the same set of markup is incredibly powerful moving forward.
BEAUTIFUL slide show - easy to set up - and easy to customize and execute. Thank you for posting this. I ran into one issue - the thumbnails are not appearing in browsers beyond IE, and I figure I edited something somewhere so I am testing. But otherwise - WONDERFUL FIND. Thanks so much....
Can you replace the images with swf's at all?
this is brilliant work - simple and elegant - I was wondering if you think placing a swf flash animation instead of an image would be possible?
I will use this apply this tutorial soon on my website. Will inform you later Martin. :)
Thanks Martin!
Thanks Ahstrom, I had the same trouble in Chrome and vertical-align:top fixed it.
Cheers
WE LOVE IT!
That is why we made a Wordpress plugin out of this amazing slider!
You can find it at http://wordpress.org/extend/plugins/islidex/
Thank you so much for the script!!!
Hope you like the plugin :)
Hi there
Great Slideshow. Please can someone help me. I am new to this and i dont know how to add more than three images to the slideshow? How does one do this and can you add unlimited amount of images?
Please reply to this. Its really urgent!!
Thank you :)
You missed the #main-div in the CSS here in the tutorial, which is pretty important for this...
TRied to use this as an alternative to the flash websites. Put 90s images in and 90 thumbnails and the images are no longer tied to the thumbnails...oh well..
I love the tutorial. I have it working fine. I wanted to know how to display all thumbnails if you have more then will fit in main content holder. my main section is 830 pixels and that holds 13 thumbnails but i have 19 slides i want to display. If i let it run the slide will show up but you can never see the thumbnails for them. Is there a solution to this? Thank you for a great tutorial, it works great for a iPad site.
The tutorials on this website are amazing!
I would say that they are too good, because when I use things like this on a website people expect you to be able to do all sorts of things, so its setting the bar too high for myself lol!
Much appreciation though.
Great tutorial! Flow is fantastic and very cool.
I'm having a problem getting your script to work with my navigation script. I'm using the organic tabs script and when I hit refresh or go to my page, I get the javascript pop up window that says "Please, fill in width & height for all your images!" I've tried rearranging the script order in the header but it's not working. Any thoughts?
Jeff
this is pretty nice and sleek!!!
Hey
Thanks for the tutorial. I've been successful doing the slideshow.
Now, can anyone please tell me how to put this on a HTML page I already have on Dreamweaver?
very very nice!!!
thanx.
m. steuck
I know this is an old tutorial (thus the issue) but it seems to not work in the latest version of firefox and some other browsers now! It looks so great but the slider at the bottom is not aligned right. Does anyone know how to fix this?
Hi Martin
Thanks for the great tutorial and thank you to the numerous people commenting with further great ideas.
Awesome post. Clear and simple
all i get is conflicting css with the li & ul elements in my navigation menu. Ive tried to figure it out but it just wont work. Has this been written in a way that it will conflict with existing li elements? Pleaaaaaaase help!
Really great, gonna use it!
Really thankful!
I am using it in my website and it runs very well
thanks a lot :)
Great!! Thx a lot..
Hey, nice tutorial, using it for client project.
Great Tutorial, thank you.
great great great!!!
thanks a lot for this great articel
greetings from bremen
Nice job. U're good.
There is some way to make a link to start from slide 2 or 3?
This is an awesome plugin, thanks for this tutorial.
Great tutorial and nice basic code to work with. Idid some changes to the way the active page is highlighted using transparent GIFs. Here it is on a client's homepage.
http://unbelievabra.com/
I've added a few of the fixes I've seen in the comments and cleaned up some of the code for a project I've been using this for. Thanks for the inspiration and starting code!
I've changed it a little so the interval is just reset after a user has clicked an image, rather than just clearing it, and it will continue sliding automatically from the image the user clicked, rather than the beginning.
Code is on the source of:
http://www.devseo.co.uk/examples/jquery-slider-example/
Hope it helps some people!
Nice gallery. I was just wondering how you would alter the code to allow more than one gallery displayed on a page.
As it stands any subsequent gallery controls the first gallery on the page.
cont from above...
I have figured it our in a very simplistic way. I have create multiple instances of each css element. ie
slides1, slides2, slides3 {
}
and then just duplicated the code within the .js so there is a lump of code for each gallery. Obviously this makes the .js quite long as I am duplication a lot of code which I am sure can be coded so that it dynamically changes the number after it references a css element.
You can see the code here:
http://www.cucocreative.co.uk/script.js
This is excellent and it solves my problem. Great tutorial!
Thank you tutorialzine.com for this tutorial. Here is what did for one of my customers.
http://www.jaggeredge.com/sendbook/index.html
I can't wait for new tutorial
This would be a great plugin!
Props to Ahstrom for fixing the Webkit issue with the thumbnails. Adding
vertical-align: top;to the#gallery liclass fixes it perfectly. Thanks!Since there is no ".current" class on the selected slide "div" adding "prev", "next" buttons is actually impossible.
Very nice. I will use it. Thanks a lot
So, I have it performing well in most browsers, was able to fix that inline list issue in IE7 with this snippet of code:
li{
/ Every thumbnail is a li element /
width:60px;
display:inline-block;
display: inline; / for ie */
zoom: 1;
}
I just can't get the animation to function in the latest Safari or Chrome (I think these are both webkit browsers). Works fine in FF, IE 7 & 8.
It successfully switches the active state of the current menuItem, but it never adjusts the margin-left: property. Any ideas?
http://www.theofficialmartinez.com/globatext3/index2.html
Awesome..I used this slider on a client's website and you can view the working example here: http://mappsolonline.com/portfolio.php
Amazing tutorial,
I just made a couple of changes so it displays FLV files using JW flv player.
Demo is here : http://elerya.com/tuto/flv/
Source (no flv files included, put flv files in flv/ folder) : http://elerya.com/tuto/flv/flv-apple-slideshow.zip
Thanks for the tutorial !
Super slider !
I really love this site, used a couple of widgets here.
Anyone know why this gallery doesn't work in Safari for iPhone? First slide appears OK but won't advance, either automatically or manually.
Other that this it works great everywhere else. Thanks!
Nik
Just in case anyone is reading this, the above problem exists with the latest versions of Safari (all platforms) and Chrome (all platforms). I thought it might be some CSS3 compatability problem but apparently not. Still, looks great with all other browsers across all platforms (including Opera for iPhone).
Any thought would be really welcome.
Nik
Last post.. I keep answering my own questions.
Above problem caused by nesting a div tag within a table! Now the table is defined in the CSS main container. Sorry for being a p.i.t.a!
N
Martin, is it possible to add a previous and next button?
It is possible to add a next and previous button to the slideshow. Here's how:
1.) Add the following to script.js, right under "var positions = new Array();":
var currentPosition=0;
2.) Add the following functions for the next and previous arrows in the script.js file, right before "$('#menu ul li a').click(function(e,keepScroll){":
3.) Add the following to the script.js file after "var pos = $(this).parent().prevAll('.menuItem').length;" in the "$('#menu ul li a').click(function(e,keepScroll){" block.
currentPosition = pos;
4.) Add the next and previous buttons to your slideshow and style them as needed:
Previous
Next
I think that's it. If anyone wants the script, I can upload it. Not sure if I missed anything. Hopefully that helps!
Whoops, wasn't thinking about the links. Anyways, just add previous and next links with IDs of prev-button and next-button. Basic HTML that you'll need to style to your needs.
Dan could you upload the script, I'm not finding some of the blocks of code you're talking about?
Thanks Dan :) I'll try it out when I get home!
Here you go, Jacob:
http://www.mediafire.com/?ebubmfg9r8pab9o
Thank you very much Dan, that worked beautifully :) Now I just have to make them pretty haha.
No problem. If you want the buttons on top of the images, you'll need to create a div right below the slides div and above the menu, then set the margin to the opposite of the height (for instance, our nav is set up as: width: 900px; height: 250px; margin-top: -250px;). That should put them on top. Good luck! Glad it works!
Also, I added some functionality for the next and previous buttons so that when the next button is pressed on the last slide, is slides back to the first slide, and if the previous button is pressed on the first slide, is slides to the last slide for continuous scrolling. If you're interested in that too, I can upload the new script.
Dan. Thank you so much for your original code and the edits that you have done afterwards.
The link below for the version that has the functionality for continuous-slide doesn't work. Could you please post it again.
Thanks again for everything!!
-M
Yes DAN can you upload that new script - it sounds great!
Thanks Martin for this tutorial, I've been trying to switch it round so the navigation's on the left which works well.
I'd really like to change the transitions tho so that the images slide out to the right and the next image slides back in from the right can you give me any pointers on how to change the coed to do this?
Thanks :)
Corrie,
Here's the link to the continuous slider. Let me know if it works.
http://www.mediafire.com/file/nznkqvtu9e6ondg/continuous-slide-script.js
You'll need to add the previous and next buttons to your page somewhere in order to get the functionality. Read my comments above for details.
Hi Dan,
Do you have a link to the continuous-slide-script.js you uploaded?
The mediafire link is down at the moment.
Thanks!
Barney
DAN you're a legend :) Thanks
I haven't tried it yet but I'll let you know how it goes when I do.
I've switched the layout so the thumbs are vertical on the left and incorporated them into a Spry accordion - just about to try TONY's code to get the individual 'li' within each accordion tab to access the correct images. If I remember I'll post a link when I get it online in case it's useful to anyone.
Thanks for everyone's help
C
Does anyone know how to get this to start at slide 3?
Need help asap!
Thanks
I worked it out!
In case it's useful....adding '+ 1' after .length will load slide '2' first
Therefore:
var pos = $(this).parent().prevAll('.commercialItem').length + 8;
will load slide 9
Kinda found it by accident but it works
So, following on from my previous post - this allows me to have multiple ul within an accordion menu.
Thanks for that Dan!
All this needs now is a stop/start button! Anyone?
Thank you very much Dan, that worked beautifully :) Now I just have to make them pretty haha.
Thank you so much for this slider, it's great. One problem I have is that when it first is loaded, it is showing the large second graphic instead of the first one?? Although it progresses properly, it starts on the second graphic, and that ends up being twice as long. The thumb nail is showing in order properly.
Ok, fixed that problem. I had to add the line:
<div style=”width: 770px;margin: 20px auto;” id=”slides”></div>
Hi, I want to add a pause and play button. how can i do the pause and play effect ??
Hello again,
This is the code i am using
$('#pause').click(function () {
clearInterval(itvl);
$(this).hide();
$('#play').show();
but what is happening is the first time i click on pause it works great and then i click play and everything is fine but if i click on pause again nothing happens and the slider keeps scrolling..... any help please ???? it is very important
Very useful i was looking something like that. I will use it in my website. Thanks a lot
Lovely tutorial. Easy to follow, implement and modify. Cheers!
This is a really cool tutorial, thanks a bunch!
Martin - big big thanx to you!
DAN - you the best!!!!!
First off, thank you for an awesome tutorial. I was looking for a way to create a gallery using CSS, and your tutorial was perfect. I do have a question though. With the new monitors and laptop displays that are large then 1200 px wide. I noticed that you can see the edges of the previous and next image if you expand the browser window to full capacity. Is there a way to prevent these images from being seen?
Great tutorial! I've got it working the working nicely in Firefox and Chrome, however in IE I kept getting the popup telling me to add images sizes. I've done that to each image on each slide, however I still get that popup. I deleted the block of JS code that generates the popop. This made it so all the images loaded, however I can't advance past the second slide. I've currently configured 4 slides total. Any ideas?
I do website design , and I love all things Apple, having worked in Apple in the past:) Thanks for the tutorial and you have given much details on how to use it. This is timely for me to use on one of my new project relating to wedding photography. Is this compatible across all the major browsers ( IE7?).
Again, thumbs up for the tutorial shared.
Anyone seeing layout issues inside chrome? Specifically inside the UL?
Thanks in advance,
Why doesn't this work in IE8? I've tried the demo on several machines and it just refuses to run on IE8.
This is so helpful for someone who knows nothing about js. I'm trying to replace the thumbnail images as well as have them stretch across the entire width (920 px). Is this possible? Thank you!
Just wondering, In the .js file where it says insert height and width here how should i enter this info?
Tried entering it like:
{
alert("width=575 height=470");
return false;
}
But that doesn't seem to work. Am i formating this wrong? Ie missing out some commas or something? Sorry to be such a dumass I suck at JavaScript could someone help me out?
How can i put previous and next button..
This is so nice, but i was looking for wordpress plugin version, i dont know, exist or no?
Anyone get this to work with a finger swipe in the iPad without a complete overhaul?
Superb plugin and using it for 1 year. How about support for mobile devices?
Hello .. thx for this slider! So nice... I want to know .. how i can fix one prob.
The problem is:
After click on thumbnails or arrows prew and next .. auto sliding is turning off.
How i could made "nonstop" in autoslide, after using thumbnails and arrows?
Martin Angelov, thank you veruy much to share and make a better web! Hugs!
I've added more thumbs than first row of menu can shows.
now I don't konw how I can show all the thumbs for my visitors. I think that in the slideshow miss functions to scroll all the thumbs in the menu.
can you help me please?
thanks!
Hey I really dig this slider, I'm trying to use it but in a responsive website. I've already the widths to percentages but I can't understand the jquery part.
How do I change the jquery to accept and convert percentages?
Thanks.
Hi I love your tutorial and I have a question is there a way to rotate the bottom part for example I have 4 images but at the beginning Im showing just 3 is there a way to slide to the last image? something like this gallery? http://www.tn3gallery.com/ thank you
thanks for the article. how would you add a "next" "prev" arrow to this?
Nevermind. Found the code by Dan in comments.
However, menu position is incorrect. It skips by 2.
Hence, instead of:
var menuPosition = pos + 2;
it should be
var menuPosition = pos + 1;
hope this helps.
Great TUT!!!
i will love to know if there is a way to make it start again by it self (Just repeat and Repeat)
Looking forward for you answer (best by email :) )
thanks again for the tutorial!!
Your tutorials are awesome. I am trying to eliminate the menu buttons and just have the gallery slide at a setInterval.....I'm struggling to do so though.. I used the first half of your script, and then went on to try using window.setInterval(function(){animation code here},5000);
Great tutorial. I am having one problem in that my thumbnail pictures do not always stay in line (sometimes on refresh, usually the last one of the 4, but sometimes the 2nd or 3rd or multiple) move down about 25px making it noticably out of line (and half of it not showing due to overflow:hidden....I've posted this issue on stackoverflow and no one can seem to figure it out: http://stackoverflow.com/questions/14061143/css-positioning-anomaly-safari-chrome
This is amazing slider tutorial, would be nice to see it works on responsive webdesign sites and the problem with thumbnails for auto sliding!
Thanks alot, this is an great example slider
Been looking for tutorials on this cool image slider. Pretty awesome! I don't why you didn't make it auto-slide? Anyway, thanks a lot, buddy! Cheers!
I use these slider on one of my microstock websites. Looks and works great...
Thanks for this tutorial, I'm making my own image slider.