Making a Google Wave History Slider
Introduction
We've all seen the videos (and some even got access to a developer's preview) of Google's latest product - Wave. Although not "ground-braking" and "revolutionary" as we've imagined (wonder why "over-hyped" comes to mind) it still features some great UI that will surely inspire at least a few developers to implement some of it in their works.
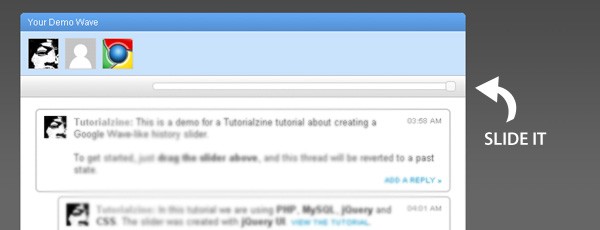
I, being one of those inspired people, am going to show you how to create a Google Wave-like history slider. Using it, we will enable our visitors to go back and forth in time to view the changes that take place on a comment thread.
So take a look at the demo (maybe even keep it open in a separate tab), download the example files and keep on reading.
Note: This tutorial is quite old and doesn't work in PHP7 and above. We are keeping it online only as a reference.
Step 1 - XHTML
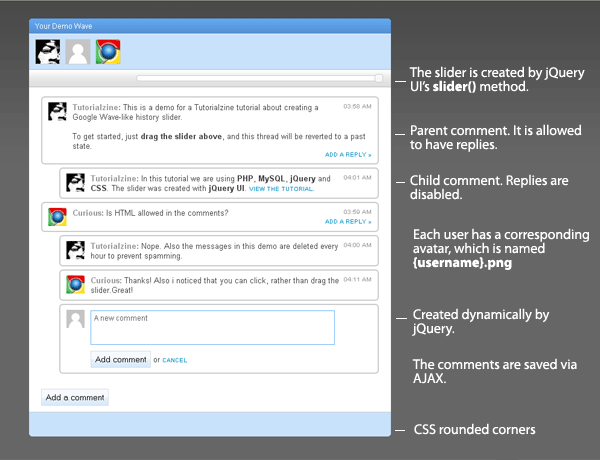
The technologies we are using include PHP as a back-end, MySQL as data storage, jQuery, CSS and XHTML for the front-end with AJAX in between. The slider itself is a component created with jQuery UI.
First lets take a look at the body section of demo.php
demo.php
<div id="main">
<p id="orig">View the <a href="https://tutorialzine.com/2009/10/google-wave-history-slider-jquery/" target="_blank">original tutorial »</a></p>
<h1>Google Wave-like</h1>
<h2>History Slider</h2>
<div id="wave">
<div id="topBar">Your Demo Wave</div>
<div id="subBar">
<img src="img/tutorialzine.png" alt="Tutorialzine" /><img src="img/demo.png" alt="Demo" /><img src="img/curious.png" alt="Curious" />
</div>
<div id="sliderContainer">
<div id="slider"></div>
<div class="clear"></div>
</div>
<div id="commentArea">
<?php
foreach($comments as $c)
{
showComment($c);
// Showing each comment
}
?>
</div>
<input type="button" class="waveButtonMain" value="Add a comment" onclick="addComment()" />
<div id="bottomBar">
</div>
</div>
</div>
This is pretty much all the layout we are using. The main reason why the code is so short is that we are using CSS to style it, and that the outputting of the comments is handled by a special PHP function, both of which will be explained in a minute.
Step 2 - CSS
The great thing about jQuery is that, thanks to Google's CDN, you can directly include it in your site, without having to worry about downloading and storing it on your server. This also aids your page loading time.
The same is true for jQuery UI, which contains our slider. Not only that, but the CDN also holds the styling and images needed to display it properly.
However, we still have to include our own custom styles. In the example files you can find them in demo.css. Here only the more interesting bits are shown:
demo.css
#orig{
    /* The link that float to the right of the title */
    float:right;
    font-family:"MyRiad Pro",Arial;
    font-size:10px;
    letter-spacing:1px;
    text-transform:uppercase;
    padding-top:10px;
}

.clear{
    /* Clearfix, needed by IE6 */
    clear:both;
}

#main{
    /* The main container */
    width:600px;
    margin:30px auto;
}

#wave{
    /* CSS rounded corners */
    -moz-border-radius:6px;
    -khtml-border-radius: 6px;
    -webkit-border-radius: 6px;
    border-radius:6px;

    background:white;
    width:100%;
    overflow:hidden;
}

#topBar{
    background:url(img/bg.jpg) repeat-x;
    font-size:12px;
    color:white;

    height:20px;
    overflow:hidden;
    padding:5px 0 0 10px;

    border-bottom:1px solid #e4f1ff;
    -moz-border-radius:6px 6px 0 0;
    /* A Firefox fix, for once */
}

#bottomBar{
    height:40px;
    background-color:#c9e2fc;
    -moz-border-radius:0 0 6px 6px;
    border-top:1px solid #CCCCCC;
}

#subBar{
    background-color:#c9e2fc;
    padding-left:10px;
}

#subBar img{
    /* The avatars at the top of the page */
    margin:8px 8px 8px 0;
    border:1px solid #cccccc;
}

.waveButton,.waveButtonMain{
    /* The submit buttons */
    background:url(img/button_bg.jpg) repeat-x 50% 50%;
    border:1px solid #DDDDDD;
    padding:4px;

    cursor:pointer;
}

.waveButtonMain{
    display:block;
    margin:10px 20px;
}

.textArea{
    padding:4px;
    font-family:Arial,Helvetica,Sans-serif;
    font-size:12px;
    color:#666666;
    border:1px solid #66aff9;
    margin-bottom:10px;
}

.replyLink{
    float:right;
}

#commentArea{
    padding:10px;
    color:#444444;
}

.commentText{
    margin-left:40px;
}

.waveComment .waveComment{
    padding-left:30px;
}

.waveComment .waveComment .replyLink{
    /* Hiding the reply link on the comment replies -
    only 2 levels of ancestry are allowed */

    display:none;
}

.waveTime{
    color:#999999;
    float:right;
    font-size:10px;
}

#slider{
    width:400px;
    font-size:10px;
    float:right;
    margin-right:10px;
}

#sliderContainer{
    background:url(img/dark_bg.jpg) repeat-x #f5f5f5 50% 50%;
    padding:9px 10px;
    border:1px solid #bbbbbb;
    border-left:0;
    border-right:0;

    height:10px;
    padding:9px 10px;
}

div.ui-widget-content{
    /* Styling the slider */
    background:#FFFFFF;
    border:1px solid #CCCCCC;
}

.comment{
    margin:5px 10px;
    padding:8px 10px;
    border:2px solid #cccccc;

    /* Rounding the comment */
    -moz-border-radius:6px;
    -khtml-border-radius: 6px;
    -webkit-border-radius: 6px;
    border-radius:6px;

    overflow:hidden;
}

span.name{
    font-weight:bold;
    color:#999999;
}

.commentAvatar{
    width:30px;
    height:30px;
    float:left;
    margin-right:10px;
}
Step 3 - PHP
There are four main PHP files that handle the back-end:
- demo.php - outputs the comments;
- ajax/saveComment.php - adds new comments, it's reached by AJAX requests;
- functions.php - holds some functions used by demo.php;
- connect.php - handles the DB connection.
We'll be looking only at the first three files here.
demo.php
define("INCLUDE_CHECK",1);
require 'connect.php';
require 'functions.php';
// Including the files for the DB connection and our custom functions
// Removing comments that are older than an hour.

mysql_query("DELETE FROM wave_comments WHERE id>5 AND dt<SUBTIME(NOW(),'0 1:0:0')");

$comments_result = mysql_query("SELECT * FROM wave_comments ORDER BY id ASC");
// Selecting all the comments ordered by id in ascending order

$comments=array();
$js_history='';

while($row=mysql_fetch_assoc($comments_result))
{
    if($row['parent']==0)
    // If the comment is not a reply to a previous comment, put it into $comments directly
    $comments[$row['id']] = $row;
    else
    {
        if(!$comments[$row['parent']]) continue;

        $comments[$row['parent']]['replies'][] = $row;
        // If it is a reply, put it in the 'replies' property of its parent
    }

    $js_history.='addHistory({id:"'.$row['id'].'"});'.PHP_EOL;
    // Adds JS history for each comment
}

$js_history='<script type="text/javascript">
'.$js_history.'
</script>';

// This is later put into the head and executed on page load
The comments are ether parents (they are added directly to the thread) or children (added as a reply to a parent). Only two levels of ancestry are allowed (meaning that replies are disabled for the children).
The comments are later outputted by the showComment function (you can see it in the XHTML step above).
ajax / saveComment.php
define("INCLUDE_CHECK",1);
require'../connect.php';

if(empty($_POST['comment'])) die("0");
// If there isn't a comment text, exit

$comment = mysql_real_escape_string(nl2br(strip_tags($_POST['comment'])));
$user='Demo';
// This would be a nice place to start customizing - the default user
// You can integrate it to any site and show a different username.

$addon='';
if($_POST['parent']) $addon=',parent='.(int)$_POST['parent'];

mysql_query("INSERT INTO wave_comments SET usr='".$user."', comment='".$comment."', dt=NOW()".$addon);

if(mysql_affected_rows($link)==1)
    echo mysql_insert_id($link);
    // If the insert was successful, echo the newly assigned ID
else
    echo '0';
And lastly, there is functions.php
functions.php
if(!defined('INCLUDE_CHECK')) die('You are not allowed to execute this file directly');
function showComment($arr)
{
echo '
<div class="waveComment com-'.$arr['id'].'">
<div class="comment">
<div class="waveTime">'.waveTime($arr['dt']).'</div>
<div class="commentAvatar">
<img src="img/'.strtolower($arr['usr']).'.png" width="30" height="30" alt="'.$arr['usr'].'" />
</div>
<div class="commentText">
<span class="name">'.$arr['usr'].':</span> '.$arr['comment'].'
</div>
<div class="replyLink">
<a href="" onclick="addComment(this,'.$arr['id'].');return false;">add a reply »</a>
</div>
<div class="clear"></div>
</div>';
// Output the comment, and its replies, if any
if($arr['replies'])
{
foreach($arr['replies'] as $r)
showComment($r);
}
echo '</div>';
}
function waveTime($t)
{
$t = strtotime($t);
if(date('d')==date('d',$t)) return date('h:i A',$t);
return date('F jS Y h:i A',$t);
// If the comment was written today, output only the hour and minute
// if it was not, output a full date/time
}
The last step is the trickiest one - in this case the jQuery code.
Step 4 - jQuery
All the JS code is located in script.js. I will split it into two parts:
script.js - part 1
$(document).ready(function(){
    // Executed once all the page elements are loaded

    lastVal = totHistory;

    // Create the slider:
    $("#slider").slider({
        value:totHistory,
        min: 1,
        max: totHistory,
        animate: true,
        slide: function(event, ui) {

            if(lastVal>ui.value)
            $(buildQ(lastVal,ui.value)).hide('fast').find('.addComment').remove();
            // Using buildQ to build the jQuery selector
            // If we are moving the slider backward, hide the previous comment

            else if(lastVal<ui.value)
            $(buildQ(lastVal,ui.value)).show('fast');
            // Otherwise show it

            lastVal = ui.value;
        }
    });
});

var totHistory=0;
// Holds the number of comments

var positions = new Array();
var lastVal;

function addHistory(obj)
{
    /* Gets called on page load for each comment, and on comment submit */
    totHistory++;
    positions.push(obj.id);
}

function buildQ(from,to)
{
    /* Building a jQuery selector from the begin
    and end point of the slide */

    if(from>to)
    {
        var tmp=to;
        to=from;
        from=tmp;
    }

    from++;
    to++;

    var query='';
    for(var i=from;i<to;i++)
    {
        if(i!=from) query+=',';
        query+='.com-'+positions[i-1];
    }

    /* Each comment has an unique com-(Comment ID) class
    that we are using to address it */

    return query;
}
As you remember, we generated a special PHP string, which holds calls to the addHistory function. Each time it runs, it increments the totHistory counter. After all the comments are loaded the $(document).ready runs and the slider is initialized with totHistory as the maximum value of the slider. The minimum value is 1, because we want to have at least one comment visible.
Now lets take a look at the second part of the file.
script.js - part 2
function addComment(where,parent)
{
    /*  This functions gets called from both the "Add a comment" button
    on the bottom of the page, and the add a reply link.
    It shows the comment submition form */

    var $el;
    if($('.waveButton').length) return false;
    // If there already is a comment submition form
    // shown on the page, return and exit

    if(!where)
        $el = $('#commentArea');
    else
        $el = $(where).closest('.waveComment');

    if(!parent) parent=0;

    // If we are adding a comment, but there are hidden comments by the slider:
    $('.waveComment').show('slow');
    lastVal = totHistory;

    $('#slider').slider('option','value',totHistory);
    // Move the slider to the end point and show all comments
    var comment = '<div class="waveComment addComment">\
    \
    <div class="comment">\
    <div class="commentAvatar">\
    <img src="img/demo.png" width="30" height="30" />\
    </div>\
    \
    <div class="commentText">\
    \
    <textarea class="textArea" rows="2" cols="70" name="" />\
    <div><input type="button" class="waveButton" value="Add comment" onclick="addSubmit(this,'+parent+')" /> or <a href="" onclick="cancelAdd(this);return false">cancel</a></div>\
    \
    </div>\
    </div>\
    \
    </div>';

    $el.append(comment);
    // Append the form
}

function cancelAdd(el)
{
    $(el).closest('.waveComment').remove();
}

function addSubmit(el,parent)
{
    /* Executed when clicking the submit button */
    var cText = $(el).closest('.commentText');
    var text = cText.find('textarea').val();
    var wC = $(el).closest('.waveComment');
    if(text.length<4)
    {
        alert("Your comment is too short!");
        return false;
    }

    $(el).parent().html('<img src="img/ajax_load.gif" width="16" height="16" />');
    // Showing the loading gif animation
    // Send an AJAX request:

    $.ajax({
        type: "POST",
        url: "ajax/saveComment.php",
        data: "comment="+encodeURIComponent(text)+"&parent="+parent,
        /* Sending both the text and the parent of the comment */
        success: function(msg){

            /* PHP returns the automatically assigned ID of the new comment */
            var ins_id = parseInt(msg);
            if(ins_id)
            {
                wC.addClass('com-'+ins_id);
                addHistory({id:ins_id});
                $('#slider').slider('option', 'max', totHistory).slider('option','value',totHistory);
                lastVal=totHistory;
            }

            transForm(text,cText);
            // Hiding the form and showing the newly-added comment in its place
        }
    });
}

function transForm(text,cText)
{
    var tmpStr ='<span class="name">Demo:</span> '+text;
    cText.html(tmpStr);
}
The functions in this part of the code handle the comment submission via AJAX to the PHP back-end.
I believe that further clarification is needed for the success function in the AJAX. As you know, it is called when we have successfully executed the AJAX request (in this case it is called if the comment was written to the MySQL database).
Inside this function we check whether a proper insert ID is returned, which corresponds to the internal MySQL id that was given to the auto-increment field (see below for the MySQL part or take a look at table.sql in the example files).
If everything is OK, we call the addHistory function with the new data and update the maximum value of the slider. This ensures that the newly-added comment is history-scrollable with the rest of them.
Step 5 - MySQL
This step is only required if you want to run the demo on your own server. If you run into problems, read through the comments below or write a new one if your problem is not addressed there.
To be able to run the demo, you'd have to create the MySQL table wave_comments with the following code (also available in table.sql in the example files):
CREATE TABLE `wave_comments` (
`id` int(11) NOT NULL auto_increment,
`parent` int(11) NOT NULL default '0',
`usr` varchar(16) collate utf8_unicode_ci NOT NULL default '',
`comment` text collate utf8_unicode_ci NOT NULL,
`dt` datetime NOT NULL default '0000-00-00 00:00:00',
PRIMARY KEY  (`id`),
KEY `parent` (`parent`,`id`)
) ENGINE=MyISAM  DEFAULT CHARSET=utf8 COLLATE=utf8_unicode_ci;
With this our Google Wave-like History Slider is complete!
Conclusion
You are free to modify the code of this example and use it in your own sites. Also it would be great if you share what you've done with the community, via our newly added feature - Tutorial Mashups (you can find it below every tutorial).
Bootstrap Studio
The revolutionary web design tool for creating responsive websites and apps.
Learn more
This would be a nice feature to have in a blog for comments. I wonder how hard it would be to make a plugin to do this?
ohh man your killing me, i cant wait got my invite.
wow! Now this is what you call an innovative tutorial, that's pretty sleek mate! Will be using this some how on my next project!
It's great to see Google Wave exploding into popularity like it is now. I can't wait until it's really open for public use, it's going to really shake how businesses collaborate and work.
If i use the js/css with a language other than php, but that outputs the same content as the php, will it work?
Nice... now I just need an invite.
Sliders are one of the worst UI controls, specially without snap points. Please dont turn sliders into a trend again on web UI, there are so many better solutions.
Great tutorial. I've never seen anything like it. Keep pumping out the great content!
Awesome Demo.... Great Effect...
really nice tutorial
Oh man, amazing tutorial! i've to use it in my next site :)
thanks
@Henrique This is a pretty slick design improvement and might "cure" some of the shortfalls you see in this UI control's overall use. I might suggest adding a pop-up date to show the user where they are in the history which fades away when their mouse moves away from the slider. What would you suggest as an alternative to a slide to accomplish the same functionality, by the way?
My hesitation is that the user will be constantly forced to scroll to a point in the history, down to where they would like to see, then back up to adjust the slider. Something to maybe float the slider as you scroll down and lock the page to a comment when you slide the scroll bar would help to alleviate this issue.
Great post in general and especially for those of us who have not been able to get our hands on Wave.
That's a nice demo, with a great in-depth explanation. Thanks!
Thanks for the great comments!
A nice upgrade to the demo would be to have the window scroll to the comment as it is shown/hidden, while keeping the slider static on the screen.
It would also be great to see a similar concept packaged as a Wordpress plugin. However I'll leave it to you guys to figure it out - you can modify and use the code any way you see fit.
this is really nice tutorial.i must use it in my project.
This is so excellent. And if someone makes a Wordpress plugin from it, I'll be able to die happy. Seriously, this is exactly the kind of thing I had in mind for my WP blog comments.
Thank you!!
i think it's good for newsfeed....hhhmmmmmm......create some modification inside this code.....wow....thx for ur inspiration dude.....can't wait to try for our new project.... ^^v
Best Regards
Andy -NuFolder-
Hm.. i dont know why but when i use it on localhost i get this errpr
Notice: Undefined index: replies in C:\wamp\www\g\functions.php on line 29
Just don't get it why ..
@Henrique:
You could always use this to get snap points:
http://blog.egorkhmelev.com/2009/11/jquery-slider-safari-style/
Got it working with wordpress comments :) Thanks guys.. if you did like to have a look http://designerfoo.com/custom-wordpress-development#contentstartshere -> Planning to put the slider to good use :) let me know what you think!
Hi,
This is a very nice tuto. Thanks to the authors.
NITRO, just replace your code from line 29 to 33 by :
You won't have the "Undefined index" notice, and it should work.
I'd like to know if developments are planned to add a user connection interface (to have others than "Demo") and if Comment could have more properties ?
For example it could be useful to display, with a dropdown menu, comments which belongs to the selected item of the dropdown menu they have been created with.. (I'm not sure this is understandable, excuse my French...)
Whatever, thanks a lot, that a very good stuff... Let us know newt steps !
beemol
Good, very nice, Buy be careful with the characters validation. You should use the php function (for example) addslashes ($ text). Someone can create a XSS attack. e.g:
‘?>location.href=”http://www.torrento.com.ar”
Thanks for sharing.
Greetings
Ops…The example does not display properly. Write to my e-mail and tell you how to solve it. And forgive me for my English, because it is not very good. My native language is Spanish = P
@ MdqrideR
Thanks for the comment. On the PHP side (before writing to the database) strip_tags is used, which removes any scripts and leaves only plain text behind it.
The problem you describe, arises from the fact that in the front-end, after you hit the submit button, the string you've filled is shown unmodified as your comment (to save a MySQL select).
This means that the only person a hacker could possibly XSS attack is himself. However, if you plan to use this in a production environment it would be best to fix it.
The solution is to strip the tags on the front end with JS, using a regular expression. You can put the following code in line 92 of the second part of script.js:
@Martin:
Exactly, so in the front and not in the end as I mentioned. Using regular expressions as you say the problem is solved. Just mention it in case someone uses it in a production environment.
Again, thanks for sharing.
A healthy and happy Christmas and prosperous new year to all;)
hello,
i dont understand this how can i make this script without demo ?
i have test it but when i make a comment i am user "demo" and when i refresh the site the comment go away .
what must i do or change ?
Great ! Thank so much. I'm trying to put it into my wordpress theme. If successful I will share it with you :D
This would be great....if it work for me. I really don't know much (nothing) about mySQL and I'm having the following message everything I refresh the page: / Unable to establish a DB connection /
if i comment the line: / require 'connect.php'; / in demo.php I can see the page but my comments don't get stored in the DB.
Help?
thanks
Hey , Martin :
//SORT BY DESCENDING
$comments_result = mysql_query("SELECT * FROM wave_comments ORDER BY id DESC");
so , I see some error in this :
Notice: Undefined index: ........
SO .... Do You can help me????
@ Anton
It seems that your PHP error reporting level is set too high. You can fix this by adding the following line to connect.php
Gr8 code but has a bug it seems
Notice: Undefined index: replies in functions.php on line 29.
Thanks to beemol .its fixed on functions.php
Hello Martin,
What i was about to do is to use it as comments for albums, I use $alId = $_GET['alId']; variable which is passed when selecting an album.
How can I pass this variable to saveComment.php file that album ID would be inserted into mySQL table with other data?
Thanks, for help and these great tutorials
absolutely fantastic, they help many people teaching these things. The code is very well done ... thanks
This is great. nice one.
really cool : )
You guys are ahead of the curve. Google wave is not even fully used and you have started posting jquery history sliders
Good job
Josh
IDEA - Add a small dot to the last added "thing" this would help the users eye catch the newly added "thing" (comment)...
Hello :)
I'm building a project for photo album and sharing, and i'v already implemented some of your fantastic solutions on my app, but this one is giving me some fight =P
I'm now able to save into the Database the name of the user that is posting based on $_SESSION variables, but in the comments section, right after posting, the name is always "DEMO"... i know i can change this name in the demo.js file, but i want to be able to put a php variable in there...
If you guys have some questions on the explanation, please say, i really want this to work :)
Cheers ;)
Nevermind my problem is now solved.
I put the content of demo.js inside script tag on demo.php :) And now the PHP is parsed!
I know i know it's not the most "elegant" way of doing it, but it's the easier, quicker and bug free solution! :)
Cheers :)
PS: If you have another solution feel free to post, i'll be watching this blogpost :)
Hi. Is it possible to have readers login before they can make a comment with this Google wave?
Anyone know how I could add a name field to the comment? Right above the Comment field, they have the option to ad their name.
This is so cool, I am going to implement in my latest design.
Thanks for sharing :)
cool!! thanks for share...
I am becoming fan of this site.. Here every tutorials are described in details.. It is very helpful... Thanks
You know what I have done some checking I have noticed one way how to make this awesome unsurpass-able... The replies to the comments could also get a possibility to be answered to!
Here is a simple example with category link tree which recursively places the data based on parent value in mysql database: http://www.codeassembly.com/How-to-display-infinite-depth-expandable-categories-using-php-and-javascript/ All so some fancy text editor inclusion would be beutilicious :D
But I think that I will be doing this on my own.
By he way thanks for really cutting edge tutorial ;)
Cool! It's fantastic...
Hi Martin, great tutorial indeed but when the comment is longer for example it contains multiple lines it looks like the text is being cut and only the part in the box is visible and the other is not...
Hi Martin!, I have a problem, I want to order de Comments DESC but when i do it the reply dissapear, How can I solve it?
$comments_result = mysql_query("SELECT * FROM wave_comments ORDER BY id DESC");
I want the new post be on top and reply ordered ASC, maybe some facebook style.