Making a Really Cool jQuery Gallery
Introduction
One of the main benefits of using a popular java script library, such as jQuery, is the incredible number of available plug-ins that will kick-start any development project.
Today we are going to build a custom gallery that scans a folder of images and outputs a slick gallery, utilizing PHP, CSS, jQuery and the jQuery Lightbox plug-in.
There is no need to download the plug-in - I've included it in the demo files, so grab them and get on reading.
The XHTML
We start off with our XHTML front-end.
demo.php
<div id="container">

<div id="heading"> <!-- the heading -->
<h1>A cool jQuery gallery</h1>
</div>
<div id="gallery"> <!-- this is the containing div for the images -->

<?php
//our php code goes here
?>

<div class="clear"></div> <!-- using clearfix -->
</div>

<div id="footer"> <!-- some tutorial info -->
</div>

</div> <!-- closing the container div -->
And that is basically all there is to it. Note the highlighted area - this is where we put our PHP code, that will generate the gallery images. Now lets go through how this is done.
The PHP
The idea is simple - our PHP back-end is going to scan a folder that we've set up with our gallery images, and turn it into a fancy CSS & jQuery gallery. The great thing about this strategy is that it is incredibly easy to set up a gallery, and adding images to an existing one is a charm - just dump them in the gallery's directory via FTP and it is ready to go.
demo.php
$directory = 'gallery';  //where the gallery images are located

$allowed_types=array('jpg','jpeg','gif','png'); //allowed image types

$file_parts=array();
$ext='';
$title='';
$i=0;

//try to open the directory
$dir_handle = @opendir($directory) or die("There is an error with your image directory!");

while ($file = readdir($dir_handle))    //traverse through the files
{
    if($file=='.' || $file == '..') continue;   //skip links to the current and parent directories

    $file_parts = explode('.',$file);   //split the file name and put each part in an array
    $ext = strtolower(array_pop($file_parts));  //the last element is the extension

    $title = implode('.',$file_parts);  //once the extension has been popped out, all that is left is the file name
    $title = htmlspecialchars($title);  //make the filename html-safe to prevent potential security issues

    $nomargin='';
    if(in_array($ext,$allowed_types))   //if the extension is an allowable type
    {
        if(($i+1)%4==0) $nomargin='nomargin';   //the last image on the row is assigned the CSS class "nomargin"
        echo '
        <div class="pic '.$nomargin.'" style="background:url('.$directory.'/'.$file.') no-repeat 50% 50%;">
        <a href="'.$directory.'/'.$file.'" title="'.$title.'" target="_blank">'.$title.'</a>
        </div>';

        $i++;   //increment the image counter
    }
}

closedir($dir_handle);  //close the directory
By traversing through the files in the directory and skipping the non-image files, we output some XHTML code for every image . This code (lines 28-39) consists of a div container, with a CSS class pic (and in some cases a nomargin, more on that later), and we set its background to the image file via the style attribute. We position the image in the center of the background by specifying its position to be 50% 50%. This centers it both horizontally and vertically and thus shows only the middle part, that fits into the div container's size. This creates a nice thumbnail, with no need of actually resizing the image.
This works best with images with smaller resolutions, so you should consider resizing those 10 megapixel photos before uploading them.
The div contains a hyperlink which is linked to the image and has a title of the image filename. Both these attributes are used by the lightBox plugin to generate the lightbox gallery. So by renaming the file, you can change the caption that shows under it.
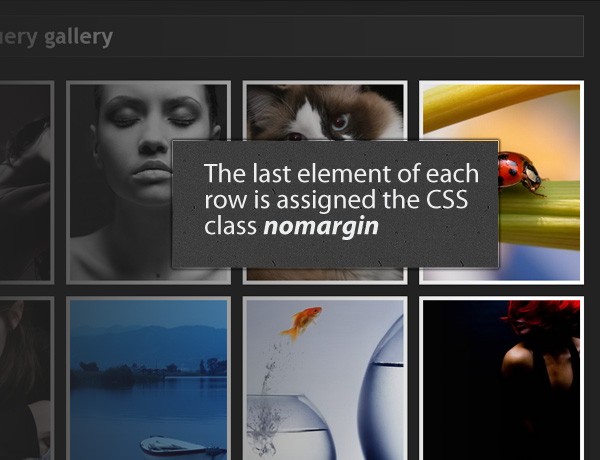
You may wonder what is the point of that nomargin class? Every image in the gallery has a right and a bottom margin. But this means that it is not possible the last element of each row to align with the right part of the heading div and it looks amateurish. So we assign this special class, which clears the right margin for the last element on each row and gives us a proper alignment.
The CSS
Everything is set up, but we still have to give it that cool look.
demo.css
/* first reset some of the elements for browser compatibility */
body,h1,h2,h3,p,td,quote,small,form,input,ul,li,ol,label{
    margin:0px;
    padding:0px;
    font-family:Arial, Helvetica, sans-serif;
}

body{   /* style the body */
    margin-top:20px;
    color:white;
    font-size:13px;
    background-color:#222222;
}

.clear{ /* the clearfix class */
    clear:both;
}

a, a:visited {  /* a:visited is needed so it works properly in IE6 */
    color:#00BBFF;
    text-decoration:none;
    outline:none;
}

a:hover{    /* the hover effect */
    text-decoration:underline;
}

#container{ /* the main container div */
    width:890px;
    margin:20px auto;
}

#heading,#footer{   /* the header and the footer share some of their style rules */
    background-color:#2A2A2A;
    border:1px solid #444444;
    height:20px;
    padding:6px 0 25px 15px;
    margin-bottom:30px;
    overflow:hidden;
}

#footer{    /* ..but not all */
    height:10px;
    margin:20px 0 20px 0;
    padding:6px 0 11px 15px;
}

div.nomargin{   /* our special nomargin class */
    margin-right:0px;
}

.pic{   /* divs that hold all the pictures in the gallery */
    float:left;
    margin:0 15px 15px 0;
    border:5px solid white;
    width:200px;
    height:250px;
}

.pic a{ /* in every .pic container there is a hyperlink exactly the size of the container */
    width:200px;
    height:250px;
    text-indent:-99999px;
    display:block;  /* don't forget that widths and heights of hyperlinks are useless without display:block */
}

h1{ /* style the heading */
    font-size:28px;
    font-weight:bold;
    font-family:"Trebuchet MS",Arial, Helvetica, sans-serif;
}

h2{ /* the footer text */
    font-weight:normal;
    font-size:14px;
    color:white;
}
The jQuery
To make it all tick, we need to include the jQuery java script library in our page, and add the lightBox plugin. The following code was taken from the head section of demo.php:
<link rel="stylesheet" type="text/css" href="lightbox/css/jquery.lightbox-0.5.css">
<link rel="stylesheet" type="text/css" href="demo.css" />

<script type="text/javascript" src="http://ajax.googleapis.com/ajax/libs/jquery/1.3.2/jquery.min.js"></script>
<script type="text/javascript" src="lightbox/js/jquery.lightbox-0.5.pack.js"></script>
<script type="text/javascript" src="script.js"></script>
On line 1 we include the lightbox plugin's CSS file, which styles the lightbox that displays the images. On line 2 we include our own CSS file.
Line 4 is where we include the jQuery library from Google's CDN. Later come the lightbox plugin itself and our own script.js file.
Now we are ready to put the finishing touch.
script.js
// after the page has finished loading
$(document).ready(function(){

    $('.pic a').lightBox({
    // we call the lightbox method, and convert all the hyperlinks in the .pic container into a lightbox gallery

        imageLoading: 'lightbox/images/loading.gif',
        imageBtnClose: 'lightbox/images/close.gif',
        imageBtnPrev: 'lightbox/images/prev.gif',
        imageBtnNext: 'lightbox/images/next.gif'

    });

});
The lighbox() method takes an object as an optional parameter. The only reason we provide any parameters is that I changed the default location of the plugin, putting it in a subfolder /lightbox which aids for a cleaner file structure. Unfortunately the images that the plug-in uses become inaccessible and have to be provided manually.
With this our gallery is complete.
Conclusion
In this tutorial you learned how to create a stylish image gallery with the help of the jQuery lightBox plug-in. You can use the example code into your projects and you are free to modify it in whatever manner you find appropriate. You can as well use it as is and add a gallery to your site with minimum modifications needed.
Bootstrap Studio
The revolutionary web design tool for creating responsive websites and apps.
Learn more
thanks for sharing...i like it
Well that's original.
This is what I've been looking for, for a very long time. Great stuff, no one has something this easy to put together.
Great, bookmarked
This is a good tutorial..
But I wish to add jquey pagination to this forcing it to show specific amount of images on 1 page..
How to do this..
@ Arjun S Kumar
To add pagination you'll need to modify the while loop at demo.php (line 13) to skip some images. Also you'll need to to add some code that will handle the pagination itself. Maybe something like this:
// before the while - put it in line 9
$page = 1;
if ( (int)$_GET['page'] > 1 ) $page = (int)$_GET['page'];
$imgPerPage = 12; // you can change this
$start = ($page-1)*$imgPerPage;
$stop = $start + $imgPerPage;
// inside the while - put it in line 25
if($i<$start || $i>=$stop) { $i++; continue; }
The only thing that is left now is to display the pagination links. There is a great function for displaying digg-style navigation. You can download it here:
http://www.strangerstudios.com/sandbox/pagination/diggstyle.php
To use it just copy the PHP code of the function in the bottom of the page, and use the following code to display the navigation:
// displaying the navigation with getPaginationString() - put it in line 35 in demo.php
echo getPaginationString($page,$i,$imgPerPage,1,'demo.php');
// if you want to change the name of the main demo file from demo.php to index.php,
// you'll need to change the last parameter from 'demo.php' to '/'.
That is about it. You would still need to style it though.
Great tutorial. Thanks for sharing.
I have one question. How to load ''Gallery'' as external page into div element. I tried to load css and js files in main page on several ways but no success. All I've get is nice looking thumbnail gallery with no actions. When click on the thumbnail it's open image as new window.
Some advice please.
Sorry, forgot to mention that i use Ajax.
Thanks
Thanks for the comment, Sasha. You'll have to run the code from script.js after you insert the gallery into your DIV element:
$('.pic a').lightBox({
.....
});
This will re-initialize the lightBox gallery.
Great code. Very useful to show how php can make this gallery dynamic. Bookmarked.
Good job Gentlmen.
Didnt help me out...
can you change the entire PHP code with what you have explained in that comment and provide me..?
It will be helpful.
Thanks for the response Arjun.
However I think it would be better if you try it yourself. It would be a great experience. A great deal of the learning curve consists of spending time on your computer, trying to make something to work.
I tried it. But the thing is it is displaying only images as per the count of the page in which we are viewing..
i.e. if we are viewing 6-th page it shows only 6 images
Sorry Arjun, I have mistaken a row in the code above. You have to replace the row (located in the "before the while" section):
$stop = $start + (int)$_GET['page'];
with:
$stop = $start + $imgPerPage;
This will fix the problem.
Now it is working fine..
By the way you are covering some good tutorials as per the new trends.
Hey that jQuery slideshow in your homepage looks really cool..
Any tutorials for that..
:)
I'm thinking of making categories for gallery by making folders inside the basic image folder and that directory should be the name of category..
Any idea...
The gallery wasn't made with categories (or albums) in mind.
The easiest way to do it would be to physically copy the gallery files in the sub directories and modify them to show a strip with links (or thumbnails) to all available albums.
Really like the simple tutorial and the implementation. Can you point me to where/how I might put in some hyperlinks on the images (thinking of using it for a product catalogue - and want users to be able to click image to go to product page) and still keep the next / previous functions?
Many thanks.
Thanks for the comment, Tim. This will not be an easy thing to do - currently the gallery is just scanning a folder of images and is unable to store additional product data.
In order to provide the functionality you want, you'll have to put the gallery in a database, in which instead of pictures you'll show products.
In the DB you'll have to add fields for a product image, title, description, price and so on.
Later instead of listing all the files in the directory you'll SELECT them from the database and show them.
Also you'll have to consult with the LightBox plugin's documentation and build some AJAX-es to show HTML data instead of a gallery image.
Just what I'm looking for thanks alot !!
A very very cool site. In recent times, I found the very constructive and unique site that is yours.
I like your site very much.
Keep the rock within..
I like the design a lot, the photos I am using are a little larger than average. They expand and look great, but I was wondering, is there a way to have the thumbnails scale down some to be able to see more of the overall picture?
thanks
add this:
.pic { -webkit-background-size: cover; -moz-background-size: cover; -o-background-size: cover; background-size: cover; }Dave, unfortunately the images in the thumbnails are displayed as a background and it cannot be scaled down.
One solution to your problem would be to use different, smaller, images for the thumbnails.
Just copy the images you've put into your gallery and batch re-size them. After this you could change line 28 of demo.php in the PHP section of the tutorial:
<div class="pic '.$nomargin.'" style="background:url('.$directory.'/'.$file.') no-repeat 50% 50%;">
You'll have to replace the url() part with your thumbnail. Because the thumbnails have the same names as the original images, you'll only have to change the $directory variable here to your thumbnail directory.
I tried this to get a my thumbnails loading from another folder but it isn't working. I even tried this:
$thumbsdirectory = 'imgs/gallery/thumbs';
and
but it didn't work. Any ideas on this?
"<?php
$directory = 'gallery/studio';
$thumbsdirectory = 'gallery/studio/thumbs';
..."
"<div class="pic '.$nomargin.'" style="background:url('.$thumbsdirectory.'/'.$file.') no-repeat 50% 50%;">"
Thank you very much! For me is very hard learn all this I'm an illustrator, but I'm making progress. I have a doubt, how can I set to the big image automatic adjust for any resolutions? Thank you again!
Many thx AlexNewaro!
This part did the trick! Now I only have to make thumbnails 200/250px's :)
Thanks Martin, for the easy to implement script!
could you please upload a new source file that grabs the thumbnails from a different directory with scaled down images??
thanks : )
That would be really nice!
hello,
great tutorial i realy love it.
i still have 1 question: wen i have for exampel a gallery named:
and these are 3 diferent folders. kan i first make a selection of the different gallerys so that wen whe select one we can go furter?
also is it possible to use mysql for the storage?
After a long work i compiled this tutorial to make my site dedicated to orkut.com users..
I used this php code too list directories and from your tutorial I think my site is up..
http://www.orkutbuddy.com
Great tutorial! Worked great! It seems that the images are put into a random order? Any thoughts on how to put them in, say, name order?
Thanks again - great work!
@ kris
If I understand what you are trying to do, you'll have to make a static entry page, with thumbnails that lead to the respective galleries.
After this, on every gallery you'll have to put a link that leads to this static page. Something like a "Up one level" link.
@ Brandon
The images in the gallery are currently ordered by filename. If you want to change the ordering, you can put leading numbers in front of the filenames.
The tutorial is great, but I'm having the same problem Brandon had: the images are put in a random order, even though they are named as 1, 2, 3, etc. How could I possibly solve this?
Thanks, and great work and website! :D
All works fine.
01tiger.jpg will be the first, tiger.jpg will be the second.
I have been working with your PHP Gallery and just love it, although I am having a lot of trouble getting the pagination to work. I am not sure How to really set this up. Could you provide a short tutorial on how to extend the gallery with this pagination function?
Hello, i am trying to limit the number of images it dispays accross tghe page (columns) to 3 from 4.
How is this possible?
Great tutorial! I discovered something when implementing the Pagination, however. For it to work, the statement
if($i=$stop) { $i++; continue; }
must be placed directly after the
while ($file = readdir($dir_handle))
{
rather than after all the other stuff in the while. Other than that, it all worked perfectly.
Thanks!
AWESOME tut! just what I was looking for!
Is it possible to use highslide instead of lightbox?
Also it would be really cool and much more cooler if you show us how to integrate it with this script: http://bit.ly/UBfHz
What say? You can post it A part 2 of this tutorial :)
Amaaazing website!
This cool site. Amaaazing!
Great Tutorial. However, I am having trouble previewing the php file in Firefox, Safari or opera. All I get is -
A cool jQuery gallery
'.$title.'
'; $i++; //increment the image counter } } ?>
closedir($dir_handle); //close the directory
I believe its a bug of some sort. Could you help debug it please.
Many Thanks
Awesome site! Nice work dude!
A good demo, thanks. This could be enhanced with semantic HTML - using an unordered list (in this specific demo) and removing target="_blank" either completely or adding it dynamically with the jQuery (the target attribute has been deprecated in XHTML1.0 Strict, mind you). The title attribute on the anchor tag isn't particularly useful either - it merely repeats the link text and should a visitor be using a screenreader with titles turned on, they will get to hear the word or phrase twice. The purpose of the title attribute is to further describe the link.
Also, by using the Cascade in CSS you can remove the repeating class="pic" and easily style everything from the containing div's ID.
Best regards, Karl
Hi there! Love the gallery, so easy to implement, no thumbnailing or coding required, just FTP to the gallery folder, awesome!
One problem though, the same as Brandon; the images seem to be displayed randomly... I've tried numerically sequenced files, alphabetically ordered, FTP in reverse order etc, nothing works...! I would love a solution if anyone had any ideas, thanks in advance!
Greg
Hello,
i am working for a while on a portfolio-site (i'm trying to) and don't get it together... so here's my question: Is it possible to do a galerie (who looks like this one at first). A click on an image and the thumbnails are sliding apart, opening a content-area (accordeon-like). in this area a jQuery Carousel is showing more content.
Can anyone follow my explanation? Is this possible at all?
Regards Heinzey
@Martin
Is there a way to change things around a little bit so that the thumbnails are not set as background ?! This particular part is breaking an ajax functipn that I'm using to empty the div since any background image is not recognized as data and will therefore not be emptied. This bug occurs in Safari IE8 and Opera:
the functions that breaks is this: $('#content').find('*').not('#speakers','#watches').empty();
My guess is that its the .find('*') part that does not recognize background image as data to empty
Thanks
Hi all! Excellent gallery, but i have a problem, the same as Greg - random order of pictures.
Also tried different options, like alphabet, numbers etc., but without any success :(
Urgently needed solution,
Regards
Alex
HI! Finally problem solved! Contact me for working code :)
how did you solve the order of pictures?
Hi Alex, how did you order the pictures?
why not just post it ?
Alex, can you post the code here??? Or just simply the changes that you made to make it works?
I found the following URL
http://stackoverflow.com/questions/2087248/i-need-to-sort-php-jquery-gallery-script-alphabetically
Which gives ideas on how to sort the images.
I keep getting the die error, "There is an error with your image directory!". I believe I am linking correctly. Is there another possible problem?
I was wondering if you ever figured out the problem, as I am having the same one. I've checked and double checked, and even went as far as renaming it. It's still a no go for me. Any help appreciated. Thanks in advance
wondering if you ever figured out the problem you had with accessing the gallery directory. I am having the same issue you have with the error "There is an error with your image directory! "
Any help is appreciated.
thanks
Stunning - and easily configurable into an existing site. Awesome work.
Good job!!!
Great gallery - clean and simple.
And also thanks to DMJendor for posting the link to sort out the alphabetical sorting issue - nice one!
This was EXACTLY what I was looking for.
I'm a beginner-intermediate in PHP but after reading all the comments here I got it working with no 1 error that I fixed quickly. I now have a working gallery with pagination and have the option (commented code) to use alphabetical order as well.
Thanks for everyone who helped and I hope I can be of help to anyone as well.
See my sample at http://www.getbcdesign.com (in the gallery section)
Hello :o)
this gallery is perfetcly what i was looking for :OD greaaaaaaat !! woohoo !
but... yeah there's a but lol
i can't center my gallery into my page :o( playing with the css, but cannot find the answer...
Could you help please ? i put the page in the 'website' field.
Thanks a lot :o)
Hi there!
Great script! Just a quick one..Is possible to create spaces between words in the title??
Ex . "Great_Script.jpg" TO "Great Script" replacing underscore with space??!!
I've DOne it!!!
$title = strreplace(""," ",$title);
Where do you place the code for the _ underscore replacement?
Below line 44
43 $title = implode('.',$file_parts);
44 $title = htmlspecialchars($title);
45 $title = strreplace(""," ",$title);
it's work !!
Martin! what a useful code! i used it in my website to lauch the CrossSlide Java Plugin... But.. I was wondering... what modifications shoud I do to get it to read the Subfolders as well?? and assign it to a variable!
Here is my actual code:
http://portadavid.20x.cc/code.html
All i need it is to have anothe variable to adress 1 level subdirectory!
eg.
echo '
<div class="pic '.$nomargin.'" style="background:url('.$directory.'/'.$subdirectory.'/'.$file.') no-repeat 50% 50%;">
it would save my life!! thanks a lot in advance!
Really nice tut, thanks
I really like the ability to read from a directory, yay PHP!
Your script is amazing and simple. I'm a front end designer using an instant website service http://www.tmw.to and it was amazing to be able to iFrame your page in to the site after tweaking the CSS and adding the alphabetical ordering from the other comments on this page. You are all very appreciated and thank you.
Hi there!
Spaces between words in the title?
Shinnobi says: $title = strreplace(“”,” “,$title);
But it does not work..There are other ideas?
Thanks for this amazing tutorial. I have a really simple question. I want to change the language.
How can I change "Image 1 of 20" part? I inspected the code so many times, I just can't see it.
All of my images are saved as PDF's. Will this work with PDF's?
Good effect :
lightbox-container-image { padding :0}
lightbox-container-image { -moz-box-shadow: 0 0 55px 5px #eee;
-webkit-box-shadow: 0 0 55px 5px
EEE;
-o-shadow: 0 0 55px 5px #eee;
-ie-shadow: 0 0 55px 5px #eee;
box-shadow: 0 0 55px 5px
EEE;}
Hi there
Great gallery, trying to implement the thumbnail background but can't get it to work
tried
$directory = 'gallery';
$thumbsdirectory = 'gallery/thumbs';
....
...
but doesn't seem to be working.....pointers please
Ta in advance
UPDATE
can get the thumbnail to display now, can't get the original file to display in the lightbox??
any thoughts
Cheers
figured out how to get a smaller size in the preview,
<div class="pic '.$nomargin.'" style="background:url('.$directory.'/'.$file.') no-repeat 50% 50%;">
is basically an inline CSS styling statement, therefore by adding the CSS background-size statements we can get the iamges to be reduced and fit (in theory) into any size of 'window' that we create in the CSS file that is associated with the gallery.
I have changed my code to read as follows (at line 69)
<div class="pic '.$nomargin.'" style="background:url('.$directory.'/'.$file.') no-repeat; background-size: cover; background-clip:content-box; -webkit-background-clip:content-box; / Safari /">
maybe that can help someone else - certainly works for me, please check out the gallery on my site (http://www.cncakes.co.uk)
Can this handle nested folders?
I love everything in here! You are awesome Martin. Thanks a lot for sharing these cool stuffs. It really helped a lot with my assignments. Keep posting! :) Xo
Hi! first of all I would like to say great Plugin and very useful.... I have one question for this plugin ... can I integrate Prettyphoto plugin instead of Lightbox...? if so how can I do it... plz advice on it
Thanks in Advanced
kunal
Hi Martin,
Is there a way embedding your gallery with another page?
Displaying the images on a sidebar for example.
Thanks
I use chrome. I have tried the demo and it works great. When I click a image I see the image open up correctly. When I download the files and place them on my webserver when I click a image it opens in a new window as just the image. If I try this from Firefox it works fine. I have looked around and can't not seem to find a answer why I can't get the image to open correctly instead of in another window while using chrome and also ie. Any suggestions would be greatly appreciated.
Hi - did you find answer to your question about opening the image in new page - this happens to me also.
I see the images but I do not get the lightbox when I click the image or the next option - I just get the image on a new tab??
What am I doing wrong?
thanks in advance
double check your code may be you called jqury library more than 1 time in your code
Awesome Script, never find a useful one for my site. Thanks a ton !
Do you have a responsive / mobile first version of this? That would be amazing.
Thanks for posting the demo, nice.
This cool script.. Amaaazing!
Hi - code looks fine but when I change the $directory to my directory (e.g. http://www.thebestshoppers.com/images) I get your error message :
There is an error with your image directory!
I tried a few other directories also with no luck.
Can anyone solve this for me?
thanks
Hi!
I want to ask some question regarding pagination :
there's a problem with my code and its been bothering me for an hour now, for example, i declare 2 pictures per page($imgPerPage = 2;), the problem is each and every time i click the next link from the first page, which will be "page 2", it will show the 2 previous picture from the first page. But pages 3 up to the last page is working fine.
can you help me with this?
thank you in advance!
Hi there I was just wondering if it's possible to sort the images by the date and time in which they were created?
Yes you can sort the image ordering in that way, you would do the sorting in the php file and use get or post to send the order type to the php script if you wanted to allow ordering on the user side.
Hey, for some who asked for sorting:
readdir() opens the files as given from filesystem, so to sort the files one can use scandir. Scandir returns an array so instead of a while-loop a foreach is useful:
replace lines 11 and 13:
11: $dir_handle = @opendir($directory) or die("There is an error with your image directory!");
13: while ($file = readdir($dir_handle))
with:
$files = scandir($directory);
foreach($files as $file)
If you have really a lot of huge pictures, you can already start browsing through the images while they are being loaded, but the "next" and "previous" buttons wont show up until all images are loaded. Therefore it might be useful to preload those images by using code like this at the beginning of the page:
<div style="visibility:hidden;">
    <img src="lightbox/images/blank.gif">
    <img src="lightbox/images/close.gif">
    <img src="lightbox/images/loading.gif">
    <img src="lightbox/images/next.gif">
    <img src="lightbox/images/prev.gif">
</div>